Documentation
General documentation category. With some custom fields.
7.2 Publishing Menu Items
Menu Items provide access to articles, not unlike picture frames display artworks that are otherwise stored in the backroom of a museum. This tutorial demonstrates the use of menus and explores the relationship between menus, articles and categories.
Prerequisites
Administrator access to a Joomla site (version 5 or above). See 1.0 Admin Login.
Your website has a main menu with a home menu item that is a featured item menu type. This is standard with a new Joomla installation.
Publishing Menu Items
Setup
Create a New Category
- Navigate to Content > Categories and click on the New button.
- Enter a title.
- Note that Published is the default status.
- Save and Close
Create Two Articles
- Navigate to Content > Articles and click on the New button.
- Enter a title and some body text.
- Featured is set to No.
- Note that Uncategorised is the default category.
- Create one Uncategorized article and one article in the new category.
- Save and close.
There are now two articles; one in the new category, and one in the Uncategorised category.
Viewing the Site
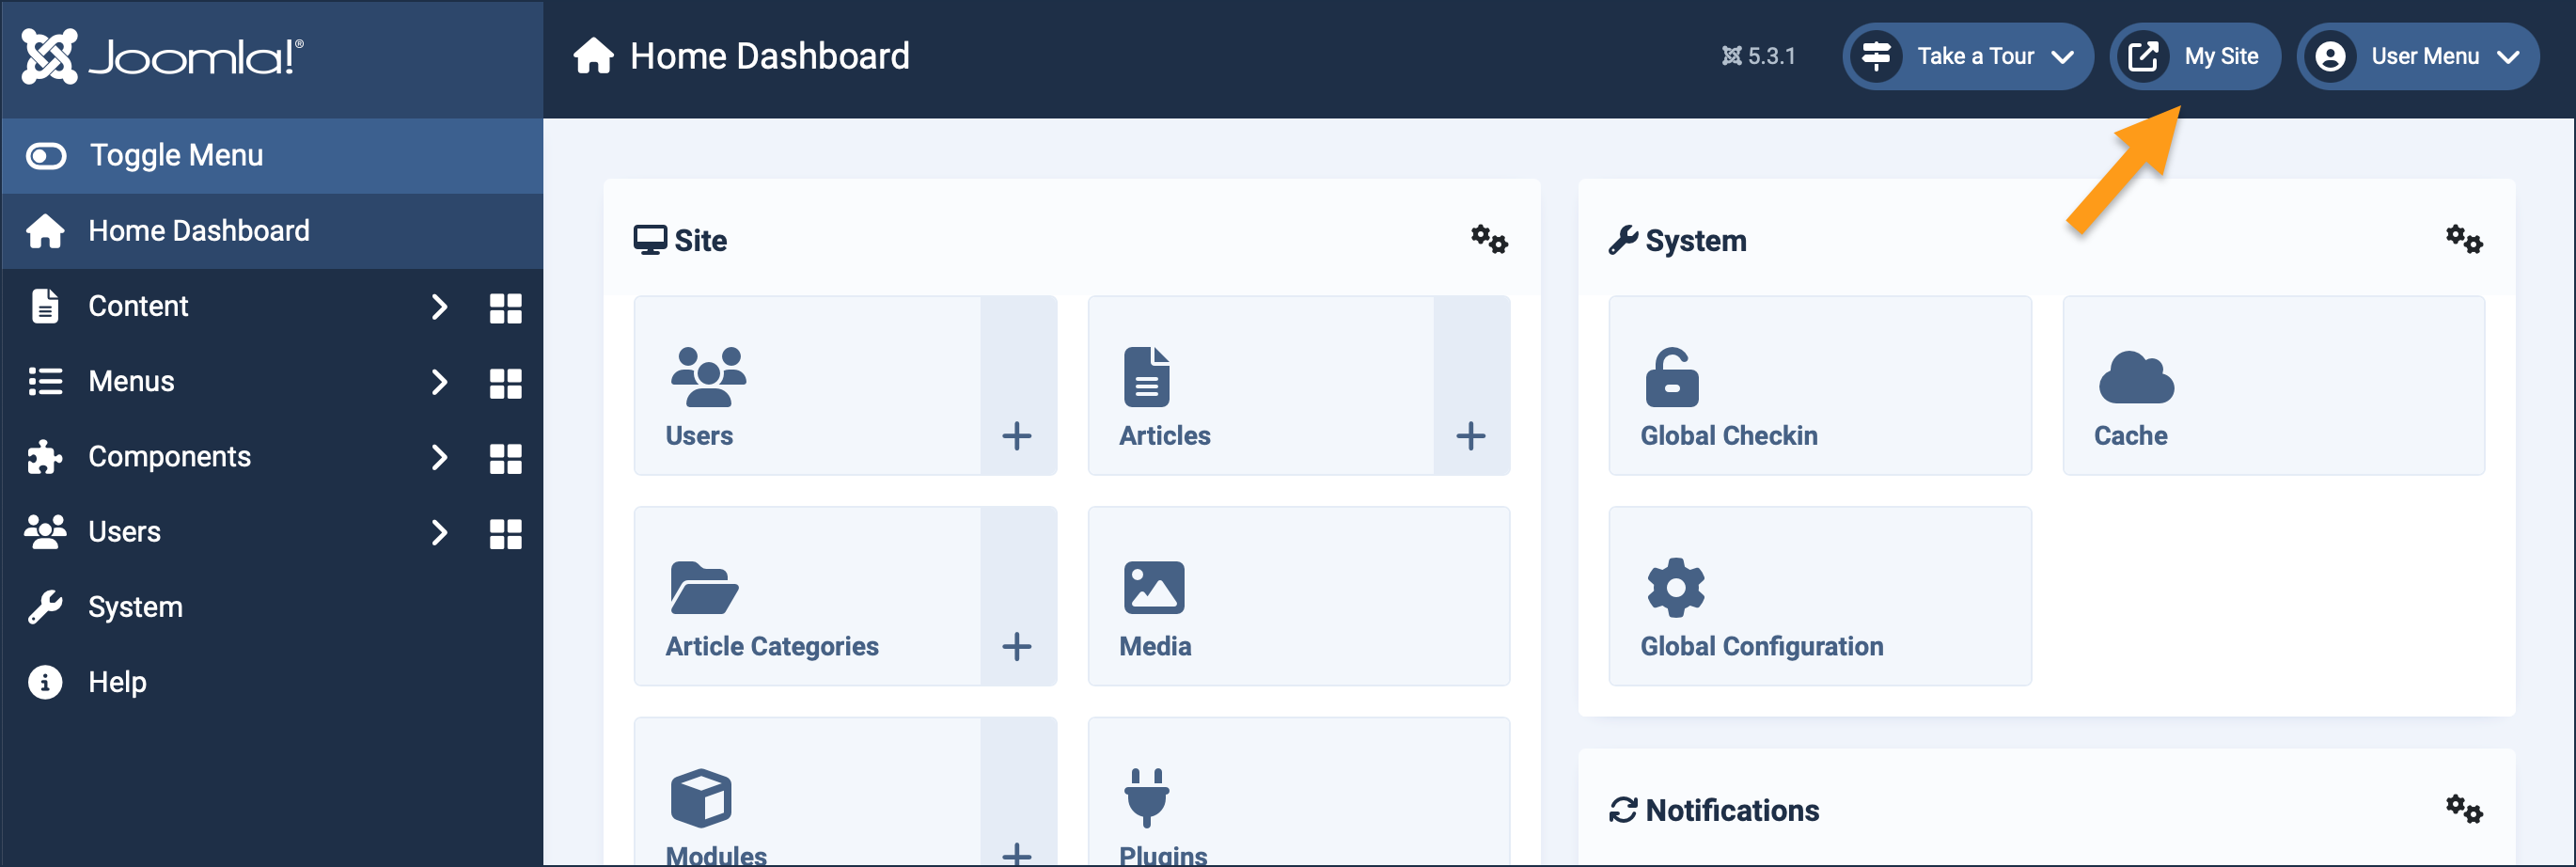
The exercise frequently directs you to "view the site" and later to "close the tab," make updates in the administrative area, then once again "view the site." This method ensures the site is refreshed after every change. To view the site, click on the icon (with the site name) in the header.
Exercise
View the homepage by clicking on the icon in the header. The homepage appears but neither of the articles appear on the homepage or anywhere else in the site.
Close the tab and navigate to Content > Articles. Edit one of the articles by clicking on the title. Click the Preview button. The article pops up and appears to function properly. Close the preview frame, then close the article without saving.
Menu items are needed to provide links to articles.
Navigate to Menus > Main Menu. Edit the Home menu item by clicking on the title. Note that the menu item type is Featured Articles. Main Menu is a menu item that displays featured articles. Close without saving.
Navigate to Content > Articles and make our two articles featured articles by clicking on the Featured icon. The icon changes from a gray circle to a gold star.
View the site and observe the articles are now listed on the homepage.
Menu items are needed to view articles on the website. The Home menu item is a Featured Article type, displaying featured articles.
Close the tab and remove the Featured status of both articles by clicking on the gold star next to each. The articles will no longer appear on the homepage. We will now create a new menu item to view the articles.
Create a Category Blog Menu Item
Navigate to Menus > Main Menu then click on the New button to create a new menu item:
- Title: Enter an appropriate title
- Menu Item Type: Category Blog
- Choose a Category: The new category
- Save and Close
View the website and observe the new Category Blog menu item in the Main Menu. Click on the link and observe that one of the articles is listed (the one in our new category—the other article is in the Uncategorised category).
Close the tab and navigate to Content > Articles. Edit the other article and change the category to the new category. Save and close.
View the website, then click on the new Category Blog menu item. Both articles appear.
A Category Blog menu item a list of articles in a category.
Close the tab and navigate to Menus > Menu Items. Click on the status icon for the new menu item, changing its status to Unpublished.
View the website and observe that the new menu item no longer appears, and our articles are again inaccessible.
Menu items must be published to appear in the website.
Close the tab and restore the new menu item by clicking on the Status icon to publish it.
Create a Single Article Menu Item
Click on the New button to create a new menu item:
- Title: Enter an appropriate title for one of the articles
- Menu Item Type: Single Article
- Choose an Article: One of the new articles
- Save and Close
View the website and explore both menu items to view the articles.
The Category Blog menu item displays a list of all articles in its category; clicking on the article link they renders the full article. A Single Article menu item displays a single article directly.
Effect of Unpublishing Articles
Close the tab and navigate to Content > Articles then unpublish both articles by clicking on the Status icon.
View the website and observe that both menu items still appear in the main menu. Click on the menu items.
- The Category Blog menu item displays a message that no articles for the category exist.
- The Single Article menu displays an error message—article is unavailable because it is unpublished.
Effect of Unpublishing a Category
Close the tab and republish both articles by clicking on the status icon.
Navigate to Content > Categories then unpublish the new category by clicking on the Status icon.
View the website then click on the menu items.
- The Category Blog menu item displays an error—it requires a published category to function.
- The Single Article menu displays an error as well—its article requires a published category.
Note that the menu items still appear even though they display error messages when clicked.
Close the tab and republish the category by clicking on the status icon.
Effect of Unpublishing Menu Items
Navigate to Menus > Main Menu then unpublish the new menu items by clicking on the Status icon.
View the website and observe that the new menu items no longer appear. The articles are still published and available, but unreachable.
Recall that the Home menu item is a Featured Articles menu type.
Restore the Featured Articles
Close the tab and navigate to Content > Articles. Click on the Featured icon to make both new articles featured items.
View the website. The articles are once again reachablere on the homepage.
Concepts
Menu Items, Articles, and Categories are interdependent. Menu Items provide access to Articles; Articles and some Menu Items require Categories.
Menu Items can be thought of as the picture frames in which Articles, and lists of Articles (Featured Items, Blogs, etc.) appear.
Menu Item can appear even when the lists or articles they link to have issues.
1.0 Logging in in the Administrator Side
The administrator area is the area that controls all aspects of a Joomla website such as: creating menus and content; installing site features; controlling access. A site owner has control of the entire administrative area and may create accounts for other users, configuring their access for specific responsibilities such as creating, editing, or approving content. This tutorial describes how users log in to the administrator area.
Prerequisites
You must have an administrator account, either as the site owner (e.g. if you just created a new site), or as provided by the site administrator. You will need a username and password. There will be other tutorials for building a site with Joomla.
A Joomla site configured for default login. Sites configured for advanced login options such as Single Sign-On or Passkeys are beyond the scope of this tutorial.
Steps
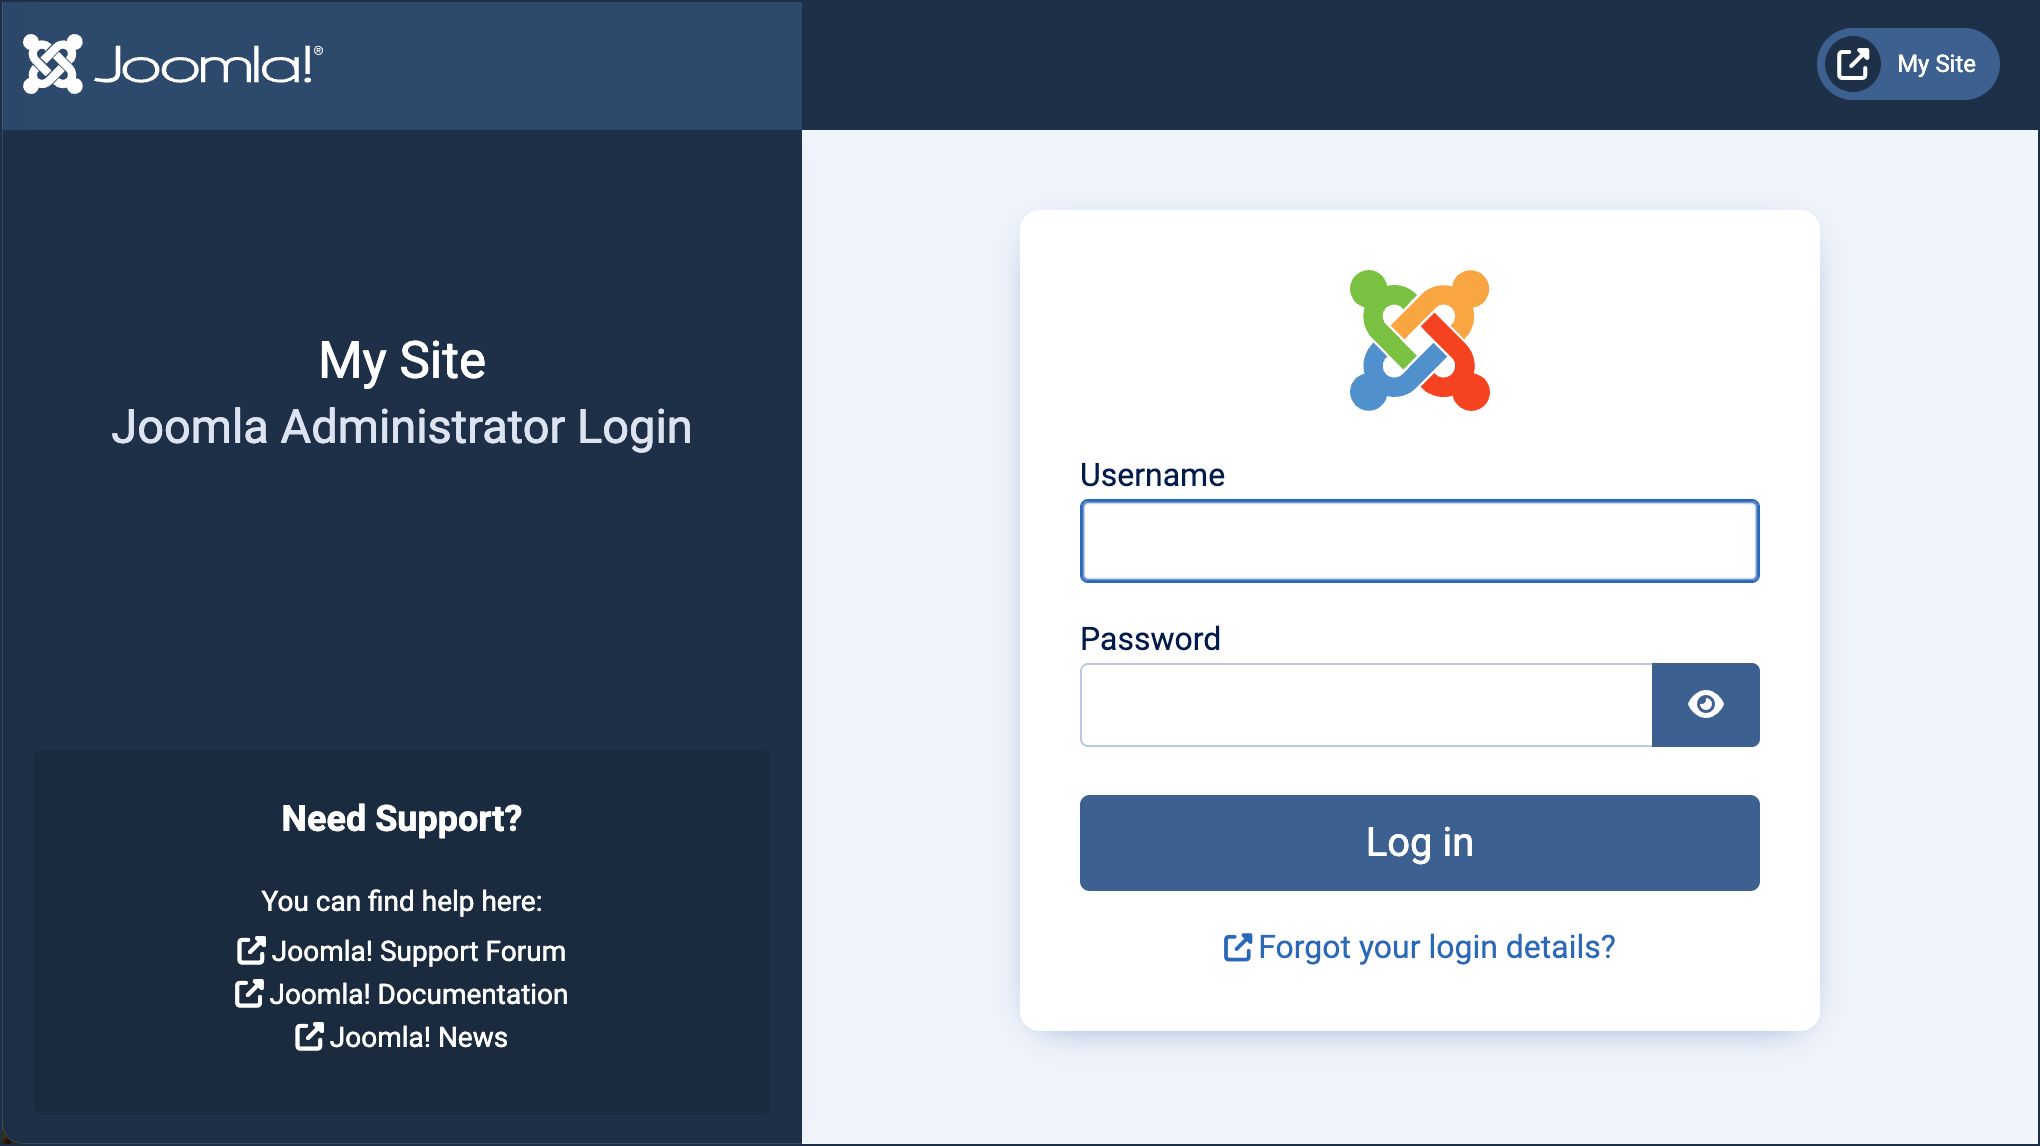
- Open a browser and navigate to the login screen of your site by appending /administrator to your site’s URL. For example, if your site URL is https://www.mysite.com use https://www.mysite.com/administrator.
- Enter your username and password, then click Log In.
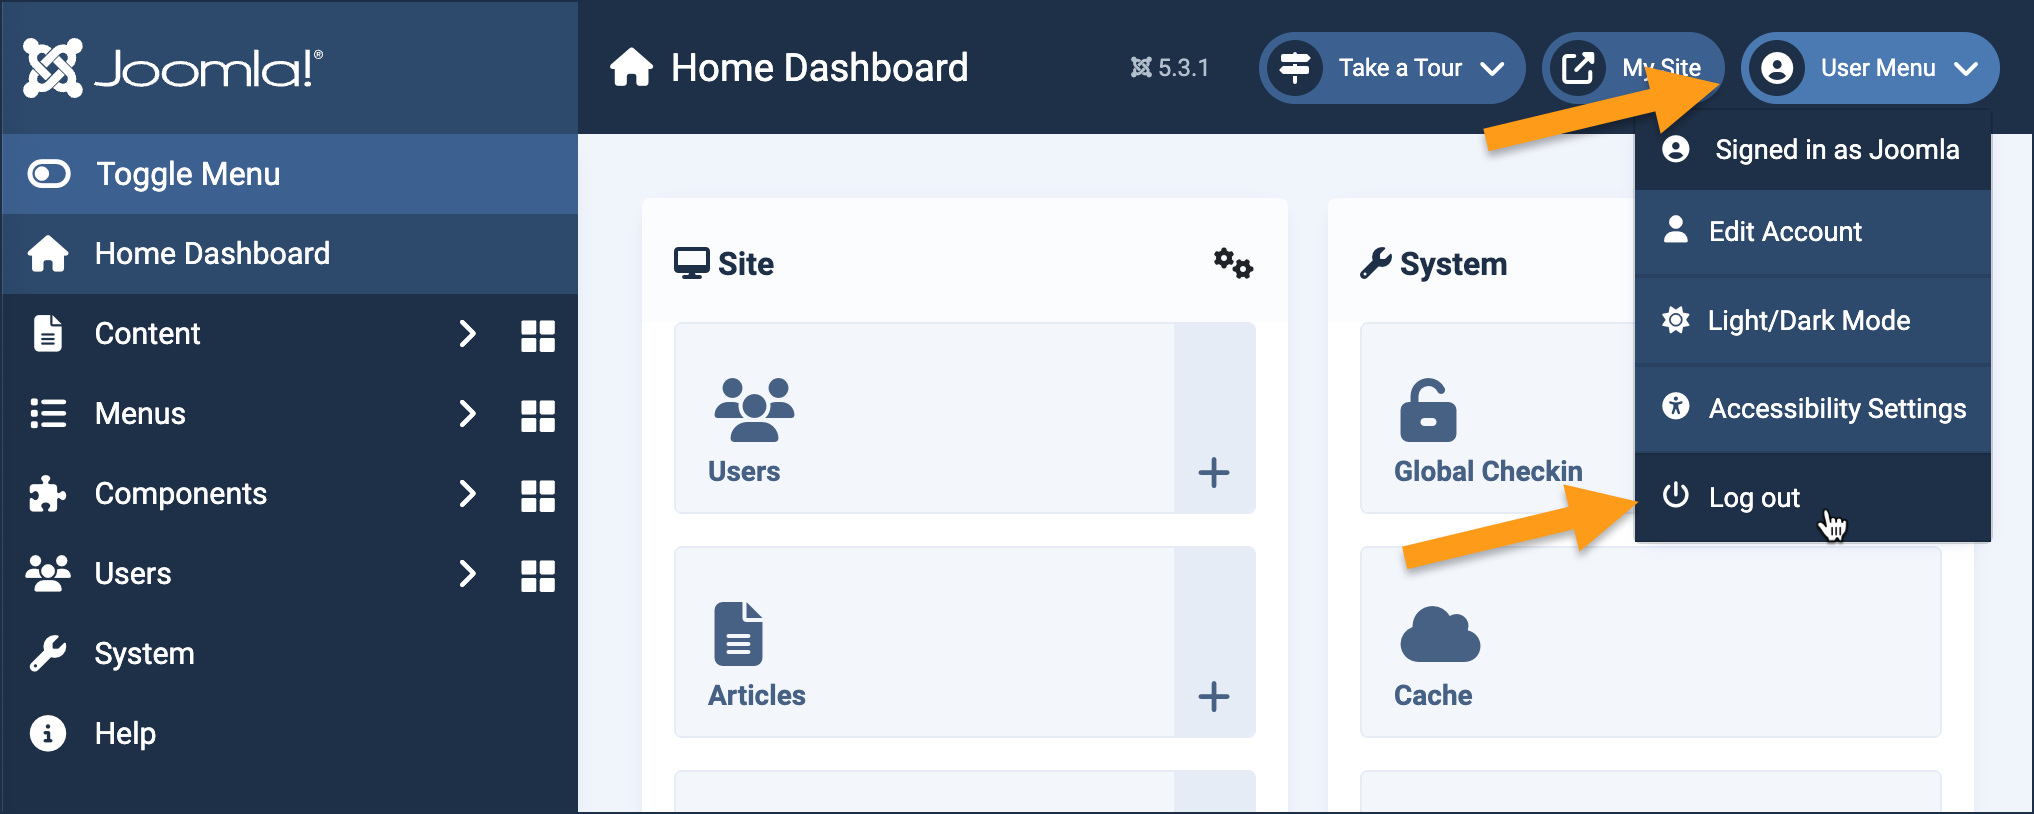
- To log out, select Log Out from the User Menu in the header.
Concepts
- Administrator side.
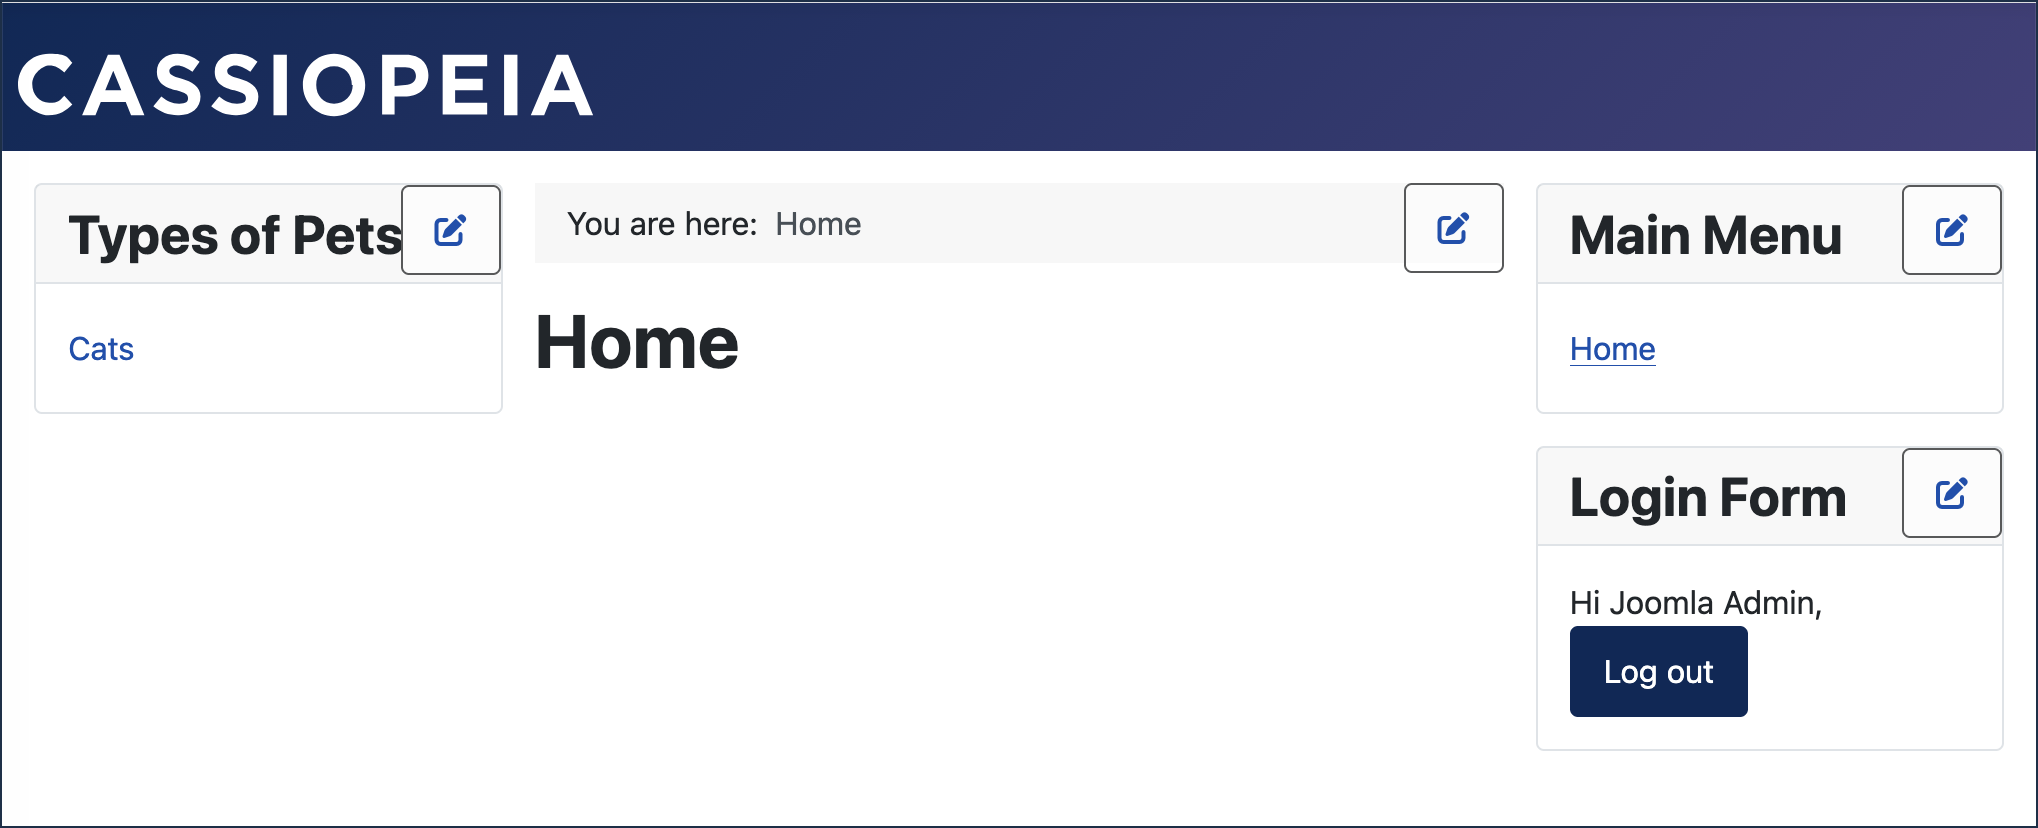
- Navigating to the login screen. It's important to note that the administrator login screen is different than the non-administrative login form you may see on site pages.
- Logging in with your username and password.
- Logging out.
Article in current user manual
10.1 Submenus
A menu is a container that holds a list of menu items, such as links to articles. A menu module is used to display menus on a website. Submenus are menus in which the menu items are organized in a hierarchy. In this tutorial we will create articles for different dogs and cats and link to them using a menu containing a hierarchy of menu items.
Prerequisites
Administrator access to a Joomla site (version 5 or above). See 1.0 Admin Login.
Setup
Create the Articles
Create seven simple articles. Each article will have a title only.
- Login to the administrative area then navigate to articles (Content > Articles).
- Click on New. A new-article form appears.
- Enter a title: Animals
- Choose Save & New (an option under the Save & Close button). The article is saved and a new-article form appears.
- Repeat to create all seven articles:
- Animals
- Dogs
- Collie
- Pomeranians
- Cats
- Burmese
- Russian Blues
- After entering the last article, click Save & Close to return to the article list.
- Verify that the seven articles appear in the list.
Create a Menu
- Navigate to Menus > Manage
- Click on New
- Enter a Title: Animals and Unique name: animal-menu.
- Click Save & Close.
The Animals menu now appears under Menus > Site on the left. Click on the Animals menu. An empty list of menu items is displayed.
Add Menu Items
- Click New
- Title: Animals
- Menu Item Type: Articles > Single Article
- Select Article: Animals
- Click Save & New
- Title: Cats
- Menu Item Type: Articles > Single Article
- Select Article: Cats
- Parent Item: Animals
- Click Save & New
- Title: Dogs
- Menu Item Type: Articles > Single Article
- Select Article: Dogs
- Parent Item: Animals
- Click Save & New
- Title: Burmese
- Menu Item Type: Articles > Single Article
- Select Article: Burmese
- Parent Item: Cats
- Click Save & New
- Title: Russian Blues
- Menu Item Type: Articles > Single Article
- Select Article: Russian Blues
- Parent Item: Cats
- Click Save & New
- Title: Collies
- Menu Item Type: Articles > Single Article
- Select Article: Collies
- Parent Item: Dogs
- Click Save & New
- Title: Pomeranians
- Menu Item Type: Articles > Single Article
- Select Article: Pomeranians
- Parent Item: Dogs
- Click Save & Close.
We now have a menu with menu items linked to our articles, arranged in a hierarchical order — Dogs and Cats under Animals, and each breed under its respective heading. Next we'll create menu modules so the menu appears on the frontend.
Create Menu Modules
We'll create four site modules to display four different views of the menu:
- All Animals: appears on the homepage with a complete list of links to the entire Animals menu.
- Animals: appears with the Animals article, showing links only to Cats and Dogs.
- Dogs: contains only dog breeds and appears only in articles about dogs.
- Cats: contains only cat breeds and appears only in articles about cats.
Navigate to Content > Site Modules. You may see site modules for Breadcrumbs, Main Menu, and Login Form. These are standard with a new Joomla installation and appear on the homepage.
All Animals Module
- Select Module Type: Menu
- Title: All Animals
- Select Menu: Animals
- Base Item: Animals
- Start Level: 1
- End Level: All
- Position: Sidebar Left
- Click Menu Assignment:
- Module Assignment: Only on the Pages Selected
- Click None to clear checkboxes, then check: Home
- Expand the Save menu and click Save & New.
Animals Module
- Select Module Type: Menu
- Title: Animals
- Select Menu: Animals
- Base Item: Animals
- Start Level: 2
- End Level: 2 (Cats and Dogs will be the only items displayed)
- Position: Sidebar Left
- Click Menu Assignment:
- Module Assignment: Only on the Pages Selected
- Click None to clear checkboxes, then check: Animals > Animals, Main Menu > Animals
- Expand the Save menu and click Save & New.
Dogs Module
- Select Module Type: Menu
- Title: Dogs
- Select Menu: Animals
- Base Item: Dogs
- Start Level: 3
- End Level: All
- Position: Sidebar Left
- Click Menu Assignment:
- Module Assignment: Only on the Pages Selected
- Click None to clear checkboxes, then click the dropdown arrow to the right of Dogs and choose Select. This selects Dogs, Collies, and Pomeranians.
- Expand the Save menu and click Save & New.
Cats Module
- Select module type: Menu
- Title: Cats
- Select Menu: Animals
- Base Item: Cats
- Start Level: 3
- End Level: All
- Position: Sidebar Left
- Click Menu Assignment:
- Module Assignment: Only on the Pages Selected
- Click None to clear checkboxes, then click the dropdown arrow to the right of Cats and choose Select. Cats, Burmese, and Russian Blues should all be checked.
- Click Save & Close.
View the Website
The All Animals module appears in the left sidebar of the homepage, displaying the entire Animals menu. Navigate through the site to verify each module:
- Click Animals: the Animals article appears on the right, with the Animals module in the left sidebar showing links to Dogs and Cats.
- Click Dogs: the Dogs article appears on the right, with the Dogs module in the left sidebar showing links to Collies and Pomeranians.
- Click Pomeranians: the Pomeranians article appears on the right with the Dogs module on the left. Note the breadcrumbs menu above the article with links back to Dogs, Animals, and Home.
Summary
We created seven articles for our menu to link to, then created the menu as an empty container. We added menu items to the menu in a hierarchy by setting each item's parent. Finally, we created four menu site modules to display the menu on the website in different ways: an all-inclusive menu on the homepage, and context-sensitive menus showing relevant links for the Animals, Dogs, and Cats sections.
Concepts
A single menu contains submenu items arranged in a hierarchy, and is used to display multiple context-appropriate submenus on the website. This can be especially helpful with large hierarchies containing many menu items.
Large dropdown menus can be confusing and difficult to navigate. Using submenus can simplify navigation while using a single large and complex menu.
10.3 Article Display Options Hierarchy
Article information such as author, hits, article date, article category, and more is displayed when viewing and article and when viewing a list of articles. These details may be turned on or off; most are turned on by default. The control originates in the system configuration (also known as the global setting) which applies to all menu items and articles which can either adopt (inherit) or override the global setting. This tutorial demonstrates how this inheritance works by focusing on how the Author setting is controlled.
Prerequisites
Administrator access to a non-production Joomla site (version 5 or above). See 1.0 Admin Login.
Your website has a main menu with a home menu item that is a featured item menu type. This is standard with a new Joomla installation.
Setup
Create a New Category
- Navigate to Content > Categories and click on the New button.
- Enter a title (e.g. "Sundial Software")
- Save and Close
Create Two Articles
- Navigate to Content > Articles and click on the New button.
- Enter a title and some body text.
- Example titles: "Sun Daze Companion" and "Olympus Solar Calculator"
- Set Category to the new category.
- Under Options tab, observe that Author is set to Use Global (Show)
- The author will appear when viewing the articles.
- Save and close.
Create a Menu Item
The menu item will display our articles in a list. Visitors will then click on one to view an individual article.
Add a Category Blog menu item:
- Click on Menus and then Main Menu.
- Click the New button and configure:
- Title: enter a meaningful title (e.g. "Sundial Software Blog")
- Menu Item Type: Category Blog
- Choose a Category: the category created in the setup.
- Under Options tab, observe that Author is set to Use Global (Show)
- The author will appear in the list of articles.
Viewing the Site
The exercise frequently directs you to "view the site" and later to "close the tab," make updates in the administrative area, then once again "view the site." This method ensures the site is refreshed after every change. To view the site, click on the icon (with the site name) in the header.
Steps
The Global Setting
The articles and menu items normally inherit from the global setting. Check this setting.
In the Admin area:
- Click on System and then Global Configuration.
- Click on Articles under Component.
- Look for the Author field and note that it is set to Show.
- If not, set it to Show now and save).
- Articles and menu items will display the author of each article.
View the site and click on the category blog menu item (in the main menu).
The author appears in the list of articles (under the heading Written by).
View the articles and observe that the author appears here as well.
Close the tab, return to the Admin area and change the global setting to Hide:
- Click on System and then Global Configuration.
- Click on Articles under Component.
- Change the Author setting to Hide and save.
View the site and again click on the category blog menu item.
The author no longer appears in the list of articles.
View the articles and observe that the author appears is hidden.
The menu items and articles are using the global setting to show or hide the author.
Override the Global Setting
Close the tab and edit the category blog menu item:
- Click on Menus and then Main Menu.
- Click on the category-blog menu item.
- Under the Options tab change the Author setting to Show and save.
View the site and again click on the category blog menu item. Observe that the author is displayed.
The menu item is no longer inheriting from the global configuration.
View the articles and observe the author is shown as well.
The article is inheriting its setting from the menu item.
Override the Menu Setting
Close the tab and edit one of the articles:
- Contents > Articles
- Click on one of the articles to edit.
- Under the Options tab change the Author setting to Hide and save.
View the site and click on the menu item.
In the article list, the author is shown for both articles (this is the menu setting). View the articles. Observe that one article displays the author while the one just edited does not (it has overridden the menu setting).
Inherit from the Article
There is one more setting we want to look at, where the menu inherits the setting from the article.
Close the tab and edit the articles:
- Content > Articles
- Under the Options tab set the Author setting to Show in one article, and Hide in the other, and save.
Close the tab and edit the menu item:
- Menus > Main Menu
- Edit the category blog menu item.
- Under the Options tab change the Author setting to Use Article Settings and save.
View the site and click on the menu item. One of the articles in the list displays the author, while it remains hidden in the other. The menu is inheriting from the article setting.
Concepts
Inheriting settings from a single point in the system configuration establishes a consistent look across the entire website, and a single point to update.
Overrides provide the means to individualize menus and articles when needed.
10.4 Adding a New Menu
Adding a New Menu
In this tutorial, you’ll learn how to create an additional menu separate from the default one in Joomla. You’ll also see how to display that new menu using a Menu Module. Once you have the new Menu, you can then add menu items to it.
Prerequisites
- 2.0 First steps with articles, menu-items and categories
- 9.2 Menu Modules
Steps for creating a menu
- Login to Joomla as an administrator and navigate to the Home Dashboard.
- In the left-side menu, expand Menus and click on Manage.
- Click on the New button. A New Menu form appears.
- Enter a title (required).
- Enter a unique name (required).
- Enter a description for the menu.
- Save and close
Steps for displaying the menu using a menu module
- In the left-side menu, expand Content and click on Site Modules.
- Click on the New button. A Select a Module Type window appears.
- Click on the block titled: Menu(This module displays a menu in the Frontend).
- Enter a title (required).
- In the Module Tab, In Select Menu click the down arrow to select the new menu you just created.
- In the Module Tab, In Position click the down arrow to select a template position where you would like the menu displayed.
- In the Module Tab, In Status click the down arrow to select Published.
- In the Menu Assignment Tab, In Module Assignment click the down arrow to select one of four options:
- On all pages: displays the menu on all pages
- No pages: does not display the menu on any pages
- Only on the pages selected: only displays the menu on the pages you check from the list of pages
- On all pages except those selected: only displays the menu on the pages that you do not select from the list of pages
- Save and close
Steps for adding menu items to the menu
- follow these instructions: 2.1 Creating an Article and Menu Item
Concepts
- menu
- menu module
Existing resources
Subcategories
User Guides
User Documentation, also known as The User Manual.