 User Documentation
 User Guides
User Documentation, also known as The User Manual.
Accessing the Schema.org Custom Fields
In order to update the Schema.org information for an article, the system plugin must be enabled and configured. (see: J5.x Schema.org for information on enabling and configuring the plugin.)
In the Article Edit view a tab will display titled Schema.
- Schema Type: Select the applicable plugin for the content of the article.
Adding a Category
Introduction
Website owners with more than a handful of articles should think about how best to present content for ease of navigation. For example, if you have a zoo, a museum, a mineral collection or just a large garden you may have perhaps 1000 specimens to describe. One article for each specimen, with photographs, needs some organisational structure. If the articles were files you would probably put them in a file hierarchy. In a CMS, articles are not files but categories provide for a similar tree-like structure. Example :
| Category | Sub-categories |
|---|---|
| Mammals | Apes, Monkeys, Ungulates, Dogs, Cats |
| Reptiles | Snakes, Lizards, Crocodiles, Turtles |
| Amphibians | Frogs, Toads |
| Birds | Raptors, Ducks, Gulls, Finches, Tits |
| Arthropods | Spiders, Butterflies, Bees, Locusts |
| Fish | Sharks, Salmon, Cod, Herring, Mackerel |
Sub-categories may have further sub-categories too. A maximum manageable depth seems to be about seven. For the table above, a museum might add more parent categories:
nature -> life -> animals -> mammals...
nature -> life -> plants -> trees...
nature -> minerals...
history -> egypt...
science -> astronomy...
science -> chemistry...
Imagine how many specimens a national or small town museum holds!
Menu Item Types
There are several menu item types designed to work with Categories:
- Category Blog This is a page layout that has one or two leading article tasters, often full page width, then several more article tasters in two or three columns, and finally a pagination mechanism to link to more articles in the same category. The taster is the content before a page-break, often the first one or two paragraphs. A site Home page is often a category blog that includes All Categories. A Featured Articles layout is similar to a category blog and often used as a Home page too.
- Category List This is a list layout that displays a list of articles in a category. It can be displayed with a Search filter to allow searching for articles by Title, Author, Hits, Tags or Month published.
- List All Categories in an Article Category Tree This layout lists a category tree starting from a chosen parent. Each branch is collapsible and is most useful for large, complex category tree structures.
Menu items are covered in a later article.
Create a Category
The following example uses a Mammals category inspired by the list above to demonstrate how to create a new Category:

- Select the Content item from the Administrator menu to expand it.
- Select the + icon alongside the Categories menu item to open the Category edit form.
- The Articles: New Category form has only one compulsory field: the Title, in this case Mammals.
- The Description field is optional but it is best to fill it in as it used in some lists. Suggestion:
Mammals are warm-blooded animals that give birth to live young. - The Parent field specifies whether this is a primary category (-No Parent-) or a sub-category selected from the list of categories.
- Save and Close to return to the Articles: Categories list page.
This category is now available for use with articles.
Adding a Menu Item
Introduction
Suppose one of your articles is sufficiently important for it to merit a menu item - a link to it from the Main Menu. That would be a Single Article menu item type. There are several ways to create a new menu item:
- In the Administrator menu, expand the Menus item and select the + icon beside the Main Menu item.
- Select Main Menu in the Administrator menu and then select the New button in the Toolbar.
- Select All Menu Items in the Administrator menu and then select the New button in the Toolbar. If you use this route you also need to select the Menu the new item will appear in.
The Menu Edit Page

The Menus: New Item form has four compulsory fields to complete:
- Menu Title Enter a meaningful word or short phrase that will fit nicely into the Main Menu box.
- Menu Item Type Select to open a Menu Item Type modal dialog.
- open the Articles list and select the Single Article type.
- Select Article Another modal dialog with a list of Articles.
- Find and select the article this menu item will link to.
- Menu Over on the right (or below on small screens) check that a menu is selected.
- Select Save & Close in the Toolbar button.
That is all that must be done. Everything else is optional. Have a look at the site Home page. The menu item in the Main menu links directly to that page.

Multiple Menu Items
So far so good. But what happens when you have 10 or 100 or 1000 or more articles? It is time to think of other ways of managing articles and other page layouts.
Create a Category List Menu Item
- Select the Menus → Main Menu → + icon from the Administrator menu to open the Menus: New Item edit form.
- Select Articles → Category List in the Menu Item Type field.
- Select Select → Mammals in the Choose a Category field.
- Enter a Title, perhaps Articles about Mammals to make it clear this menu item is expected to show a list of articles.
- Save and Close.
Go to the Site Home page and reload. Select the new Articles about Mammals menu item.

Select the article title, Mammals, to go to the article view. If you have many articles you can find them here so do not need single article menu items.
Adding a Module
Introduction
Modules are small extensions used for special purposes. Sometimes they are related to other content items. For example, a Menu module is required to display Menu Items used to navigate the Site. Sometimes they are not related to any other content at all. Module content is usually displayed in boxes above, beside or below the main page content. Also, modules may be displayed on some pages but not others and to some people but not others.
The Site Modules List
It is worth looking at the Modules (Site) list. Select Content → Site Modules from the Administrator menu. You will see the Breadcrumbs, Main Menu and Login Form modules listed. The column headings are:
- Checkbox Select or Deselect all visible items in the list.
- Order Symbol After selection, used to drag modules up or down to change their order in their assigned positions.
- Status Published or Unpublished controls whether a module will be seen at all.
- Title Select a Title link to edit the module.
- Position This is the position defined in the template. The obvious positions are breadcrumbs and sidebar-right. There are many more.
- Type The type of module is given because it may not be obvious from the Title.
- Pages An indicator of the pages on which a module will be displayed. It may be All, On Selected Pages, All except Selected Pages or No Pages.
- Access Public means everyone. But this may be restricted by User Group, for example Super User.
- ID An identification number allocated by Joomla.
Add a New Module
A good module to practice with is the Custom module. It is used to display arbitrary content such as a message or announcement.
- Select the New button in the Tool bar. This opens a list of available Site modules.
- Select the Custom module. This opens the module in the Edit form.
- Enter a Title, for example Announcement.
- Enter the Module text, for example This site is closing for a software update at 20:00 on Friday.
- Select a Position from the drop-down list. In this case it could be sidebar-right along with the other modules.
- Set a Finish Publishing date. This is optional but an obvious thing to do to make the module disappear after the event announced has passed.
- Save & Close Reload the Site and see the result. Is it in the order you want? If not:
- In the Modules list select the Order Symbol in the column headings.
- Hover on the grab handle symbol for the new module and then select and drag it up or down to the required position. Note that selecting a column head symbol toggles the order so select as required and drag as required.
If you want another Custom module with another message go ahead and create a New Custom module. You can have as many as you like with different titles.
Adding an Article
Introduction
After login, starting from the Home Dashboard, there are several ways to create a new article:
- Select the + icon adjacent to the Articles button in the Home Dashboard Site panel.
- Expand the Content menu and select the + button adjacent to Articles there.
- In either location, select the Articles item and in the Articles list page select the New button the Toolbar.
Until an article has been created the Articles page shows a placeholder page saying No Articles have been created yet.
The Toolbar
On almost every page, immediately beneath the title bar, is a bar containing action buttons. This is known as the Toolbar. The buttons differ from page to page and sometimes are inactive, appearing grey, until an item is selected in the list of items. The following screenshot shows the Articles list with an article checkbox selected. The Action button is a drop-down list that has been selected to show the options available.
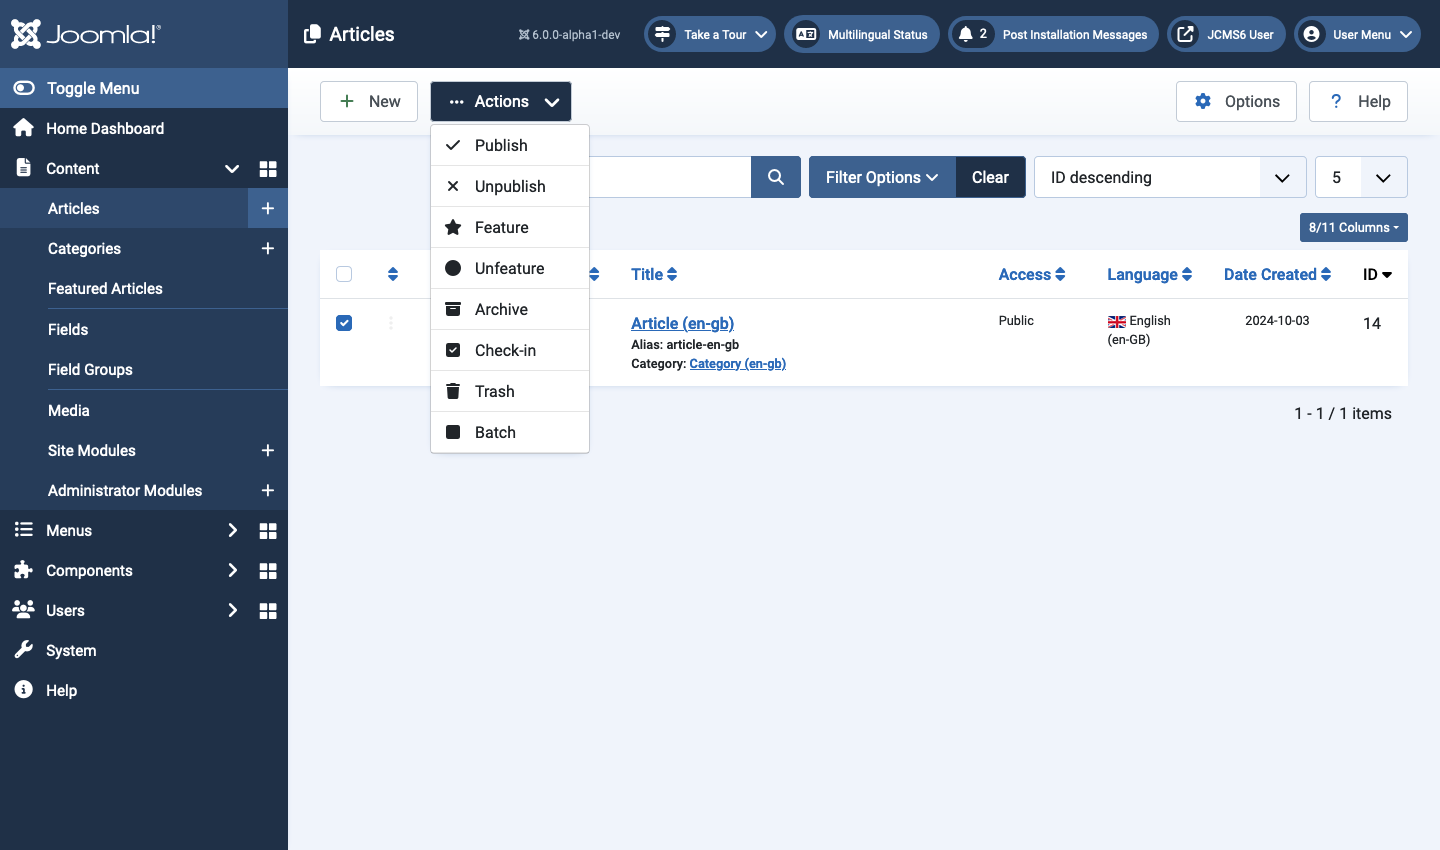
Select the New button in the Articles page Toolbar to open an article edit form.
The Articles: Edit page
Until an article has been saved the Title bar label is Articles: New and it has few Toolbar buttons. The Cancel button can be used to cancel creation of an article. There is no warning message. Any content entered is discarded. After saving, the Title bar label is Articles: Edit and the Toolbar has many more buttons.

There are a bewildering number of form fields in the Edit page but all except two have sensible defaults. The fields to fill in:
-
Title This is required and should be something short and simple. In Joomla, any form item marked as required must be filled in or the form contents cannot be saved. You could use My First Article to get started. In the following examples the word Article followed by language code was used for demonstration purposes in several different languages.
-
Content The article text. This is optional but it would not make much sense to have an article with no content. So start typing. If you just want something to try out copy the following paragraph:
Lorem ipsum ad his scripta blandit partiendo, eum fastidii accumsan euripidis in, eum liber hendrerit an. Qui ut wisi vocibus suscipiantur, quo dicit ridens inciderint id. Quo mundi lobortis reformidans eu, legimus senseritdefiniebas an eos. Eu sit tincidunt incorrupte definitionem, vis mutat affert percipit cu, eirmod consectetuer signiferumque eu per. In usu latineequidem dolores. Quo no falli viris intellegam, ut fugit veritus placeratper. Ius id vidit volumus mandamus, vide veritus democritum te nec, ei eosdebet libris consulatu.
-
Featured To the right of the edit box (on laptop or larger screens and below on smaller screens) there is a field to select to make this a Featured article. Select it and then select the Save button in the Toolbar. Featured articles may be given priority in site layouts and several may appear together in a Featured blog layout.
Preview
To see what it looks like you can select the Preview button in the Toolbar.

Note the article metadata: the information between the Title and the Content. You can configure what information appears and where it appears with those other article form fields. Later...
The Read More Break
If your article is several paragraphs long and you wish to show a number of featured articles on the Home page of your website, you should insert a Read More... break after the first paragraph. If you select the Editor CMS Content button you will find it at the bottom of the list. The break appears as a horizontal dashed red line. Here is another paragraph of test text to insert below the page break:
Donec sodales sagittis magna. Sed consequat, leo eget bibendum sodales, augue velit cursus nunc, quis gravida magna mi a libero. Fusce vulputate eleifend sapien. Vestibulum purus quam, scelerisque ut, mollis sed, nonummy id, metus. Nullam accumsan lorem in dui. Cras ultricies mi eu turpis hendrerit fringilla. Vestibulum ante ipsum primis in faucibus orci luctus et ultrices posuere cubilia Curae; In ac dui quis mi consectetuer lacinia. Nam pretium turpis et arcu. Duis arcu tortor, suscipit eget, imperdiet nec, imperdiet iaculis, ipsum. Sed aliquam ultrices mauris. Integer ante arcu, accumsan a, consectetuer eget, posuere ut, mauris.
The result is that only the text before the page break appears on a Category Blog or Featured Articles page (the Home page). Select the Article Title or the Read More button to see the full article on its own.
- Select Save & Close to close the edit form and go back to the Articles list page.
A new Joomla installation has a Site menu with a single menu item labelled Home. It uses a Featured Articles blog layout. Select the Site name link at the top right of the Joomla Administrator page to open a new tab showing the site Home page with your new article.
Site View
The following screenshot shows a site view of the first part of the article described above. Your new Joomla! site will have just the Main Menu, Login Form and your article. This screenshot is for a multi-lingual site that shows the same page in many different languages and has other content used in later tutorials.
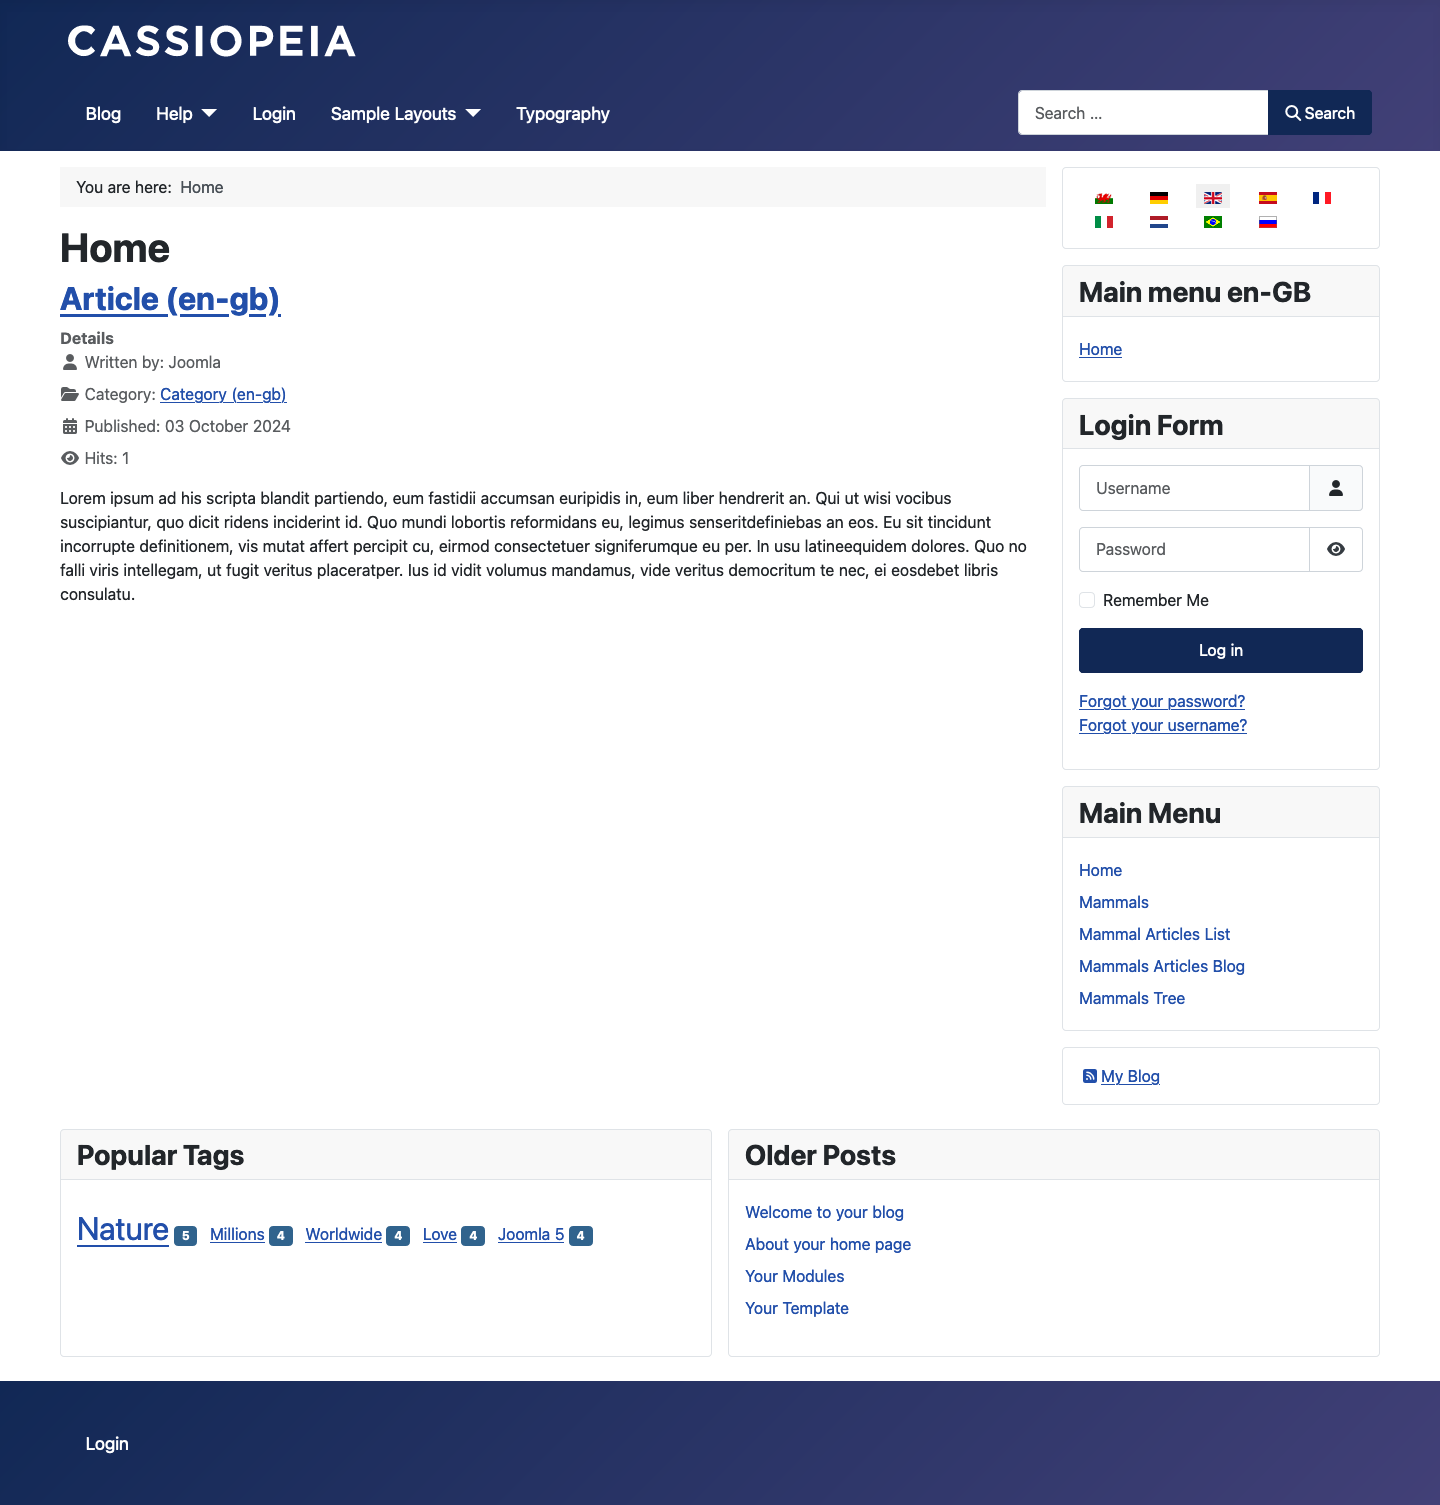
Breadcrumbs
The pale grey line that says You are here: Home is a configurable module showing where you are in the category tree.
Subcategories
Content Management
About how to manage content in Joomla: articles, menus, categories, modules.