Migration
Joomla 1.5 to 4 Planning and Migration Step-by-Step
Going from Joomla! 1.5 to 4.x is considered a major migration. This means that considerable changes in how Joomla works, tables, technology have occurred that require a migration instead of an upgrade or update. Both Joomla core extensions and any third-party extensions will need to migrate to Joomla 4.x. This includes the site template. Every single thing needs to be looked at, planned, decided upon, and executed. You will need to be diligent with staying organized throughout the process.
Intro
The fabulous thing about migration is that it is a great time to reassess goals, create a new look and feel (template), clean up, and develop other areas/elements of your site. The more organized you can be with your ideas/thoughts/plans, the better. Planning makes execution easier.
Start planning by asking the following questions or doing the tasks listed below. You may have more items to plan for depending on the complexity of your site. Sadly, there is no way we can list every possible scenario.
Planning Action Items
General
- Assess your original site goals. Migration is an opportunity to get back into focus with your goals or change direction.
- Does your server meet the minimum technical requirements for Joomla 4? If not, you will need to change hosts. No better time to change hosts than during a migration.
- What kind of development environment will you use? A development environment on your local device? A subdomain or subdirectory on your server? A new server/hosting account due to technical specifications?
Joomla Core
- Clean-up your current site. Take a look at your Sections, Categories, and Articles. Sections are converted to higher level categories from Joomla 2.5 on. Is there clean-up that needs to be done so that you don’t migrate unnecessary content? Document what you want to delete. Alternatively, you may want to document what you want to bring over depending on quantity.
- Organize your content on the current site. Do the Categories you have still apply? Document new categories you may want to add in your new site.
- Do you have any articles in the trash? If so, delete them (and any applicable media that may be associated with them if not in use elsewhere on the site). Articles (categories and menu items too) left in the trash can cause duplicate alias issues once migrated.
- The Media Manager: Decide whether you want to bring your entire /images directory over or just part of it. If your Media Manager has become a disaster, you may decide to bring over specific images via FTP or cPanel instead of migrating the entire directory. In the future, organize folders in the Media Manager so you don’t end up with a big mess.
- If you are using core components like Joomla Contacts, Web Links, or News Feeds, document this as you will need to bring those over.
- Check your menus and determine if you will bring them all over or only specific menus and menu items. Delete any menu items from the trash to prevent duplicate aliases.
- If you redesign or make changes to your site design or navigation, will you have obsolete pages that will require a redirect? Track all URLs that need redirects on a spreadsheet or notepad.
- Did you “hack the core” of your 1.5 site? If so, those changes will not migrate to Joomla 4. You will want to find alternatives to hacking the core in Joomla 4 (Understanding Output Overrides, Layout Overrides in Joomla).
- Check your User Manager. Are you intending to bring them all over? Is there clean up required? Perhaps Super Users that no longer should have access or spam users that need to be deleted? Are you using some kind of third-party extension to enhance User Profiles? This part needs careful planning especially if the user data changes frequently.
- Are there new features of Joomla that you wish to use, such as Access Control Levels (ACLs), tags, workflows, or custom fields? Start planning for that now. Planning ACLs is cautious business. Being thorough is very important.
Third-party Extensions
- Make a list of all third-party extensions in use. This includes components, modules, plugins, languages, and templates. You may copy/paste them from the Manage page into a document for reference if you’d like. A piece of paper and a pen will suffice. Include if these extensions are used heavily, moderately, hardly ever, or not at all.
- Determine whether the third-party extensions you rely on are ready for Joomla 4.
- Determine if you really need all the extensions you are using. Perhaps Joomla 4 has built-in features that could eliminate the third-party extension.
- What about your site template? If you purchased your template from a third-party source, is there a 4.x version released for it? Would you like to continue using it? Is there a migration path published by the developer? Is the new version of it responsive? Is your template a custom template? Or was it heavily customized from a third-party template? For an expansion of Template-based considerations, see Template Considerations During Migration.
- If you are changing your template for a new one, will it require any new images? For example, if your current site has a white background and your logo or other images are .jpg images with a white background, it won’t look very nice against a new template with an off-white or coloured background.
The following are step-by-step instructions to migrate your 1.5 site to Joomla 4.x. While there are many ways to migrate your site, this will give you the basic procedure to follow.
Introduction
The migration from Joomla! 1.5 to 4.x is a major migration. There are many changes in features and database tables between these two versions. It is not a one-click update. You will be building and installing a fresh Joomla! 4 installation and then migrating (moving) your data into it. If you haven't already, you may want to start with the Self Assessment document.
Let’s first distinguish between Joomla Core data and third-party extension data. Joomla Core data (Components) are:
- Categories
- Articles
- Menus
- Modules (core modules - not third-party)
- Banners
- Contacts
- Messaging
- News Feeds
- Redirect
- Search
- Smart Search
Step-by-Step
Moving Joomla core data is fairly straight-forward with the use of a migration tool. Everything else is a third-party extension or a custom built extension. This includes the template. Each third-party extension needs to be researched to determine if it’s ready for Joomla 4.x and has a migration path. You may have done this in the planning process above. If not, do it now. Some third-party extensions can be migrated with a third-party tool. Some cannot. Read. Research. Plan.
Since there are many ways to migrate data and each site is different, the exact steps are going to be slightly different for every site.
Prepare a Location for Joomla 4
- Make sure your server environment meets the technical requirements for Joomla! 4 before proceeding.
Note If your host does not meet the technical requirements, you will need to change hosts. If you need to change hosts, set up a new hosting account on a host that meets the specifications and install your fresh Joomla 4.x site in the root of the server on a temporary domain. This will make it easier when it’s time to go live. Alternatively, you can set up a development location on a local device. (See below.)
- Create a new database and new user for your Joomla! 4.x site. Document the database name, database username and database password as you’ll need these when you install Joomla 4.
Set Up a Development Location
- Create a testing site or build area to work in with one of the following:
- A subdomain
- A subdirectory
- A local device via WAMP, MAMP, LAMP, XAMPP.
- A new hosting account on a temporary domain in the root (if you would like to change hosts in the process of migration)
- Restoring a site on a local device. See Installing Joomla locally and Setting up your workstation for Joomla development.
- Restoring a site with Akeeba Backup. (Read the developer documentation or videos for how to restore a backup of an Akeeba Backup file.)
- Install a fresh installation of the latest version of Joomla 4.x into your testing site location using your new database name and database credentials.
Do not install the sample data.Note If you will be migrating any of the core extensions that will be decoupled from Joomla! 3.4+, you will need to install Joomla 4.x and the core supported extension. Core supported extensions will be accessible via the Joomla Extensions Directory and via the Install from web tab of the Extension Manager. Make sure you install any core supported extensions before migrating data. See the Project Roadmap for more details on what will be decoupled/removed. As of August 2021, only Web Links has been decoupled.
- Run a backup of your Joomla 4 site. (Backup Basics for a Joomla! Web Site or see Suggested Tools)
Prepare Your Current 1.5 Site
- On your 1.5 site, update it to the latest version 1.5.26 after backing it up.
- Clean up your sections, categories, articles, modules, menu items. Make sure they all have unique aliases.
- Empty the trash in the content manager (sections, categories, articles), menu manager, module manager.
Note Sections no longer exist in Joomla 4. Sections become a parent Category. Categories became nested categories of the parent category.
- Notify users that any changes on the current site from this point forward will have to be reentered on the new site. For complex migrations with changing data, see the Complex Joomla! 1.5 Migration With Minimal Downtime magazine article and the Complex Migrations video.
Choose a Migration Tool
- There are many migration tools. Some are free, some cost a bit of money. Some only migrate certain data. Some migrate more types of data than others.
- Migration tools can be found at the Migration & Conversion category in the Joomla Extension Directory.
- Verify that the candidate migration tool has been updated to work with Joomla 4.
- Each migration tool has its own step-by-step documentation on how to move data. (If they don’t don’t use it.) Some migration tools will require the 1.5 site and 4 site on the same server. If you’re switching hosts, you will want to restore a *subdomain* of your 1.5 site on your new hosting account to pull the data from. Then kill it when you’re done.
- When you choose a tool, select one that allows you to preserve the ItemIDs. This is necessary to keep your search engine ranking intact or you may have more redirects to do. More information on redirects follow.
- If you have a small site, you may want to do the migration manually. Create categories and articles and copy the HTML over into your new site. Then copy the image directory over. Keep the /stories directory (which is no longer the default image directory in Joomla 4.x) or your image links will be broken until you fix each one.
- One of the migration tools (a free one) allows you to bring articles and only images associated with those articles over. This is helpful if your Media Manager is out of control.
Migration
- Migrate all core data you want to move to Joomla 4.x. If your migration tool asks to move Sections and Categories, definitely do both. The conversion will happen to categories and nested categories automatically.
- Run the Database Fix by going to Extension Manager → Database and click the Fix button in the top toolbar.
- Install your new template or converted template so that you can see your content. See more about Template Considerations.
- Add new menus if the tool you chose to use didn't bring over menus. If you want to use split menus, set that up now.
- Add modules if the tool you chose to use didn't bring over modules. If the tool you chose to use brought over modules, change the module positions to the positions in your new template if required so that your modules show up and you can see what you’re working with.
- Check for duplicate alias issues and fix them.
- Check your internal links. If any are broken, fix them.
- Take a backup.
- Install other third-party extensions and configure them. (For example editors, Akeeba backup, slideshows, or plugins.)
- Take a backup.
- If you have large extensions with data to migrate, do each one according to the developer documentation and then take a backup after each one.
- If your migration tool didn't move the images, you will want to move your images from the 1.5 site to the 4.x site. Note: keep the /stories directory unless you want to relink all your images. You can start a new organisational structure in the /images directory from here forward if stories is a mess.
- Recommended but not required unless you have issues: Fix asset issues. See below for a helpful tool.
- If you are going to add anything to your site or use new core features such as Tags or Custom Fields, get them set up and configured at this time.
- Check your URLs on the Joomla 4 site and compare to the Joomla 1.5 site. If they are different, document each 1.5 URL and what Joomla 4.x URL they will be going to so that you can do redirects and keep your ranking. (An Excel spreadsheet is helpful.) See:
- Take a backup.
- Check everything.
- Clean up more.
- Test everything.
- Take a backup.
- Move or change or add updated data from the 1.5 site to the Joomla 4 site.
- Add Google Analytics to the template or use a third-party plugin.
- Check the Global Configuration and make sure all is as it should be.
- Take a final backup of the Joomla 4.x site.
- Take a final backup of the 1.5 site.
- Move your 1.5 site from the root to another subdomain or subdirectory or simply delete it. (This is so that you have it again for a brief time if you need to refer to it.)
- Backup and restore using a suggested tool (below) or simply move files to restore your 4.x site to the root of your hosting.
Note If you are changing hosts, you can leave your Joomla 4.x site where it is and simply change name servers on the domain to make it live. Make sure you've addressed any email issues first.
- Enable .htaccess if necessary for Search Engine Friendly URLs.
- Create a sitemap and submit to Google Webmaster Tools or any other search engine you would like.
- Do all your redirects from the spreadsheet you created earlier for URLs that changed in the migration process.
- Make any other changes that needed to wait until the 4.x site was live.
- Test again.
- Take another backup.
- Kill any instance(s) of the 1.5 site as soon as possible.
- Remove all other development sites you may have been working with or keep them up-to-date if they are running a current version in order to ward off hack attempts on your server.
- Welcome to Joomla! 4.x!
Suggested Tools
- Akeeba Backup for backup and restore.
- PWT ACL to fix asset issues in a few clicks.
Joomla 2.5 to 3 Planning and Migration Step-by-Step
Going from Joomla 2.5 to 3.10.x is considered a mini-migration or a minor migration. This means that Joomla core extensions will upgrade with a "one-click update" but third-party extensions are debatable and need to be taken on a case by case basis.
The one-click update will be fine and work well for many. For some larger, more complex sites, the one-click update may not be the best route. For large or very complex sites, you may want to follow instructions for a regular migration and bypass the one-click update functionality. To do this, follow the same instructions for 1.5 to 4.x planning and migration step by step, and substitute 2.5 for 1.5 while reading.
Overview
You're running 2.5 on your site. You're going to do the mini-migration to 3.5.1. It will force you to stop there and re-login. You will then update to 3.6.5 where it will stop there and force you to login again. Then, you'll update to 3.10.x. Finally, you'll do the mini-migration to 4.x. Then an upgrade to Joomla 5.x. Then an upgrade to Joomla 6.x.
Most likely, you will need to change out your template as it won't be compatible with Joomla 2.5, 3, and 4, etc. Before you start, change the default template to Beez3 in Joomla 2.5. That template should get you all the way through to Joomla 4.x. Then you can either use Cassiopeia or a different template in Joomla 4.
When it comes to testing in between all the steps, do it. However you won't really be able to see the frontend unless you set up all the module instances in Beez3. To do that, type example.com/?tp=1 to find all the module positions and assign your modules to them. This is only so that you can test functionality. Styling won't matter until you get the template you want to keep installed in Joomla 4.
Test the backend thoroughly. Make sure you can add/edit articles, modules, menu items, etc. Do this when you get to 3.5.1, 3.6.5, 3.10.x, and 4.x.
Run the DB Fix in Extensions -> Manage. Clear Joomla Cache (System -> Clear Cache) between updates. Do backups between each step!!
Check all extensions at the beginning. You might be better off uninstalling whatever you can and reinstalling in 4.x if they're easy plugins/extensions. Alternatively you could use an extension like SPTransfer or J2XML. Create a Joomla 4 site and bring over your content.
Once you get to 3.10.x, follow the instruction in Joomla 3 to 4 planning and step by step. Make sure you remove leftover 2.5 files that might be lingering.
Good luck!
Intro
Migrations are a great time to reassess goals, clean up, and develop other areas/elements of your site. The more organized you can be with your ideas/thoughts/plans the better. Plan, plan, plan. Planning makes execution easier.
Start planning by asking the following questions or doing the tasks listed below. You may have more items to plan for depending on the complexity of your site. Sadly, there is no way we can list every possible scenario. You can ask specific questions on the Joomla 4.x General Questions/New to Joomla 4.x Forum.
Planning Action Items
- Assess your original site goals. Migration is an opportunity to get back into focus with your goals or change direction.
- Does your server meet the minimum Technical Requirements for Joomla 3? If not, you will need to change hosts. No better time to change hosts than during a migration.
- What kind of development environment will you use? A development environment on your local device? A subdomain or subdirectory on your server? A new server/hosting account due to technical specifications?
- Make a list of all third-party extensions in use. This includes components, modules, plugins, languages, and templates. You may copy/paste them into a document for reference, or a paper and pen works too. Include if these extensions are used heavily, moderately, hardly ever, or not at all.
- Determine whether the third-party extensions you rely on are ready for the version of Joomla you are migrating to.
- Determine if you really need all the extensions you are using. Could it be that Joomla 4 has built in features that could eliminate the use of a third-party extension?
- Take a look at your Categories and Articles. Is there clean-up that needs to be done so that you don’t migrate unnecessary content?
- What about your template? If you purchased your template from a third-party source, is there a 3.x and 4.x version released for it? Would you like to continue using it? Is there an upgrade path published by the developer? Is the new version of it responsive? Is your template a custom template? Or was it heavily customized from a third-party template? For an expansion of Template based considerations, see Template Considerations During Migration.
- If you are changing out your template for a new one, will it require any new images? For example, if your current site has a white background and your logo or other images are .jpg images with a white background it won’t look very nice against a new template with an off-white or coloured background.
- If you redesign or make changes to your site design or navigation, will you have obsolete pages that will require a redirect?
The following are step by step instructions to migrate your 2.5.x site to Joomla! 3.x. While there are hundreds of different scenarios, this will give you the basic procedure to follow. Very complex migrations will likely be a result of installed third-party extensions. You are encouraged to contact the developers of third-party extensions installed on your Joomla! site for their suggested path to migrate their extensions.
Introduction
The migration from Joomla! 2.5 to 3.x is considered a mini-migration. This is because the Joomla! core extensions will upgrade with a “one-click” upgrade via the Joomla! Update component in the backend administrator side of Joomla. Many third-party extensions are a one-click upgrade too. Some are not. You need to look at each one and determine what path the extension needs to follow to get from 2.5 to 3.x. If you haven't already, you might be interested in reading the Self Assessment prior to following the steps below.
Joomla! Core Extensions:
- Categories
- Articles
- Menus
- Modules (core modules - not third-party)
- Banners
- Contacts
- Messaging
- Newsfeeds
- Redirect
- Search
- Smart Search
- Weblinks
For very large or complex 2.5 to 3.x migrations
The one-click update will be fine and work well for many. For some larger, more complex sites, the one-click update may not be the best route. For large or very complex sites, you may want to follow instructions for a regular migration and bypass the one-click update functionality. To do this, follow the same instructions for planning and step by step for 1.5 to 4, then substitute 2.5 for 1.5 whilst reading.
Step by Step
Set Up a Development Location
- Take a backup of your live 2.5 site. You can use a suggested tool (see bottom of page) or you can do this manually.
- Make sure your environment meets the Technical Requirements for Joomla 3 before proceeding.
- Create a new database and new user to restore your 2.5 site to.
- Create a testing site or build area to work in and restore the back up copy of your 2.5 site in one of the following places:
- A subdomain.
- A subdirectory.
- A local device via WAMP, MAMP, LAMP, XAMPP.
- A new hosting account on a temporary domain in the root. (If you would like to change hosts in the process of migration).
- Restoring a site on a local device. See Installing Joomla locally and Setting up your workstation for Joomla development.
- Restoring a site with a tool listed at bottom of page. (Read the developer documentation)
- In your test location, update your Joomla! 2.5 instance to the latest maintenance release. (Currently 2.5.28).
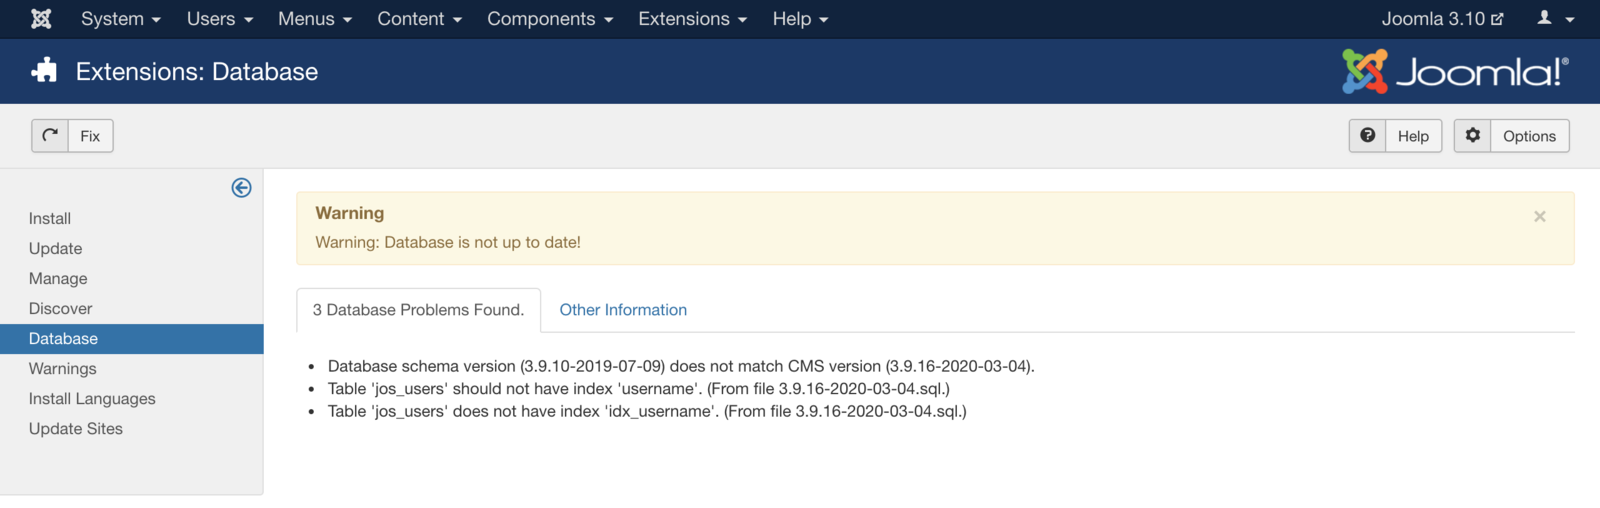
- Make sure you have the latest database schema updated to the latest version 2.5.28 by going to Extension Manager → Database tab. If your schema is not up to date as in the following image, click the Fix button:

- Empty trash: Do you have any articles in the trash? If so, delete them (and any applicable media that may be associated with them if not in use elsewhere on the site). Articles (categories and menu items too) left in the trash can cause issues in having a migration to complete without errors.
- Test.
- Backup again.
Assess Each Extension
- You are going to be looking at every single extension installed on your site. You will be determining if they need to be updated to the latest version or uninstalled. In Joomla! 2.5.28 you can go to Extension Manager → Update tab and click Find Updates which will add a tooltip in the Version column, under the Manage tab, giving some compatibility information from the backend. This functionality only supports extensions that update via the Extension Manager Update tab. If you have extensions installed that do not use the Joomla extension update then they need to be assessed manually as detailed below. The same goes for those extensions that have a tooltip. You will still need to check the type of package and migration path with the extension developer to verify how to upgrade/migrate.
- Go to Extension Manager → Manage tab.
- Click the drop-down for Type.
- Select Package from the drop-down.
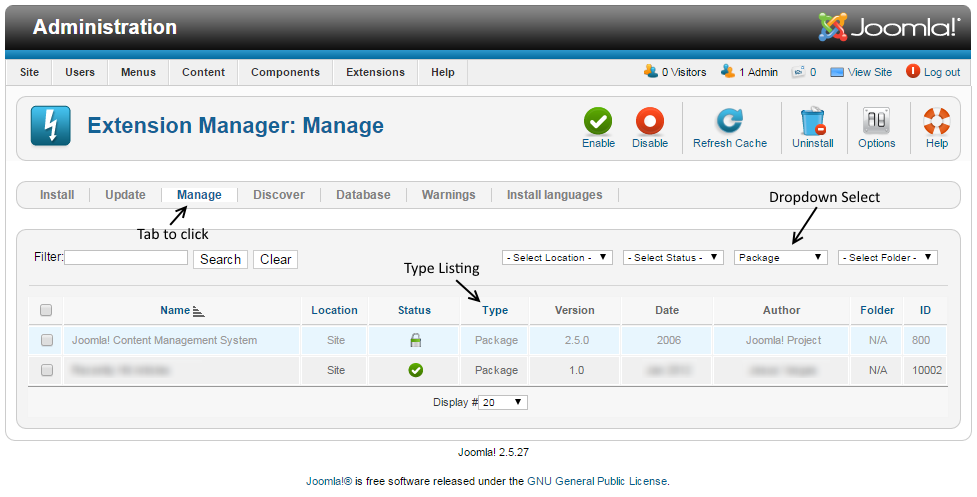
Selecting Package first is recommended because if there is something you need to uninstall in a package, it will automatically uninstall the associated Modules, Plugins, or anything else in the package at one time. - Uninstall any Packages that are no longer needed or will not be migrating to Joomla 3.
- Repeat this process of going through the Manage tab for all Types in the drop-down: Component, File, Language, Library, Module, Plugin and Template. If the Author states Joomla! Project, then leave those extensions alone. Smart Search is a Joomla core supported extension even though the Author fields are blank. For all others, make sure that you uninstall those not in use or not compatible with Joomla! 3.x.
NOTE! You will not be able to uninstall any Template that is set as default. You will need to select a Core supported template like Beez or Atomic and then uninstall the template if you need to do so.
- Make a note of any versions of Packages and Components currently running that you will be keeping on your site. You can simply copy/paste them into a document to keep track of them.
- Update all extensions to the latest versions.
- Before and as you update, note if the extensions have both 2.5 & 3.x versions in the same package. If so, they will be fine to "one-click update." If not, and 2.5 and 3.x have different packages, you need to look at them case by case. They will normally fall into one of the following scenarios:
- The extension has separate packages but upon upgrading to 3.x, they automatically detect this and still work. Make sure the developer confirms this.
- The extension has separate packages that need to be uninstalled in 2.5 and then installed with the Joomla 3.x version once the site is migrated. An example of this might be a content plugin. It is very simple to uninstall it in 2.5 and then install it again in 3.x.
- See Template Considerations for more specific information on templates and Converting a previous Joomla! Version template
Going to Joomla! 3.x
Joomla! 2.5.28 can only be migrated to the latest Joomla 3.x in two or more steps. First migrate to version 3.5.1. Then you will be offered version 3.6.5. Finally the current version will be available in the Joomla Updates page of the Components menu.
Once you have either updated or uninstalled your third-party extensions so that only those compatible with Joomla! 3 remain in your installation, continue with the following steps:
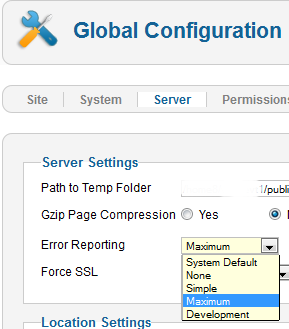
- Go to Site → Global Configuration → Server tab and turn Error Reporting from System Default to Maximum. Make sure to Save & Close.
- Go to Extensions → Plugin Manager and enter Remember Me into the Filter and press enter.
- Disable the Remember Me plugin by clicking the green check mark and making it a red circle.

- Take another backup.
- Recommended but not required: Fix assets. (Fixing the assets table). See below for a tool to do this in just a few clicks.
- Go to Components → Joomla Update. (It should say no updates found. If it doesn’t, update Joomla to the latest version and test. Then do another backup.) Click on the Options button at the top right corner.
- Select Short Term Support (This is the current text - it may be different in the future) from the drop-down for Update server.

- Click Save & Close.
- You will then see your Installed Joomla Version, the Latest Joomla! version and the URL for the update package.

- If the update is not showing up, go to Extension manager → Update and press Purge Cache from the toolbar. Now the update to Joomla! 3 should show up.
- Cross your fingers, make sure you turned off Remember Me and that you have a backup from just before this point.
- Click the Install the Update button.
- Watch the spinning circle go round and round. The amount of time the wheel spins is dependent on your site, Internet connection and server speed. The process takes about two minutes. When the update is finished, you will probably be logged out of the Administrator. Sign in again.
- If all goes well, you will get to a totally new look to the backend administrator panel.
- Click the Clear Cache button. You will now see a A Joomla update was found notice for a later version of Joomla. Postpone this update temporarily.
- Go to Extensions → Manage → Database and click Fix.
- In the Extension Manager, go to Discover and see if there are any extensions to install.
- Recommended but not required: Fix assets. (Fixing the assets table). See below for a tool to do this in just a few clicks.
- Enable Remember Me from the Plugin Manager.
- Go to the frontend of your site and see if it shows up even if it’s not the right template. If so, continue. If not, see common errors during migration.
- Take a backup.
- At this point, it would be prudent to clear your browser's cache. Some browsers, notably Firefox, will retain old version 2.5 files. That caching might prevent the operation of the Save and Save & Close buttons in the Administrator.
- Go to Content → Article Manager → Options button → Editing Layout tab and set the Enable Versions to Yes.
- Install your new template or other extensions if you have them to install. Back up often.
- Configure them. Back up often.
- Test everything. Back up often.
- If everything works as expected, turn Error Reporting back to System Default (System → Global Configuration → Server tab). Make sure to Save & Close.
- Now you should return to Joomla Updates in the Components menu. Install any updates offered. After the successful installation of version 3.5.1, you will likely be offered version 3.6.5 next. Finally, the Update facility will bring your site up to the current version in the 3.x series.
Going Live with your Joomla! 3.x Site
NOTE: It is recommended that you do the mini-migration to Joomla 4, then 5, then 6 at this point unless there's some really good reason not to do so. To continue to Joomla 4, see 3.10.x to 4.x Planning and Step by Step Migration.
- When you’re ready to go live, back up your 2.5 site for the last time. Restore it in a subdirectory or subdomain if you would like to.
- Back up your Joomla! 3.x site and move or restore your Joomla! 3.x site to the root (or change nameservers if you were building on a temporary domain at a new hosting account root).
- Test again.
- Remove the Joomla! 2.5 site from the server within a couple of days unless you have edited your robots.txt file to block the search engine spiders.
- Remove all development sites you may have been working with or keep them up-to-date if they are running a current version in order to ward off hack attempts on your server.
If you had data change on the 2.5 site while you were migrating to 3.x, you will want to get that data moved over to the 3.x site before going live. You can do this manually (make sure you keep the same user IDs - go in order) or by using a Data Import and Export extension.
Suggested Tools
- Akeeba Backup for backup and restore.
- ACL Manager to fix asset issues in a few clicks.
Joomla 3 to 4 Planning and Migration Step by Step
Planning for Mini-Migration - Joomla 3.10.x to 4.x
Going from Joomla 3.10.x to 4.x is considered a mini-migration or a minor migration. This means that Joomla core extensions will upgrade with a “one-click update” but third-party extensions are debatable and need to be taken on a case by case basis.
Start planning by asking the following questions or doing the tasks listed below. You may have more items to plan for depending on the complexity of your site. Sadly, there is no way we can list every possible scenario. Please see the Migrating and Upgrading to Joomla 4.x Forum for assistance.
The 3.10.x Bridge
Joomla 3.10.x is intended to be a bridge between the Joomla 3 life cycle and the Joomla 4 life cycle. Joomla 3.10.x will primarily be a release containing backports of API changes from the Joomla 4.x development branch to help ease the transition to the next major release for the community. New to Joomla 3.10.x is an excellent feature to the Joomla! Update component to help you with your mini-migration process: the Pre-Update Check. Once your website is updated to 3.10, the pre-update check will allow you to check the compatibility with Joomla 4.0 of your PHP and SQL options, settings, and the extensions you are using as long as extension developers utilised the targetplatform tag. See Pre-Update Check documentation for more.
Planning Action Items
The following assumes that you have already updated your Joomla 3.x site to version 3.10.x. This will allow you to take advantage of the Pre-Update Checker as part of your planning.
- Make sure your website is running 3.10.x.
- Assess your original site goals. Migration is an opportunity to get back into focus with your goals or change direction.
- Does your server meet the minimum technical requirements for Joomla 4? If not, you will need to change hosts. No better time to change hosts than during a migration.
- What kind of development environment will you use? A development environment on your local device? A subdomain or subdirectory on your server? A new server/hosting account due to technical specifications?
- Make a list of all third-party extensions in use. This includes components, modules, plugins, languages, and templates. You may just copy/paste them into a document for reference, or a paper and pen works too. Include if these extensions are used heavily, moderately, hardly ever, or not at all.
- Determine whether the third-party extensions you rely on are ready for the version of Joomla you are migrating to by selecting the Joomla Next option (once running Joomla 3.10.x) in the Joomla Update Component and checking if they show compatibility with Joomla 4. Don’t run the update to 4.x, just select Joomla Next in the Joomla Update Options so that the Pre-Update Checker can display. This will help you get a summary view of extensions in use and their compatibility. It is not a substitute for still needing to use Extensions → Manage. More on that in the Step-by-Step and the documentation for the Pre-Update Check component. This is simply to get prepared on what third-party extensions will stay or go or be replaced.
- Determine if you really need all the extensions you are using. Could it be that Joomla 4 has built in features that could eliminate the use of a third-party extension?
- Take a look at your Categories and Articles. Is there clean-up that needs to be done so that you don’t migrate unnecessary content?
- What about your template? If you purchased your template from a third-party source, is there a 4.x version released for it? Would you like to continue using it? Is there an upgrade path published by the developer? Is the new version of it responsive? Is your template a custom template? Or was it heavily customised from a third-party template? The Joomla core template for Joomla 3.x, Protostar is NOT compatible with Joomla 4. Upon migration it will disappear. Using the Joomla core template for Joomla 4.x, Cassiopeia might be an option for you. For an expansion of Template based considerations, see Template Considerations During Migration.
- If you are changing out your template for a new one, will it require any new images? For example, if your current site has a white background and your logo or other images are .jpg images with a white background it won’t look very nice against a new template with an off-white or coloured background.
- If you redesign or make changes to your site design or navigation, will you have obsolete pages that will require a redirect? If so, document them. A spreadsheet is helpful for documenting links that will need to change.
Step by Step
The following are step by step instructions to migrate a 3.10.x site to Joomla! 4.x. While there are hundreds of different scenarios, this will give you the basic procedure to follow. Very complex migrations will likely be a result of installed third-party extensions. You are encouraged to contact the developers of third-party extensions installed on your Joomla site for their suggested path to migrate their extensions.
Set up a Development Location
- Make sure you are running the latest Joomla 3.10.x version before proceeding.
- Take a backup of your live 3.10.x site. You can use a suggested tool (see the Suggested Tools at the bottom of page) or you can do this manually.
- Make sure your environment meets the technical requirements for Joomla 4 before proceeding.
- Create a new database and new user to restore your 3.10.x site to.
- Create a testing site or build area to work in and restore the backup copy of your 3.10.x site in one of the following places:
- A subdomain.
- A subdirectory.
- A local device. Joomla has a detailed tutorial on installing XAMPP. However WAMP, MAMP and LAMP are all suitable alternatives.
- A new hosting account on a temporary domain in the root. (If you would like to change hosts in the process of migration.)
- Restoring a site on a local device. See Installing Joomla locally and Setting up your workstation for Joomla development.
- Restoring a site with a tool listed at the bottom of the page. (Read the developer documentation.)
- In your test location, update your Joomla! 3.10.x instance to the latest maintenance release.
- Make sure you have the latest database schema updated to the latest version 3.10.x version by going to Extension Manager → Database tab. If your schema is not up to date as in the following image, click the Fix button:
- Empty trash: Do you have any articles in the trash? If so, delete them (and any applicable media that may be associated with them if not in use elsewhere on the site). Articles (categories and menu items too) left in the trash can cause issues in having a migration to complete without errors.
- Test.
- Backup again.
Assess Each Extension
In your planning, you determined which third-party extensions were staying or going and how they migrate. For this portion of the Step by Step, you’ll be using two different sections of the site extensively: the Pre-Update Check in Components → Joomla! Update and Extensions → Manage → Manage. You are going to be looking at every single extension installed on your site. You will be determining if they need to be updated to the latest version or uninstalled. More details in Pre-Update Check.
- Using the Pre-Update Check in order to use the Pre-Update Check, you will need to set the Joomla! Update component to Joomla 4. To do this follow:
- Go to Components → Joomla Update It should say no updates found. If it doesn’t, update Joomla to the latest version (must be 3.10.x) and test. Then do another backup. Click on the Options button at the top right corner.
- Select Joomla Next from the drop-down for Update Channel.
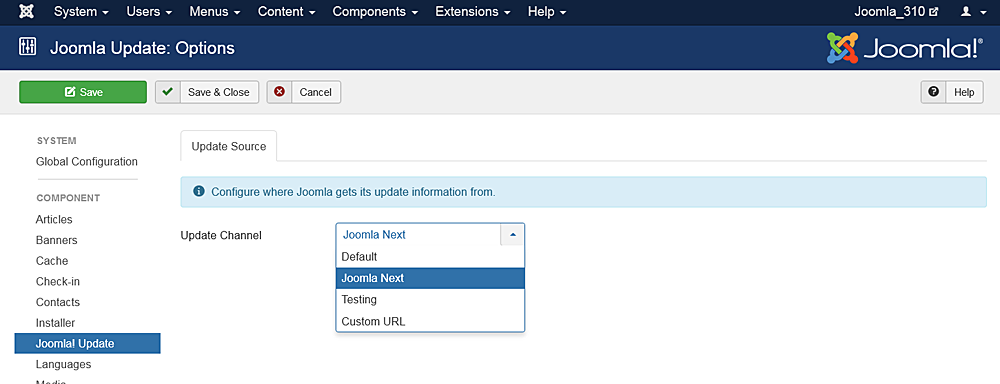
- Click Save & Close
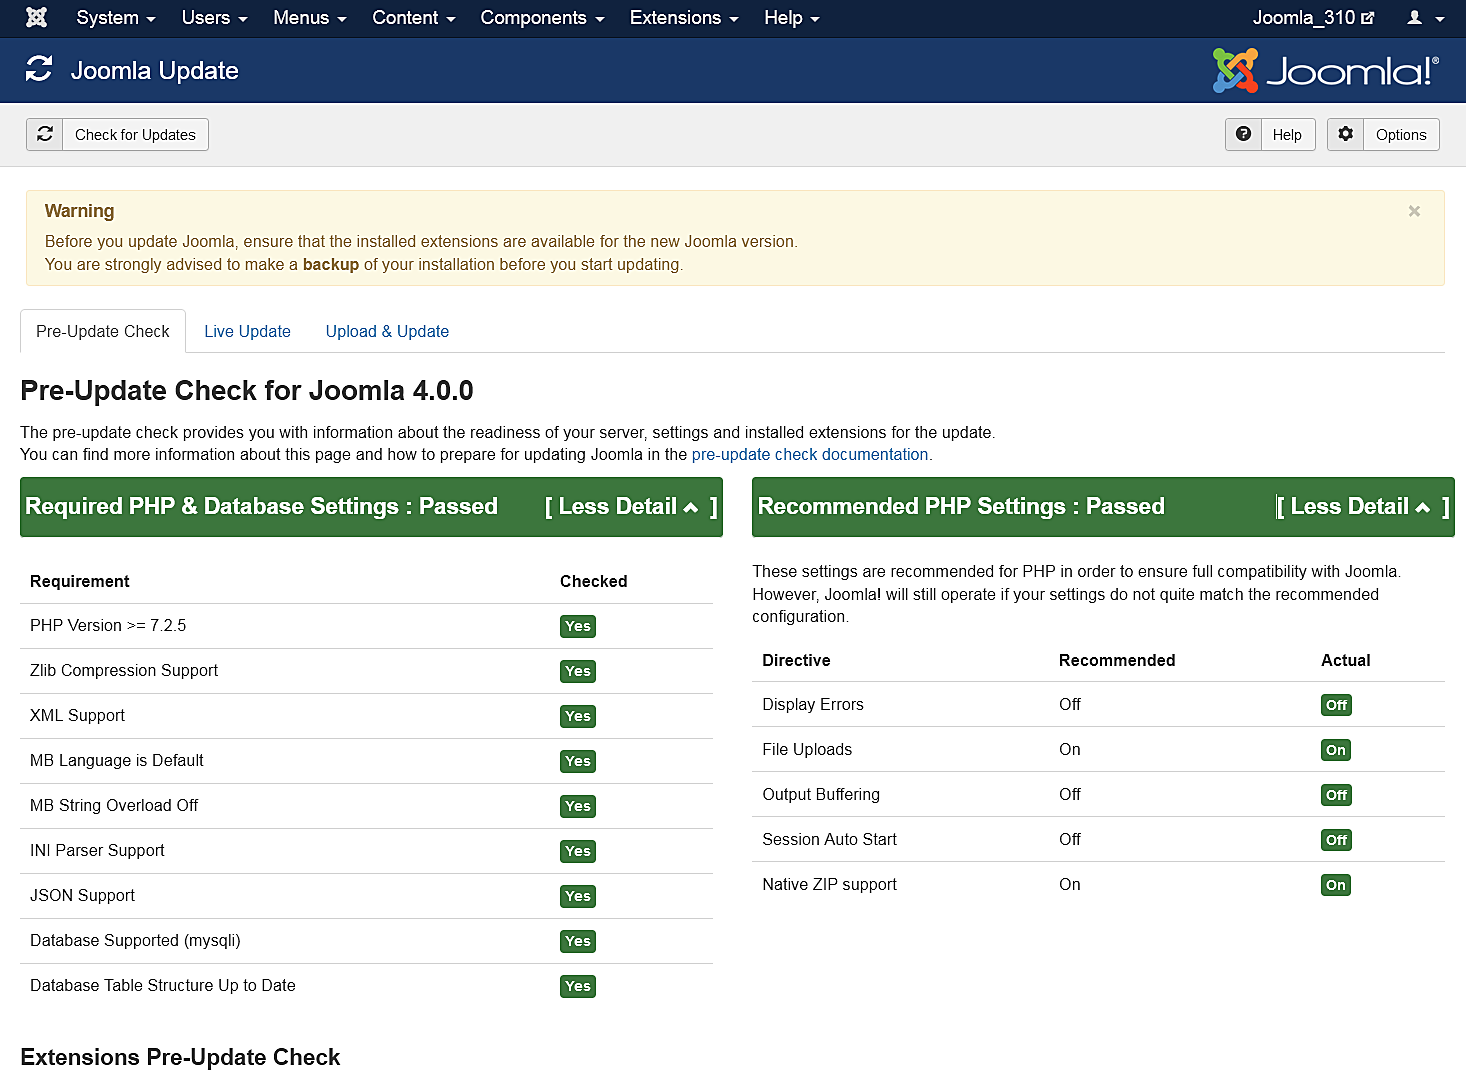
- You will then see your Installed Joomla Version, the latest Joomla! version and the URL for the update package. Joomla will show you the requirements again for Joomla 4. If it flags that you have either an incompatible system or extensions it will tell you here. Take a moment to review this page.
 Notice: Do NOT update to Joomla! 4 right now. This is only to prepare your third-party extensions and get the site compatible with Joomla! 4.
 - Look at the Pre-Update Check and the Extension Pre-Update Check in the Pre-Update Check tab of the Joomla Update component. If any extension that isn’t in your planning is listed here, add it to your list of extensions to investigate.
- If you migrated from Joomla! 2.5 to 3.x in the past, there may be some leftover extensions that need to be cleaned up. The following are older 2.5 or 3.x extensions that need to be uninstalled before updating to Joomla 4:
- plg_content_geshi
- Bluestork Administrator Template
- Beez_20
- Beez5
- Atomic
- When it comes to templates, uninstall all core frontend or backend templates except Protostar and Beez3 (frontend templates) and Isis or Hathor (administrator templates). NOTE: Protostar is NOT compatible with Joomla 4. Upon migration it will disappear. You'll need to have one template selected as default and you can use Protostar or Beez3. Protostar will disappear upon migration to Joomla 4.x.
- If you come across other files that need to be uninstalled, please add them to this page. This is a wiki so anyone can add to the page. Thank you in advance for your service.
- You will notice the tags for whether an extension is compatible or not. These tags generally tell a true story if they say No or Yes. If they say Missing Compatibility Tag it means that the extension developer didn’t use a tag in their extension so we don’t know if it is or isn’t compatible with Joomla 4. Talk to the developer to verify.
- Update Extensions: update any extensions that you will keep in your website. In Joomla! 3.10.x you can go to Extension Manager → Update tab and click Find Updates which will add a tooltip in the Version column, under the Manage tab, giving some compatibility information from the backend. This functionality only supports extensions that update via the Extension Manager Update tab. If you have extensions installed that do not use the Joomla extension update they need to be assessed manually as detailed below. The same goes for those extensions that have a tooltip. You will still need to check the type of package and migration path with the extension developer to verify how to upgrade/migrate.
- Investigate and Uninstall Extensions Extensions: go to Extension Manager → Manage
- Click the Button Search Tools to show the filter options
- Select Package from the Select Type drop-down.
 Selecting Package first is recommended because if there is something you need to uninstall in a package, it will automatically uninstall the associated Modules, Plugins, or anything else in the package at one time.
 - Uninstall any Packages that are no longer needed or will not be migrating to Joomla 4.
- Repeat this process of going through the Manage tab for all Types in the drop-down: Component, File, Language, Library, Module, Plugin and Template. If the Author states Joomla! Project, then leave those extensions alone. For all others, make sure that you uninstall those not in use or not compatible with Joomla! 4.x.
NOTE! You will not be able to uninstall any template that is set as default. You will need to select a Core supported template like Beez3 or Protostar and then uninstall the template if you need to do so. Another reminder: Protostar is not compatible with Joomla 4. Upon migration it will disappear. Selecting it as default simply gets you to Joomla 4.x.
- Make a note of any versions of Packages and Components currently running that you will be keeping on your site. You can copy/paste them into a document for reference.
- For any extensions you are keeping but don't use the Extension Manager to one-click update (Extensions → Manage → Update) update all extensions to the latest versions.
- Before and as you update, note if the extensions have both 3.10.x & 4.x versions in the same package. If so, they will be fine to one-click update. If not, and 3.10 and 4.x have different packages, you need to look at them case by case. They will normally fall into one of the following scenarios:
- The extension has separate packages but upon upgrading to 4.x, they automatically detect this and still work. Make sure the developer confirms this.
- The extension has separate packages that need to be uninstalled in 3.10.x and then installed with the Joomla 4.x version once the site is migrated. An example of this might be a content plugin. It is very simple to uninstall it in 3.10.x and then install it again in 4.x.
- See Template Considerations for more specific information on templates and Converting a previous Joomla! Version template
Notes on Search (com_search)
Search (com_search) will be decoupled in Joomla 4.x. Search (com_search) will migrate to Joomla 4. After migration, you'll need to update it to the Joomla 4.x version via com_installer. It will continue to be maintained, but more the same way a third-party extension is by receiving updates via com_installer. It is recommended to use Smart Search (com_finder) going forward. Search is still available from the Joomla Extensions Directory.
Notes on Weblinks
Weblinks was decoupled back in Joomla 3.4. If it was in use on a 2.5 site, the migration process would note this and migrate the Weblinks component and data. For the migration from 3.10.x to 4.x, it will be the same. It is still available and maintained on the JED at Official Extensions.
Notes on Legacy Routing
Legacy routing will not be available in Joomla 4.x. Only Modern will be available. When you do the migration, if you are using Legacy routing, the system will automatically change them to Modern routing. You will want to run a broken link checker on your site after migrating to Joomla 4.x and before you go live.
Going to Joomla! 4.x
Once you have either updated or uninstalled your third-party extensions so that only those compatible with Joomla! 4 remain in your installation, continue with the following steps:
- Go to System → Global Configuration → Server tab and turn Error Reporting from System Default to Maximum. Make sure to Save & Close.

- Take another backup.
- Go to Components → Joomla Update. (It should say no updates found. If it doesn’t, update Joomla to the latest version and test. Then do another backup.) Click on the Options button at the top right corner.
- Select Joomla Next from the drop-down for Update Channel.
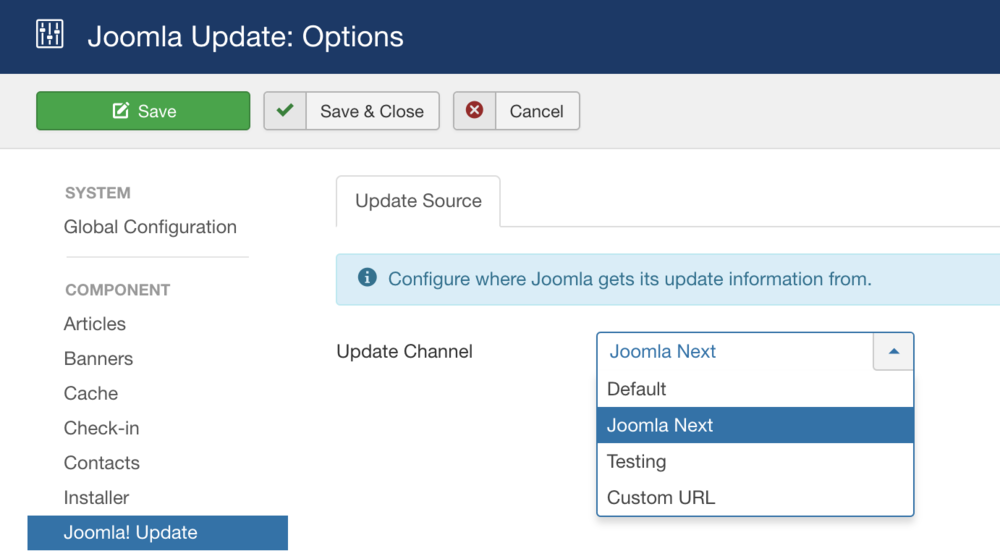
- Save & Close.
- You will then see your Installed Joomla Version, the Latest Joomla! version and the URL for the update package. Joomla will show you the requirements again for Joomla 4. If it flags that you have either an incompatible system or extensions it will tell you here. Take a moment to review this page.
- If the update is not showing up, go to Extension manager → Update and press Purge Cache from the toolbar. Now the update to Joomla! 4 should show up.
- Cross your fingers, and make sure you have that backup available in case.
- Click the Install the Update button.
- Make tea whilst the status bar loads to fully green. The amount of time this takes is dependent on your site, Internet connection and server speed. The process takes about two minutes. When the update is finished, you will probably be logged out of the Administrator. Sign in again. Twice.
- If all goes well, you will get to a totally new look to the backend administrator panel.

- Go to System → Maintenance → Database and click Fix if any errors show.
- In System → Install → Discover see if there are any extensions to install. (There shouldn't be any!)
- Go to the frontend of your site and see if it shows up even if it’s not the right template. If so, continue. If not, see common errors during migration.
- Take a backup.
- Install your new template or other extensions if you have them to install. Back up often.
- Configure them. Back up often.
- Run a broken link checker and fix any broken links.
- Test everything. Back up often.
- If everything works as expected, turn Error Reporting back to System Default (System → Global Configuration → Server tab). Make sure to Save & Close.
Going Live with your Joomla! 4.x Site
- When you’re ready to go live, back up your 3.10 site for the last time. Restore it in a subdirectory or subdomain if you would like to.
- Back up your Joomla! 4.x site and move or restore your Joomla! 4.x site to the root (or change nameservers if you were building on a temporary domain at a new hosting account root).
- Test again.
- IF you have made security changes to .htaccess file in the past, you may need to change a line (or lines) in it in order to update to the next version of Joomla 4. Please go to Htaccess changes after Joomla 4 to determine if you need to change your file or not.
- Remove the Joomla! 3.10 site from the server within a couple of days unless you have edited your robots.txt file to block the search engine spiders.
- Remove all development sites you have been working with or keep them up-to-date if they are running a current version in order to ward off hack attempts on your server.
If you had data change on the 3.10 site while you were migrating to 4.x, you will want to get that data moved over to the 4.x site before going live. You can do this manually (make sure you keep the same user IDs - go in order) or by using a third party extension.
Suggested Tools
- Akeeba Backup is very popular for backup and restore.
- More backup tools.
Joomla 4 to 5 Planning and Upgrade Step by Step
Introduction
Good news for Joomla 4.4.x to 5.x, it’s an upgrade, not a migration. Why? Two main reasons:
- Joomla 4 (J4) extensions that have removed all deprecations of code and are using up-to date Joomla code, will work in Joomla 5 (J5)
- Most others will work with the new Behaviour - Backward Compatibility Plugin enabled
This documentation reflects the simpler process by combining the planning and step by step in one document. Still, you will need some skills. Please see the Self Assessment to determine if you should or shouldn’t tackle the upgrade yourself.
https://manual.joomla.org/migrations/44-50/removed-backward-incompatibility
https://manual.joomla.org/migrations/44-50/new-deprecations
https://manual.joomla.org/migrations
Planning 4.4.x to 5.x
Hosting/Technical specification
1. Determine if your hosting environment meets the requirements.
You will not be able to upgrade to Joomla 5 if your server environment does not meet the minimum technical requirements. The option to upgrade will not appear in the Joomla Update component.
- PHP 8.1
- MySQL 8.0.13
- MariaDB 10.4.x (testing has shown that J3, J4, and J5, are compatible with MariaDB 10.4.x)
- PostgreSQL 12.0 (if you are using PostgreSQL 16 you will need to make a manual change before proceeding.)
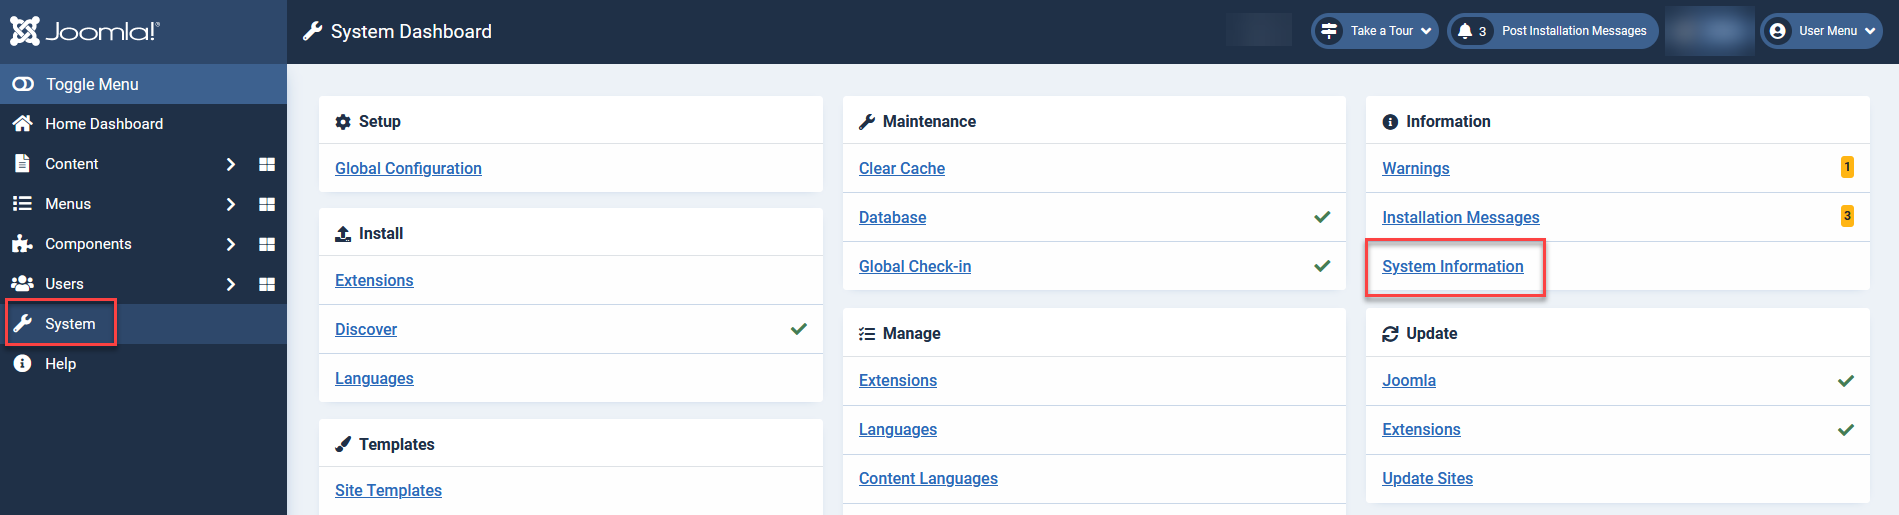
You can check your system information in Joomla 4 site by clicking System -> System Information. Contact your hosting provider if your server doesn’t meet the requirements.
The following is an example of an environment that meets the technical requirements. It shows MySQL 8.0.34, PHP 8.1, and Joomla 4.4.x.

2. Check all of your extensions for compatibility with Joomla 5
There are a number of third-party extension scenarios for this upgrade.
- The extension may be compatible with both J4 and J5 without the use of the backward compatibility plugin.
- The extension may be compatible with both J4 and J5 WITH the use of the backward compatibility plugin.
- The extension may appear to work in J5, but when you try to use it, it’s broken.
- The extension may break the entire site.
Don’t worry! It’s not as bad as it sounds! First let’s talk about the backward compatibility plugin.
The Backward Compatibility Plugin
The Behaviour - Backward Compatibility Plugin is an attempt to allow third-party extensions to use classes no longer included in Joomla 5.

When performing an upgrade from J4.4.x to J5, the backward compatibility plugin will be enabled automatically. New installations of J5 the backward compatibility plugin will be enabled by default.
The backward compatibility plugin that supports extensions that work in J4 will be in place through J5. In J6, the J4 extensions will not be made backward compatible with the plugin. This gives extension developers two additional years to make their extensions compatible with J5 without the backward compatibility plugin. The intention is that with every life cycle release, a backward compatibility plugin will support the life cycle before it until the life cycle after it.
Can you ever disable the backward compatibility plugin in J5? Great question. After determining that every single one of your third-party extensions are compliant and fully functional without the backward compatibility plugin enabled, you can disable the backward compatibility plugin. That said, we recommend using caution. Before you disable the backward compatibility plugin, doing one of the following two things is suggested:
- Do it on a dev/test site. That way, if you accidentally missed one extension that makes your backend inaccessible, it doesn’t take your production site down.
- Make sure you have access to the db. That way, you can enable the plugin again quickly if needed. More about this below.
Pre-update check vs. System -> Manage Extensions
Theoretically, the pre-update check would tell you if your third-party extensions are compatible with J5. However, the pre-update check is only helpful if all extension developers have made their extension reflect compatibility with their extensions. In a perfect world, the Extensions portion of the pre-update check would tell you if an extension either:
- Can be upgraded without the backward compatibility plugin enabled
- Can be upgraded with the backward compatibility plugin enabled
- If an update to the extension is required before upgrading from J4 to J5
- If an extension is incompatible completely
Testing has shown discrepancies between extensions that are compatible and are not compatible. This isn’t an issue with the pre-update check component. Rather, extension developers send information through their extensions which would populate the pre-update check correctly. If their extensions aren’t coded to tell the pre-update check the correct information, there’s very little (nothing) the pre-update check nor the Joomla! Project can do about it. A good source of information would be the third-party extension developer’s website to verify how the specific extension should be handled during the upgrade from J4 to J5.
The image below shows an example of the pre-update check component in Joomla 4.4.x of the Extensions section.
The top section will show the extensions that require an update. Please go to System -> Update -> Extensions and update your extensions.
The middle section shows extensions that the update information is unavailable from the extension developer. You will not know if these are compatible or not without testing them or contacting the developer.
The bottom section shows the extensions that have no update required. This means that the extensions are telling Joomla that they are compatible with Joomla 5. It is not specified if they require the backward compatibility plugin or not.
Please note that these extensions are not preferred by the Joomla Project. These extensions are shown as an example only. They were randomly picked from the JED as a test.
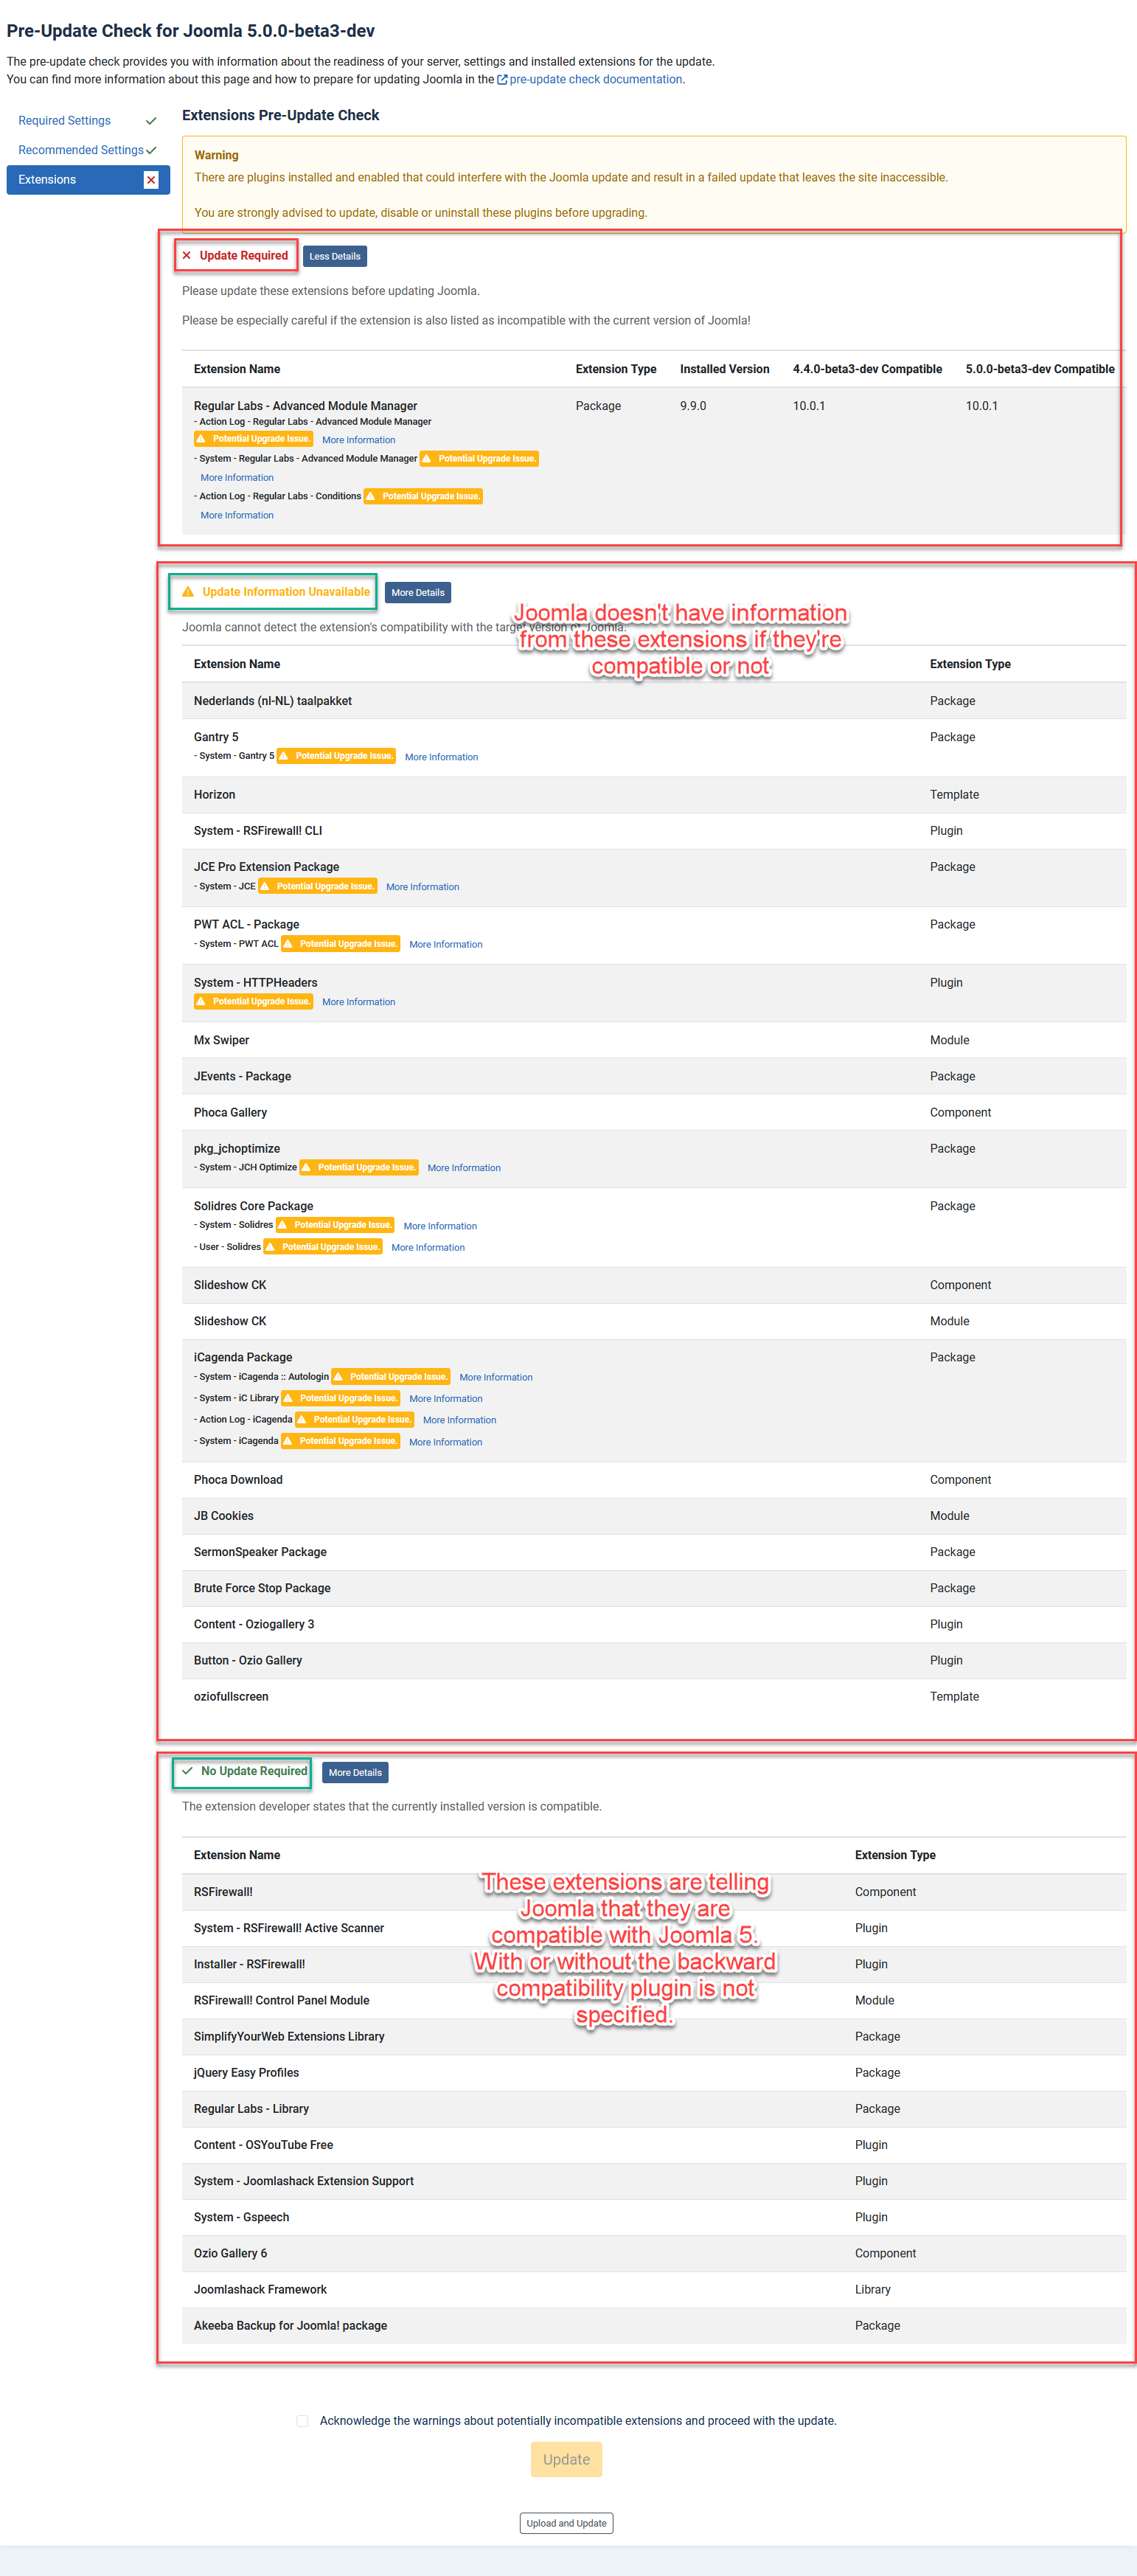
It is recommended to only use the Extensions portion of the pre-update check component as an extremely high level overview, but not the 100% source of truth. To say it another way, you may not be able to trust the pre-update check component depending on the extensions you are using.
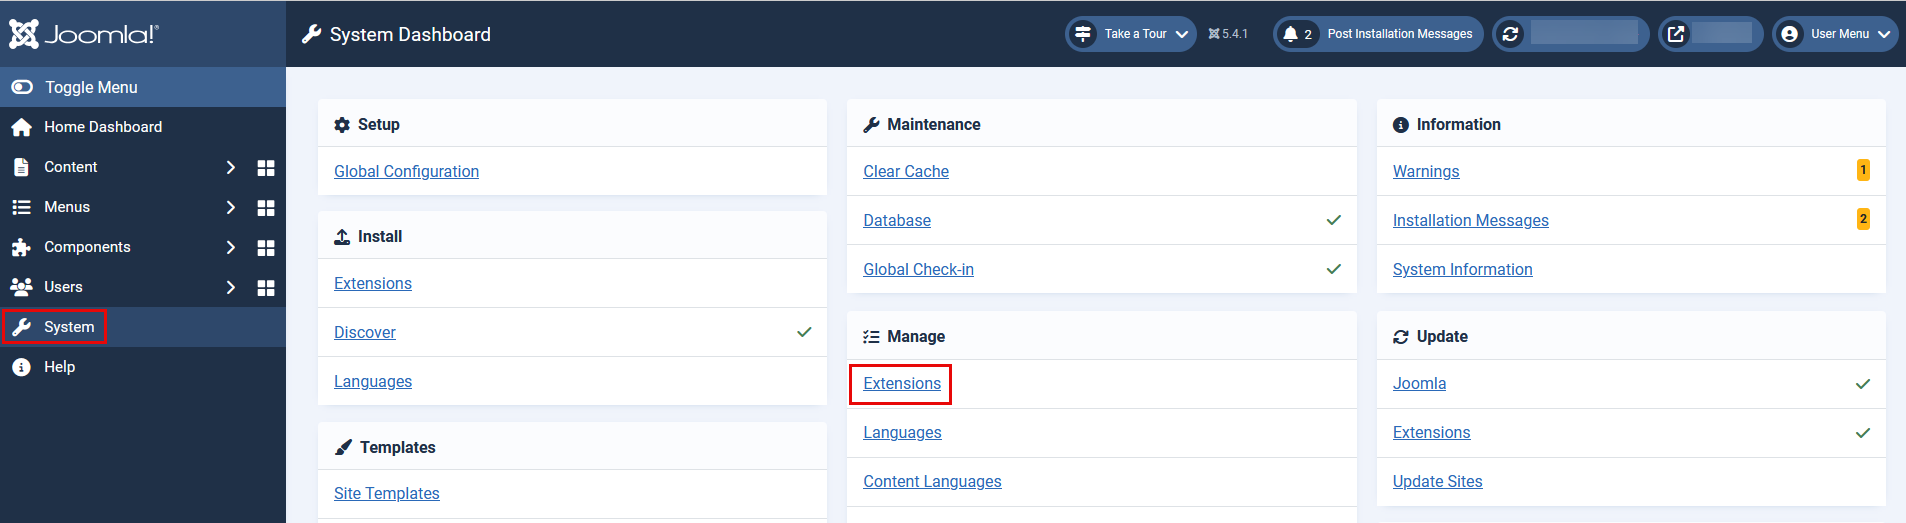
What is the source of truth then? Systems -> Manage Extensions
From the Extensions: Manage screen, you will be able to see all of the third-party extensions you are using on the site. In the screenshot below you see the main screen. In the Author column, you can see a popular extension developer’s name in a number of rows. You can also see the Author of the Joomla Project in a number of rows.
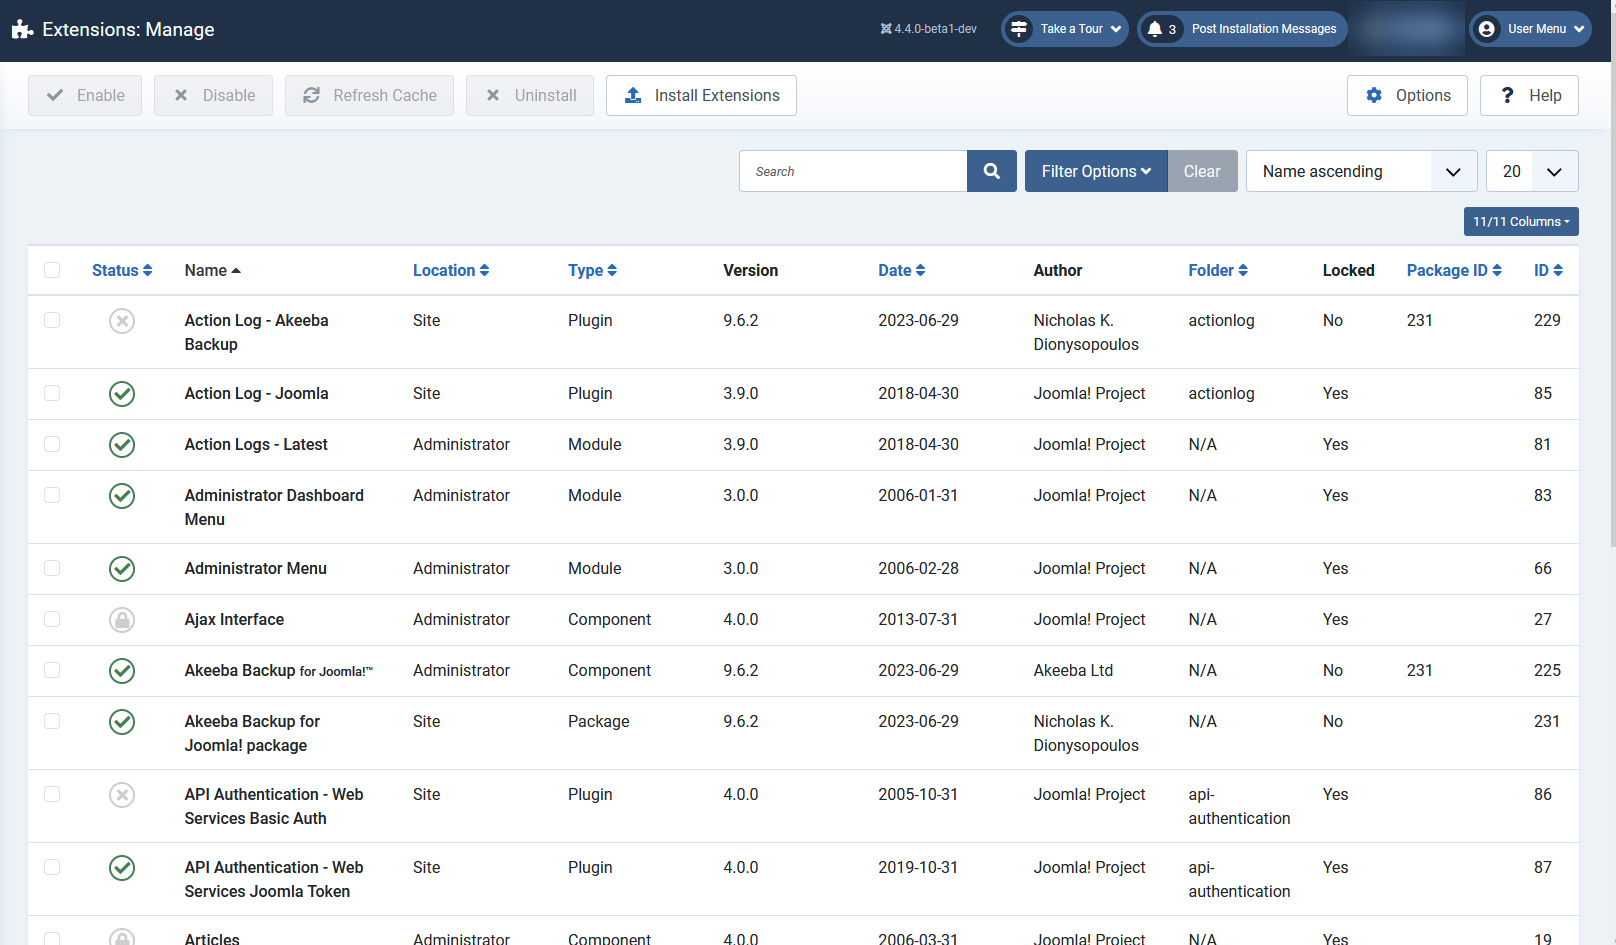
Check your third party extensions. You’ll next be determining if they are compatible with J5 (with or without the backward compatibility plugin) or not. If they’re not, the upgrade will be unsuccessful.
Three ways to check your third-party extensions for J5 compatibility
- Check the developer website.
- Take a backup/copy of your J4 site, restore it on a subdomain, turn on debug, follow the step by step (below) to upgrade to J5. See if anything breaks. If it does break, disable each extension that throws an error making note of the extension. You’ll need to contact the developer about it since it isn’t compatible with J5.
- Install a clean J5 package on a subdomain, enable the Behaviour - Backward Compatibility Plugin, install all the extensions you use and see if they work.
NOTE: The Joomla! Extensions Directory JED will display Joomla 5 compatible badges for extensions that are compatible with or without the use of the backward compatibility plugin.
You could do a combination of the above. Start with a clean install and test out your extensions. When you know which ones do or don’t work, you can work with the developers to see where they’re at with their development for J5. THEN, once all your extensions work in a clean site, you’ll know you can test a full upgrade from J4.4.x to 5.x.
You may want to determine if an extension works without the backward compatibility plugin enabled. If that’s the case, you’ll want access to the database. Plan for it. Make sure you have access to the database.
After installing J5, the backward compatibility plugin will be enabled. You must disable it. Go to 'Plugins', filter by the 'Behaviour' type and disable 'Behaviour - Backward Compatibility'. Install each extension one at a time. If it kills your site, enable the backward compatibility plugin via the database.
The Backward Compatibility Plugin can be found in the database in the _extensions table. It’s called plg_behaviour_compat. Set the Enabled field to 0 to disable the plugin. 1 to enable the plugin. By enabling the backward compatibility plugin again, you may gain access to the backend of Joomla again (as long as the extension works with the backward compatibility plugin).
OR
You can disable the extension in the database so that you can continue testing your other extensions to see if they will function without the compatibility plugin enabled. These entries will be in the #_extensions table. You’ll change the Enabled field to 0 to disable the extension.
In some cases, when you install an extension in J5 that isn’t compatible with or without the backward compatibility plugin enabled, you will need to find the entries in the database for that extension (there may be a few or many of them) and disable them until you can regain access to the backend. These entries will be in the #_extensions table. You’ll change the Enabled field to 0 to disable the extension. Once you can access the backend of Joomla again, you can uninstall it properly from System -> Manage -> Extensions and inquire with the developer.
Cassiopeia, Recaptcha, Weblinks, Schema.org, and Search (com_search not Smart Search)
Cassiopeia
Cassiopeia will remain the frontend template for Joomla 5. Your customisations should be fine, still, we recommend testing on a dev site to make sure. Bootstrap will be upgraded to Bootstrap 5.3 in Joomla 4.4.0. If there are Bootstrap discrepancies in your template, they will already be visible in 4.4.0. Thus, most, if not all issues would be found prior to upgrading to J5.
Google reCAPTCHA
If you are using Google reCAPTCHA in J4, you should replace it with Invisible reCAPTCHA prior to upgrading to Joomla 5 (or a third-party solution). J5 will not include Google Recaptcha any longer. The Recaptcha plugin will be uninstalled upon upgrade to J5. The Invisible reCAPTCHA plugin still exists if you’ve upgraded from 4.4.x. You can enable it and set it up with new keys so you can use Invisible reCAPTCHA instead. Or you may use another third-party solution. Fresh installations of Joomla 5.x do not include any reCAPTCHA plugins in the core. Fresh installations of Joomla 5.x will need to use a third-party plugin/solution.
com_weblinks
The Weblinks extension works in J5 without the backward compatibility plugin enabled in version 4.3.0+. 4.3.0 on Github. Weblinks on the JED.
Schema.org Plugin
With Joomla! 5 a new and more dynamic way of handling rich snippets (based on https://schema.org/) data was implemented. By default they are set up in a way that the information for search engines is the same as in Joomla 4, but to customize the output, please go to System => Manage => Plugins and search for the system plugin “System - Schema.org”. Edit the plugin to add your site information for a proper usage of the functionality. Read more about Rich Snippets in this magazine article.
com_search
com_search is not available in Joomla 5. Uninstall it before upgrading to Joomla 5. You will now use Smart Search (com_finder).
Trial run
As part of your planning, it’s recommended to test your upgrade on a subdomain or locally to determine it works perfectly. Make sure you keep track of any steps you need to take for your upgrade to take place perfectly.
Once you’ve tested your upgrade on a subdomain or localhost, and it works perfectly, you can take a backup of your production site and perform the upgrade to it. Step by step instructions are below.
Upgrade Step by Step
The site you will be upgrading must meet all the technical requirements and be running Joomla 4.4.x in order to upgrade. If your site is not yet running Joomla 4.4.x, update to 4.4.x prior to upgrading to J5.
- Follow all the instructions in the Planning section (above) prior to upgrading.
- Backup your website.
- Update any extensions that need to be updated.
- Disable or uninstall any extensions that are not compatible with J5.
- If you are using the old Search component (com_search) or any related modules, uninstall them prior to upgrading.
- If you are using Google reCAPTCHA, disable it and begin using Invisible reCAPTCHA instead.
- Turn Debug on (Global Configuration -> System tab -> Debug System setting to Yes).
- Backup your website again.
- Test your backup to make sure it restores. (Yes, do this. You’ll feel better.)
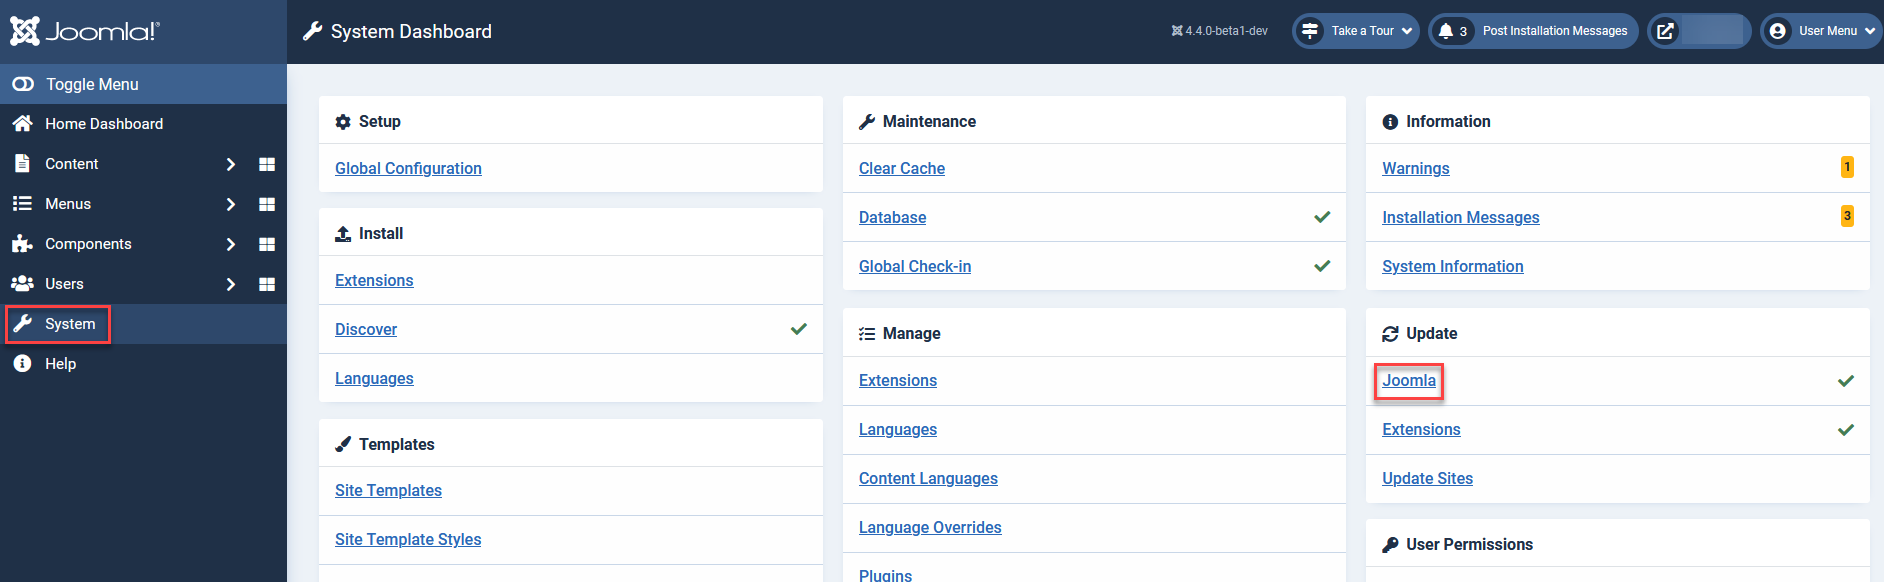
- Go to System -> Update -> Joomla
- Click on Options in the Top Toolbar on the right hand side.

- Change the Update Channel to Joomla Next.

- Click Save & Close from the Top Toolbar.
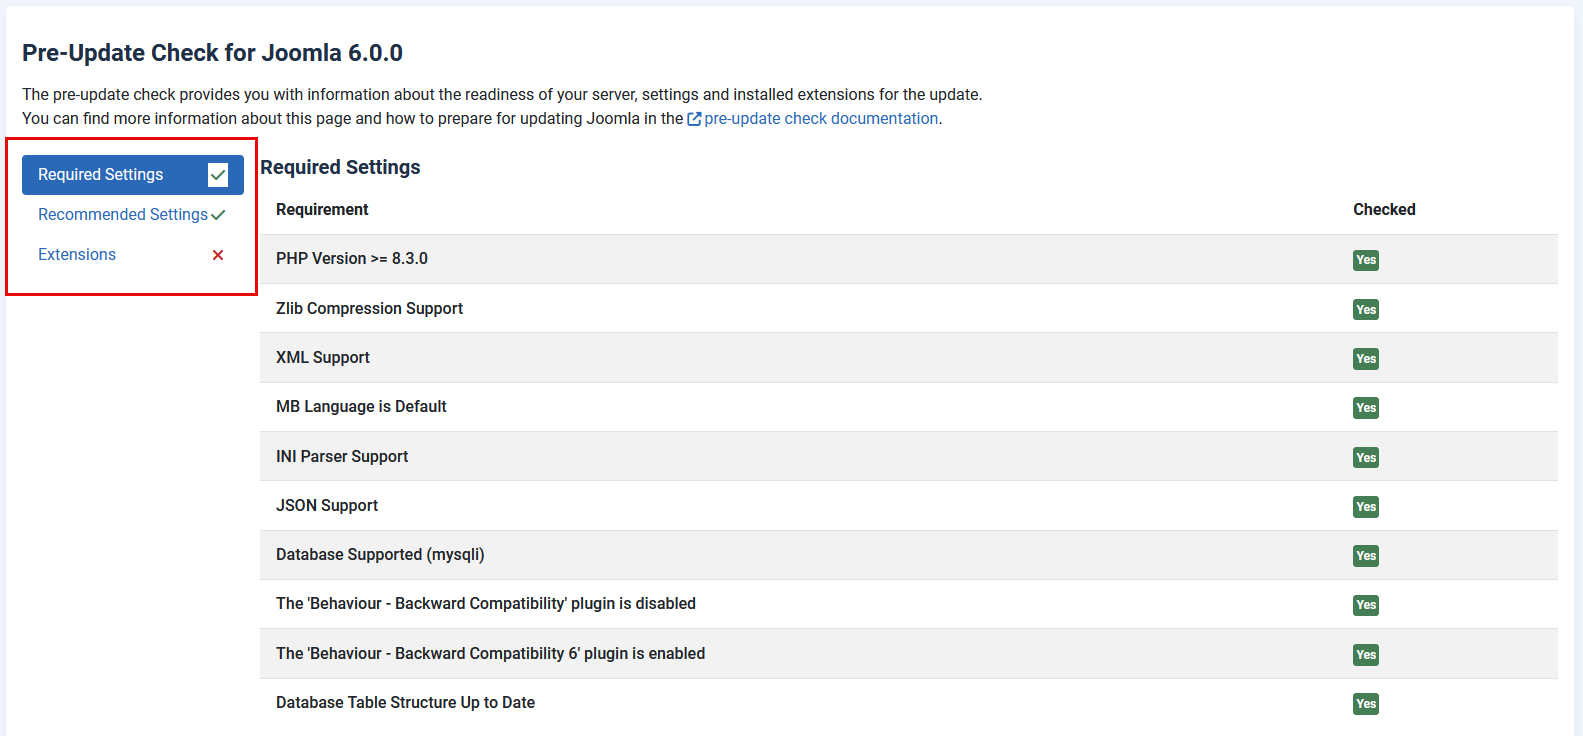
- If your server meets the technical specifications, you will see the following screen with links on the left sidebar for Required Settings, Recommended Settings, and Extensions.

- Chances are good that your Required Settings and Recommended Settings will be fine since this screen will not display if your environment doesn’t meet the technical requirements. Extensions may not be fine. See the section in Planning (above) about the Pre-update check and why it may not have a green checkmark but still have all compatible extensions. You’ve already done your testing (correct?), so you already know if they’re compatible or not.
- The Backward Compatibility plugin will be enabled during the upgrade from Joomla 4.4.x to 5.x.
- If you haven’t followed the instructions in Planning (above) for the Trial run, stop now and go back to the Planning section and follow the instructions. Planning is the most important part of this upgrade.
- Once you are sure that all of your extensions are compatible with J5 and you have tested the upgrade and the result was perfect, you may tick the button to Acknowledge the warnings about potentially incompatible extensions and proceed with the update, click OK in the popup box, then click the Update button.
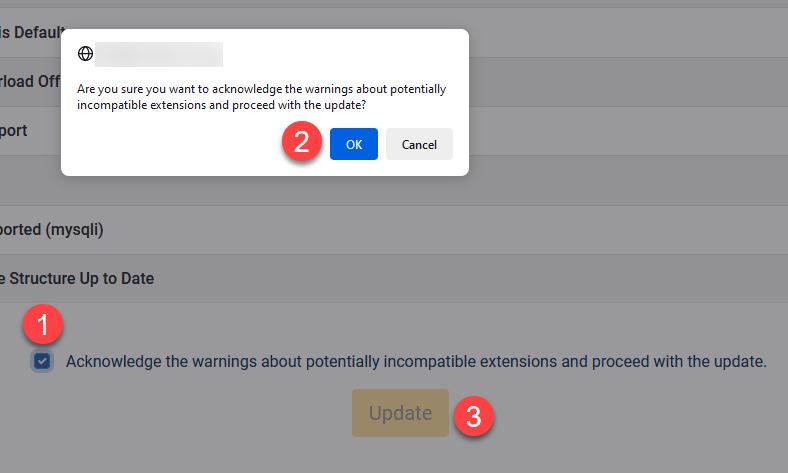
- Then, your site will ask you again to confirm you’ve taken a backup (which you have and you tested it restores).

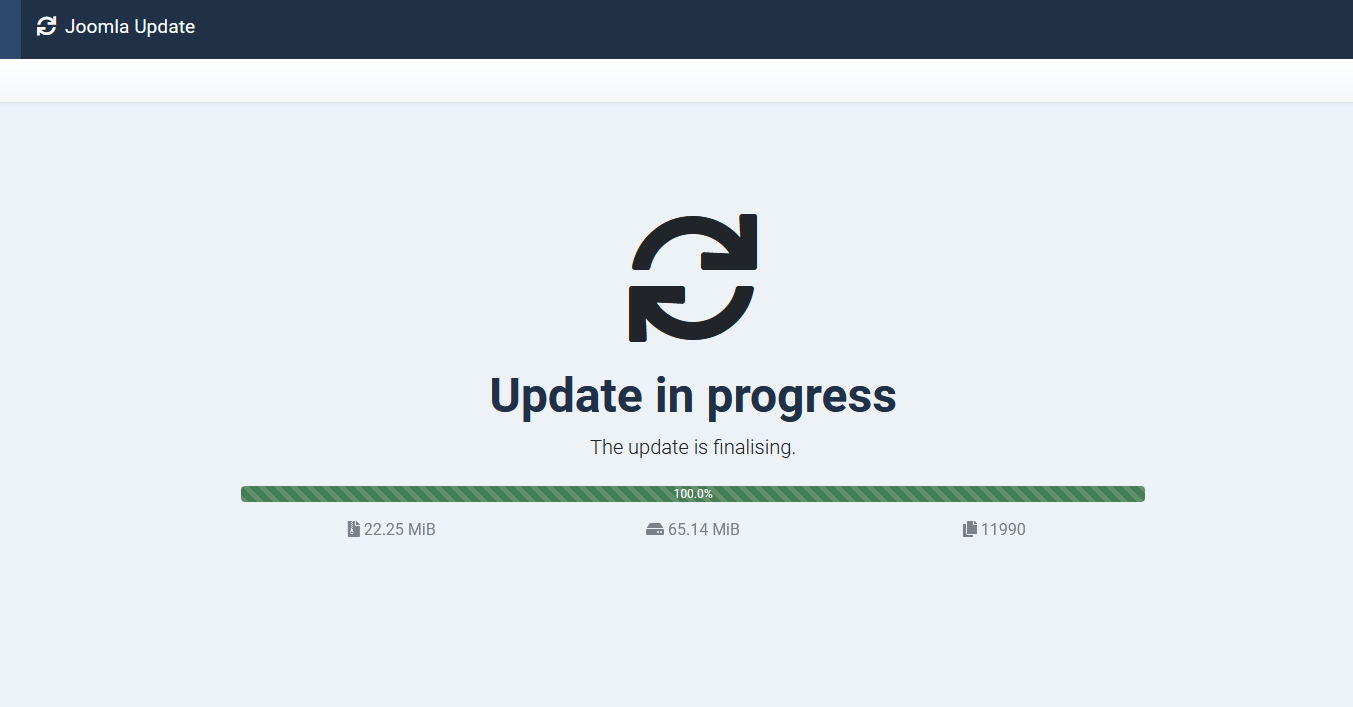
- Your site will perform the upgrade to J5.
- A successful upgrade will show you a screen like this
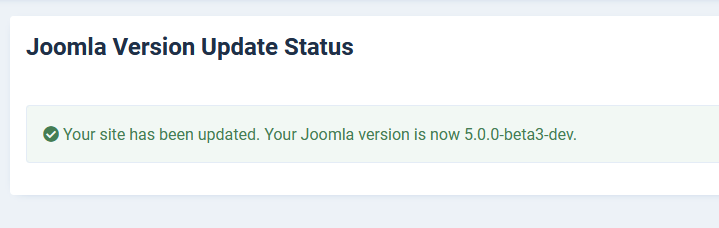
- You will see your site being Joomla 5 in the top right corner of the screen.
- Test the frontend of your site.
- Test the backend of your site.
- Turn off Debug in System -> Global Configuration -> Server tab.
- Fix up your new Smart Search if required.
- Set up your schema plugin like described in the planning area of this document.
- Enjoy a nice beverage and marvel at how wonderful you are.
What if it goes wrong?
If you tested everything beforehand, it shouldn’t. But it’s possible something in the environment changed or some code in an extension changed between the time of your testing and your upgrade.
Because you enabled Debug before you started, you should be able to see the extension that causes the issue and disable it (this may need to happen from the database if you can no longer access the backend to disable it). That way your site will be up and running whilst you figure out what went wrong, and fix it.
Worst case, restore your backup so you have time to address what happened in a test environment.
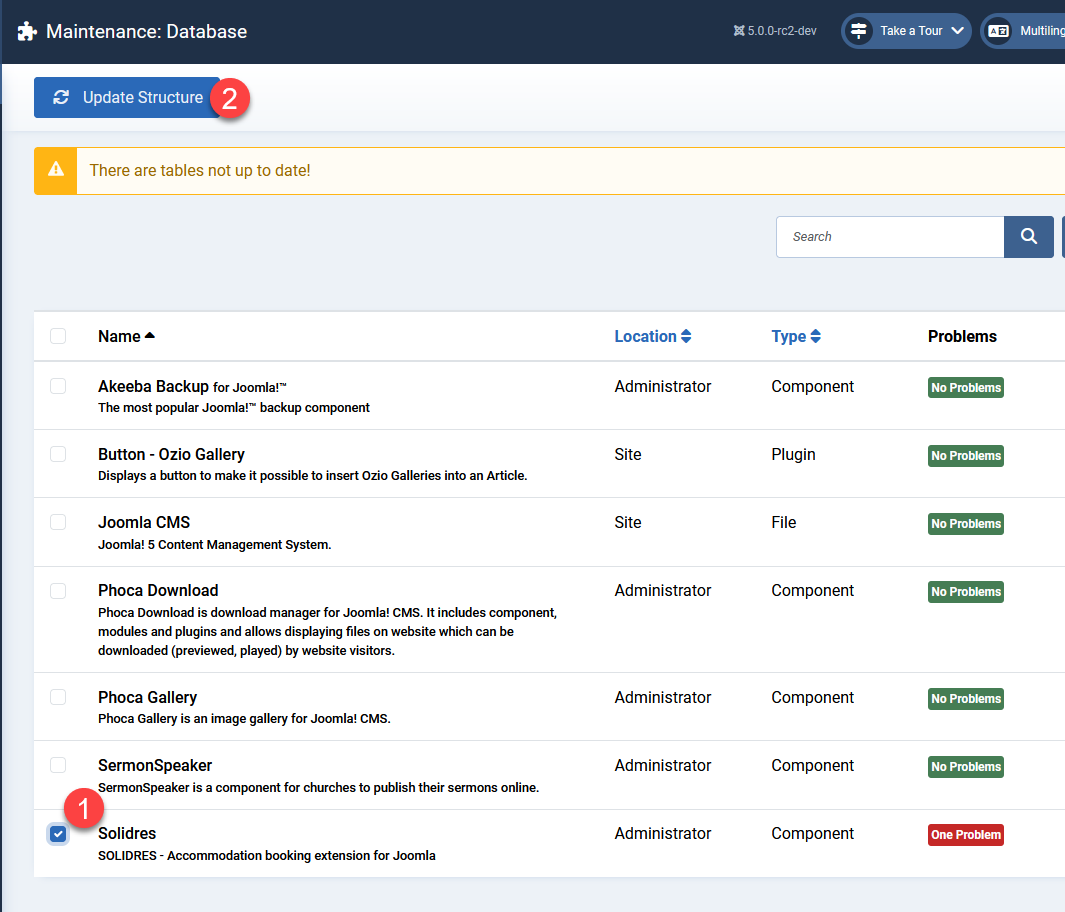
Database Fix might resolve some of your issues. Navigate to the System Dashboard and click on Database.

In the Maintenance: Database page, it will show any database structure issues your site may have. Tick the appropriate checkbox and then click the Update Structure button in the Top Toolbar.
Other places to get help
Joomla Forum: Migration & Upgrade Board 5.x
Joomla 5 to 6 Planning and Upgrade Step by Step
Introduction
Good news for Joomla 5.4.x to 6.x, it’s an upgrade, not a migration. Why? Two main reasons:
- Joomla 5 (J5) extensions that have removed all deprecations of code, are using up-to date Joomla code, and do not require the Behaviour - Backward Compatibility plugin to be enabled, will work in Joomla 6 (J6)
- Most others will work with the new Behaviour - Backward Compatibility 6 plugin enabled
This documentation reflects the simpler process by combining the planning and step by step in one document. Still, you will need some skills. Please see the Self Assessment to determine if you should or shouldn’t tackle the upgrade yourself.
Helpful links for third-party extension developers
https://manual.joomla.org/migrations/54-60/removed-backward-incompatibility
https://manual.joomla.org/migrations/54-60/new-deprecations
https://manual.joomla.org/migrations
https://manual.joomla.org/migrations/54-60/new-features/
Planning 5.4.x to 6.x
Hosting/Technical specification
1. Determine if your hosting environment meets the requirements. You will not be able to upgrade to Joomla 6 if your server environment does not meet the minimum technical requirements. The option to upgrade will not appear in the Joomla Update component.
- PHP 8.3
- MySQL 8.0.13
- MariaDB 10.6.x
- PostgreSQL 14.0
You can check your system information in Joomla 5 site by clicking System -> System Information. Contact your hosting provider if your server doesn’t meet the requirements.

The following is an example of an environment that meets the technical requirements. It shows MySQL 8.0.43, PHP 8.3, Joomla 5.4.x, and the Backward Compatibility Plugin Disabled.

2. Check all of your extensions for compatibility with Joomla 6 There are a number of third-party extension scenarios for this upgrade.
- The extension may be compatible with J5 and J6 WITHOUT the use of the backward compatibility plugin.
- The extension may be compatible with J5 and J6 WITH the use of the backward compatibility plugin.
- The extension may appear to work in J6, but when you try to use it, it’s broken.
- The extension may break the entire site.
Don’t worry! It’s not as bad as it sounds! First, let’s talk about the backward compatibility plugins.
The Backward Compatibility Plugins
The Behaviour - Backward Compatibility 6 plugin included with Joomla 5.4.x is to enhance backward compatibility between Joomla 5 and Joomla 6. The plugin assists third-party extensions to use classes no longer included in Joomla 6. It is implemented as a "Behaviour" plugin type to guarantee that it is loaded before any other plugin is loaded.
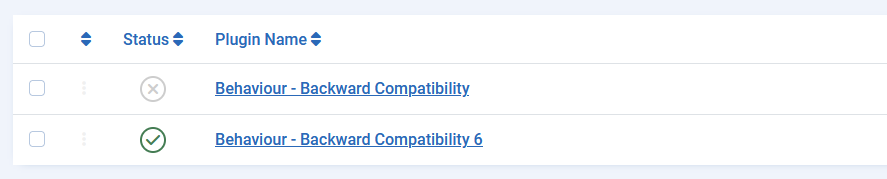
The image above shows two Backward Compatibility plugins:
- Behaviour - Backward Compatibility and
- Behaviour - Backward Compatibility 6
The Behaviour - Backward Compatibility plugin (without a number in the Plugin Name) is provided with Joomla 4.4.x to create a backward compatibility layer for Joomla 5 extensions. This plugin must be disabled before upgrading to J6.
The Behaviour - Backward Compatibility 6 plugin is provided with Joomla 5.4.x to create a backward compatibility layer for Joomla 6 extensions.
They cannot both be enabled whilst upgrading to J6.
Before upgrading from Joomla 5 to Joomla 6, the Behaviour - Backward Compatibility plugin (without a number in the Plugin Name) must be disabled. You need to make sure that all of your third-party extensions can run on your website without having the Behaviour - Backward Compatibility plugin enabled before you can upgrade to J6.
After determining that every single one of your third-party extensions are compliant and fully functional in J5 without the Behaviour - Backward Compatibility plugin enabled, you can disable it. That said, we recommend using caution. Before you disable the backward compatibility plugin, doing one of the following two things is suggested:
- Do it on a dev/test site. That way, if you accidentally missed one extension that makes your backend inaccessible, it doesn’t take your production site down.
- Make sure you have access to the database. That way, you can enable the plugin again quickly via the database if needed. More about this below.
When performing an upgrade to J5.4.x, the Behaviour - Backward Compatibility 6 plugin will be enabled automatically. In new installations of J6, the backward compatibility plugin will be disabled by default.
The Behaviour - Backward Compatibility 6 plugin that supports extensions that work in J5 will be in place through J6. In J7, the J5 extensions will not be made backward compatible with the plugin. This gives extension developers two additional years to make their extensions compatible with J6 without the backward compatibility plugin. The intention is that with every life cycle release, a backward compatibility plugin will support the life cycle before it until the life cycle after it.
Can you ever disable the Behaviour - Backward Compatibility 6 plugin in J6? Great question. After determining that every single one of your third-party extensions are compliant and fully functional without the backward compatibility plugin enabled, you can disable the Behaviour - Backward Compatibility 6 plugin. That said, we recommend using caution. Before you disable the Behaviour - Backward Compatibility 6 plugin, doing one of the following two things is suggested:
- Do it on a dev/test site. That way, if you accidentally missed one extension that makes your backend inaccessible, it doesn’t take your production site down.
- Make sure you have access to the database. That way, you can enable the plugin again quickly if needed. More about this below.
Pre-update check vs. System -> Manage Extensions
Theoretically, the pre-update check would tell you if your third-party extensions are compatible with J6. However, the pre-update check is only helpful if all extension developers have made their extension reflect compatibility with their extensions. In a perfect world, the Extensions portion of the pre-update check would tell you if an extension either:
- Can be upgraded without the backward compatibility plugin enabled
- Can be upgraded with the backward compatibility plugin enabled
- If an update to the extension is required before upgrading from J5 to J6
- If an extension is incompatible completely
Testing has shown discrepancies between extensions that are compatible and are not compatible. This isn’t an issue with the pre-update check component. Rather, extension developers send information through their extensions which would populate the pre-update check correctly. If their extensions aren’t coded to tell the pre-update check the correct information, there’s very little (nothing) the pre-update check, nor the Joomla! Project can do about it. A good source of information would be the third-party extension developer’s website to verify how the specific extension should be handled during the upgrade from J5 to J6.
The image further down this section shows an example of the pre-update check component in Joomla 5.4.x of the Extensions section.
The top section will show the extensions that require an update. Please go to System -> Update -> Extensions and update your extensions. The middle section shows extensions that update information is unavailable from the extension developer. You will not know if these are compatible or not without testing them or contacting the developer.
The bottom section shows the extensions that have no update required. This means that the extensions are telling Joomla that they are compatible with Joomla 6. It is not specified if they require the backward compatibility plugin or not.
Please note that these extensions are not preferred by the Joomla Project. These extensions are shown as an example only. They were randomly picked from the JED as a test.
It is recommended to only use the Extensions portion of the pre-update check component as an extremely high level overview, but not the 100% source of truth. To say it another way, you may not be able to trust the pre-update check component depending on the extensions you are using.
What is the source of truth then? Systems -> Manage Extensions
From the Extensions: Manage screen, you will be able to see all of the third-party extensions you are using on the site. In the screenshot below you see the main screen. In the Author column, you can see a popular extension developer’s name in a number of rows. You can also see the Author of the Joomla Project in a number of rows.

Check your third party extensions. Next, you will need to determine if they are compatible with J6 (with or without the backward compatibility plugin) or not. If they’re not, the upgrade will be unsuccessful.
Three ways to check your third-party extensions for J6 compatibility
- Check the developer website.
- Take a backup/copy of your J5 site, restore it on a subdomain, turn on debug, follow the step by step (below) to upgrade to J6. See if anything breaks. If it does break, disable each extension that throws an error making note of the extension. You’ll need to contact the developer about it since it isn’t compatible with J6.
- Install a clean J6 package on a subdomain, enable the Behaviour - Backward Compatibility Plugin, install all the extensions you use and see if they work.
NOTE: The Joomla! Extensions Directory JED will display Joomla 6 compatible badges for extensions that are compatible with or without the use of the backward compatibility plugin.
You could do a combination of the above. Start with a clean install and test out your extensions. When you know which ones do or don’t work, you can work with the developers to see where they’re at with their development for J6. THEN, once all your extensions work in a clean site, you’ll know you can test a full upgrade from J5.4.x to 6.x.
You may want to determine if an extension works without the backward compatibility plugin enabled. If that’s the case, you’ll want access to the database. Plan for it. Make sure you have access to the database.
After installing a fresh installation of J6, the backward compatibility plugin will be disabled. Install each extension one at a time. If it kills your site, enable the backward compatibility plugin via the database.
The Backward Compatibility Plugin can be found in the database in the #__extensions table. It’s called plg_behaviour_compat6. Set the Enabled field to 0 to disable the plugin. 1 to enable the plugin. By enabling the backward compatibility plugin again, you may gain access to the backend of Joomla again (as long as the extension works with the backward compatibility plugin).
OR
You can disable individual extensions in the database so that you can continue testing your other extensions to see if they will function without the compatibility plugin enabled. These entries will be in the #__extensions table. Change the Enabled field to 0 to disable the extension.
In some cases, when you install an extension in J6 that isn’t compatible with or without the backward compatibility plugin enabled, you will need to find the entries in the database for that extension (there may be a few or many of them) and disable them until you can regain access to the backend. These entries will be in the #__extensions table. You’ll change the Enabled field to 0 to disable the extension. Once you can access the backend of Joomla again, you can uninstall it properly from System -> Manage -> Extensions. Then inquire with the developer.
Cassiopeia and Weblinks
Cassiopeia
Cassiopeia will remain the frontend template for Joomla 6. Your customisations should be fine, still, we recommend testing on a dev site to make sure.
com_weblinks
The Weblinks extension works in J6 without the backward compatibility plugin enabled in version 5.4.0+. Weblinks Evolved in the JCM. Weblinks on the JED.
Trial Run
As part of your planning, it’s recommended to test your upgrade on a subdomain or locally to determine it works perfectly. Make sure you keep track of any steps you need to take for your upgrade to take place perfectly.
Once you’ve tested your upgrade on a subdomain or localhost, and it works perfectly, you can take a backup of your production site and perform the upgrade to it. Step by step instructions are below.
Upgrade Step by Step
The site you will be upgrading must meet all the technical requirements and be running Joomla 5.4.x in order to upgrade. If your site is not yet running Joomla 5.4.x, update to 5.4.x prior to upgrading to J6.
- Follow all the instructions in the Planning section (above) prior to upgrading.
- Backup your website.
- Update any extensions that need to be updated.
- Disable or uninstall any extensions that are not compatible with J6.
- Turn Debug on (Global Configuration -> System tab -> Debug System setting to Yes).
- Backup your website again.
- Test your backup to make sure it restores. (Yes, do this. You’ll feel better.)
- Go to System -> Update -> Joomla
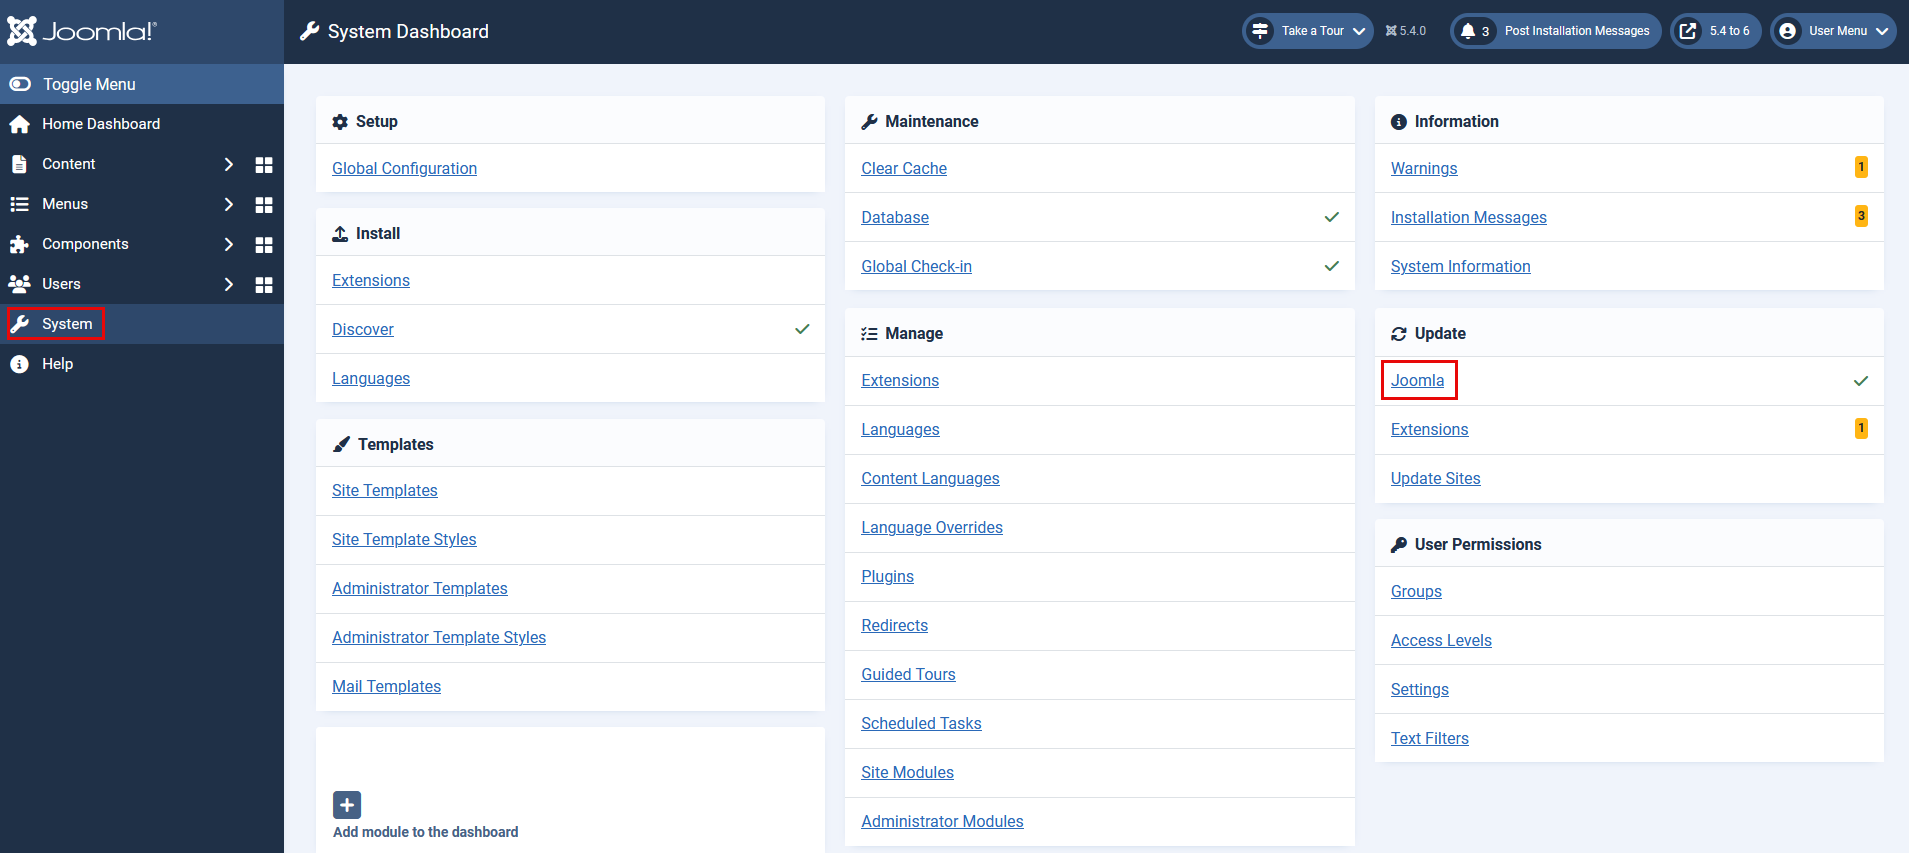
- Click on the Options button in the Top Toolbar on the right hand side.
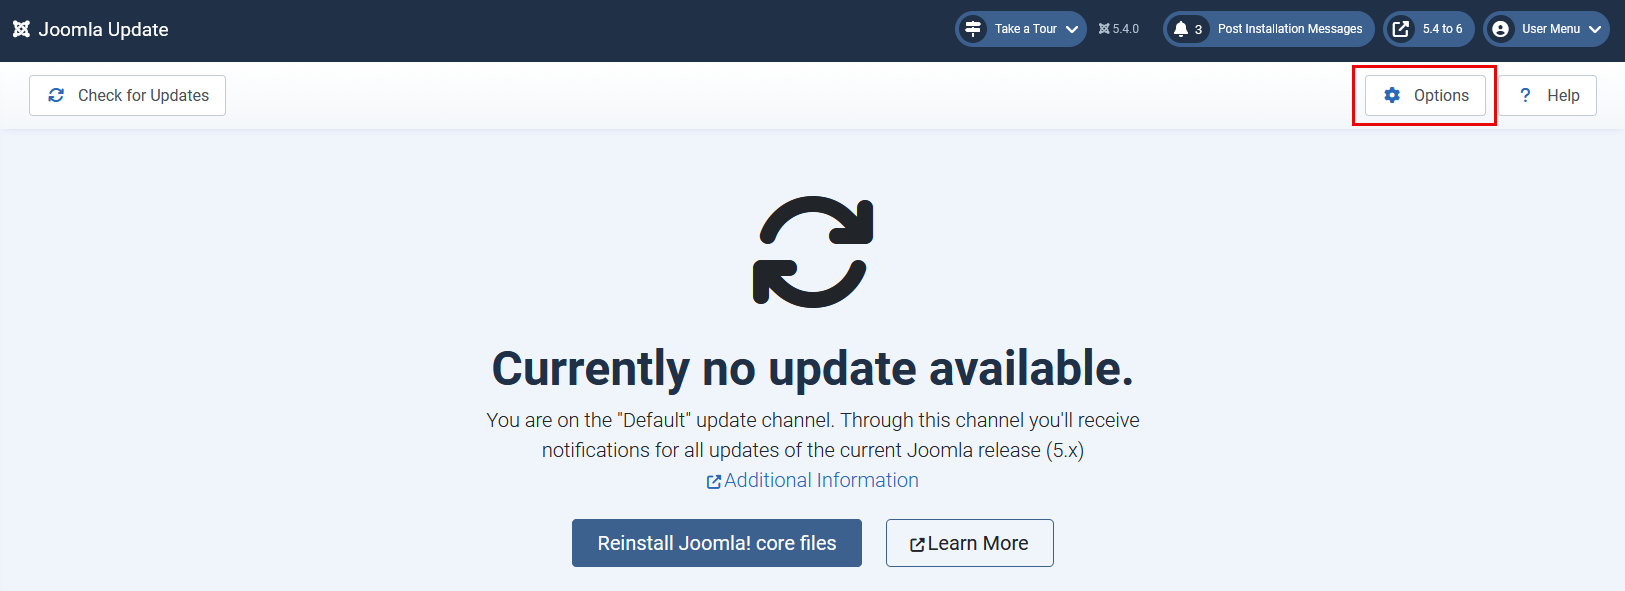
- Change the Update Channel to Joomla Next.

- Click Save & Close from the Top Toolbar.
- If your server meets the technical specifications, you will see the following screen with links on the left sidebar for Required Settings, Recommended Settings, and Extensions.
- Chances are good that your Required Settings and Recommended Settings will be fine since this screen will not display if your environment doesn’t meet the technical requirements. Extensions may not be fine. See the section in Planning (above) about the Pre-update check and why it may not have a green checkmark but still have all compatible extensions. You’ve already done your testing (correct?), so you already know if they’re compatible or not.
- The Backward Compatibility 6 plugin is enabled in Joomla 5.4.x. In order to upgrade to J6, the Behaviour - Backward Compatibility plugin needs to be disabled.
- If you haven’t followed the instructions in Planning (above) for the Trial run, stop now and go back to the Planning section and follow the instructions. Planning is the most important part of this upgrade.
- Once you are sure that all of your extensions are compatible with J6 and you have tested the upgrade and the result was perfect, you may tick the button to Acknowledge the warnings about potentially incompatible extensions and proceed with the update, click OK in the popup box, then click the Update button.
- Then, your site will ask you again to confirm you’ve taken a backup (which you have and you tested it does restore).

- Your site will perform the upgrade to J6.

- A successful upgrade will show you a screen like this:
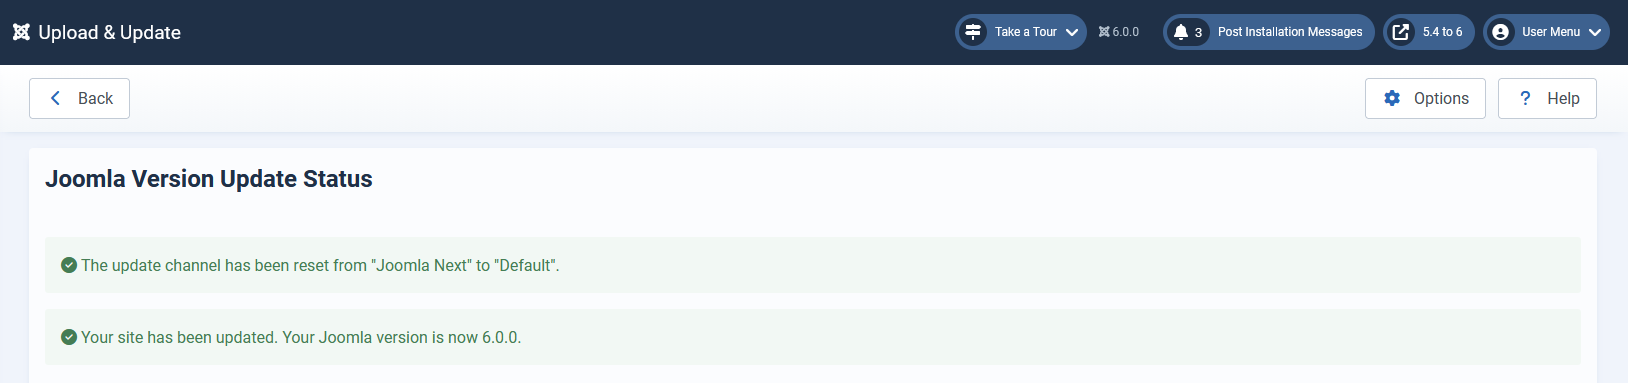
- You will see your site being Joomla 6 in the top right corner of the screen.
- Test the frontend of your site.
- Test the backend of your site.
- Turn off Debug in System -> Global Configuration -> Server tab.
- Fix up your new Smart Search if required.
- Enjoy a nice beverage and marvel at how wonderful you are.
What if it goes wrong?
If you tested everything beforehand, it shouldn’t. But it’s possible something in the environment changed or some code in an extension changed between the time of your testing and your upgrade.
Because you enabled Debug before you started, you should be able to see the extension that causes the issue and disable it (this may need to happen from the database if you can no longer access the backend to disable it). That way your site will be up and running whilst you figure out what went wrong, and fix it.
Worst case, restore your backup so you have time to address what happened in a test environment.
Database Fix might resolve some of your issues. Navigate to the System Dashboard and click on Database.
In the Maintenance: Database page, it will show any database structure issues your site may have. Tick the appropriate checkbox and then click the Update Structure button in the Top Toolbar.