 User Documentation
 System
Backup
Accidents Happen!
A lot of time, effort and money go into the creation and maintenance of a website. Pity to lose it all through a freak accident. Backup is easy for average sites. Large or specialist sites probably need specialist advice.
Backup Strategy
Joomla! websites consist of two parts:
- The files located in the Joomla root directory tree. In between updates the files may not change much as they are mostly code related. New images and documents may be added and perhaps template overrides.
- The database located somwhere else on the host server. The database contains most of the site content and may change a lot as users add or edit content.
Every site owner needs a strategy for site recovery in the event of a disaster. Common advice in the Forums is to restore the last backup. So decide what to back up and how often to do it.
Hosting services often take snapshots of customer sites and may be able to restore a site to its condition yesterday, last week or last month. But that might cover everything in the account, such as mail and other software packages. Do not rely on that for Joomla site recovery.
This article describes some common free methods to backup Joomla websites. You could choose to pay for backup tools and/or services but that is not covered here.
Akeeba Backup
If you use the Administrator menu to navigate to System / Install Extensions / Install From Web the first item in the list is Akeeba Backup. It is first in the list because it has the largest number of positive reviews. Needless to say that it has a very long history and an impeccable reputation. There is a free version and a paid for verion with some extra features. That is a common business model for Extension developers. Do not be wary! The free version is easy to use, has no distractions and suffices for most sites. What it does:
- Akeeba Backup analyses your installation to determine the optimum settings to create a backup file.
- It makes a composite backup file containing all the website files and the database content.
- It stores time-stamped backups to manage, download or delete as appropriate.
- The download is a .jpa file. It recommends use of FTP to do the download.
- There is a separate Akeeba Kickstart application to unpack the .jpa file. This is all described in the Akeeba Manage Backups page.
- After unpacking, the site is installed with an Akeeba installer in a sequence similar to a Joomla install.
- The installer changes the configuration for restoring to a different location and prompts for the new database details.
The only problem that is likely to occur is that the backup file may be very large and you may exceed your file space quota if you allow backups to accumulate.
Try it! It costs nothing and takes minutes rather than hours.
Host Tools
Most hosting services provide backup tools. Example:
cPanel
On the Tools page, the Files item has a Backup link. Tha Backup page has three options:
- Full Backup: A full backup creates an archive of all of your website’s files and configuration. You can use this file to move your account to another server or to keep a local copy of your files.
- Partial Backup
- Download a Home Directory Backup
- Download a Database Backup (with a list of dtabases)
There are also options to Restore each of these backup types. Options to produce automatic backups may be available too.
Individual folders can be compressed in various formats suitable for download using the cPanel File Manager. A database can be exported using phpMyAdmin. Neither of these methods is covered here.
Local Tools
There are occasions when you may need to backup a site locally on a laptop or office desktop computer. For example, you may want to copy a site to/from a hosting service to/from your local computer. If you have a local Joomla installation you can use Akeeba Backup as described above. Otherwise, you can backup the database and Joomla files separately.
mysqldump
If you are using MySQL you are likely to have the mysqldump command line tool available. Try this command:
/usr/local/mysql/bin/mysqldump -u root -p dbname > ~/tmp/dbname-dump.sql
where root is a user who has access to the database and dbname is the name of the database you wish to export. You may be prompted to enter the password.
You could pipe the output to a zip or gzip command too:
/usr/local/mysql/bin/mysqldump -u root -p dbname | gzip > ~/tmp/dbname-dump.sql.gz
phpMySQL
To do the same job with your local installation of phpMyAdmin, open it and select the database you wish to export. Select the Export button at the top of the screen. By default, the Quick export uses SQL as the output format. Select the Export button to try that. You will be prompted to nominate an output file.
If you select the Custom option allows you to select an Output Compression optione, either none, zipped or gzipped. Try a compressed export and select the Export button.
You need to check the exported database. Create a new database, perhaps animporttest so that it is near the top of your list of databases. With the new empty database selected use th Import button at the top of the screen. In the import form Browse to find the file you exported and then select the Import button.
It was worth the check. The gzip export only exported three tables. The zip export worked fine. That was evident in the sizes of the exported file. The zip file was 4Mb but the gzip was only 75Kb. Must be a bug somewhere!
Zip and Gzip
These command line tools are fairly ubiquitous and are often used from within graphical interfaces. For example, in the Finder on Mac I can select a directory containing a Joomla site, right click and select Compress. It takes a few seconds to make a zip archive and does not affect the original.
Restoring a Backup
Common advice from the Joomla Forums:
- Do not restore a backup on top of a faulty site.
- Empty your database by deleting all tables or create a new database and assign a database user for it.
- Delete all directories and files within your Joomla root directory.
Akeeba Quickstart
If you have used Akeeba Backup then use Akeeba Quickstart to restore your backup.
- Consult the Video Tutorial.
- Download Akeeba Quickstart (PDF 94Kb) free of charge.
- Check that the restored site works properly!
Akeeba Quickstart restores both the database and Joomla files. Other methods restore the database and Joomla files separately.
Restore the Database
If you have a database backup it is best to use system tools to restore it. phpMyAdmin can install moderately sized databases but it might run out of time or memory on large databases.
If you are using cPanel on a hosting service you can import a database from the Backup / Restore page. That is not described here.
If you have command line access, either on a hosting service or on you local laptop or desktop computer, you can use the mysql command line to do the import. Upload the database archive to a temporary location outside your web tree and expand it so you have a filename ending in .sql. Then use the following command:
mysql -u dbusername -p -D dbname < db_dump_file.sql
Replace dbusername, dbname and db_dumo_file.sql with the reak values for your site. You may be prompted for a database username password. It may take a whhile but it should go to completion.
Restore the Files
This is a simple matter of expanding the compressed file from your last backup. Except that it is sometimes not so simple. Depending on your operating system and chosen method, the archived directories and files might all appear in the current directory or a new directory or you may prompted to nominate a destination directory. Until you know what your system does it may be best to put the archive in an empty directory, expand it there and then move the containing directory to where it needs to be.
Some users prefer to use SFTP to upload files to a hosting service from the archive files extracted locally. There are thousands of files so this is quite time consuming.
In the root of your site there is a file named configuration.php. It contains the database name and access credentials. Make sure they are correct for your restored site. The file has access permissions set to 444. That needs to be changed to 644 so that you can save any editing needed.
All being well your restored site should work and be in the state it was in when the backup was taken.
Copying a Site
There are several good reasons to copy an entire website from one server to another. For example, the Forum experts often reccommend that users create a a local version of a site on a laptop or desktop computer for testing purposes such as trying out new extensions or designs. Sometimes an individual decides to move to a new hosting service for cost or performance reasons.
Whatever the reason, the process is relatively simple: take a backup in the original site and restore it on the destination site. There are some issues to watch out for:
- Make sure the destination host meets the minimum Joomla Technical Requirements. That usually means Server, PHP and Database versions
- After installation you may find some essential modules have not been enabled. Most hosting services will fix such problems on request.
Cache
For Administrators
As an administrator, Joomla provides you with the ability to cache parts of your site. You can choose to cache whole web pages or just parts of those pages. This guide explains how.
On a Joomla site web page there are 3 things which may be cached:
- The whole page itself – the Page cache
- The output from the Joomla component for that web page – known as the View cache
- The output from the modules shown on that page – known as the Module cache
You have a number of cache settings which allow you to control what gets cached:
- The system plugin "System – Page Cache"
- The Global Configuration, System tab, Cache Settings. Here the System Cache option may be set to
- OFF – Caching disabled
- ON – Conservative caching
- ON – Progressive caching
- Many modules within their options have an Advanced tab in which the Caching can be set to Use global or No caching
As described below, there are also rules for caching which are implemented within the Joomla code, and over which you have no control.
You can clear the cache through the Administrator → System → Clear Cache menu selection. In general, you can think of Joomla having 3 levels of cache, increasing in aggressiveness
- Conservative caching
- Progressive caching
- Page caching
In addition, Joomla developers can use caching facilities to store the result of database queries, for example, to increase the responsiveness of the site, but this is outside the scope of Administrator capabilities.
Page Caching
To switch this on, go to Administrator → Extensions → Plugins. Then find the System – Page Cache plugin, and enable it. This means that site pages will now be cached and whenever they're requested again, the cached page will be served, rather than it being generated by Joomla from the information in the database. The cached page will continue to be served until it's expired – as defined by the Cache Time parameter in the Administrator → Global Configuration → System tab → Cache Settings.
If you're reading this page as a tutorial and want to test the page caching, it's best to set the Global Configuration cache settings to:
- Cache Handler – File
- Path to Cache Folder – leave blank
- Cache Time – 15 (the default of 15 minutes)
- Platform Specific Caching - No
- System Cache – OFF – Caching disabled
To verify that page caching is working, go to a website page that displays an article. After you display that page you should find in the file system a cache/page directory with a file in it which has a filename like xxx-cache-page-yyy.php where xxx and yyy are long hash strings. Joomla has to store separate cache pages for separate URLs so the second string of hex digits is a hash of the URL of the site web page, to make the filename unique to that page.
Then use the Administrator functionality to change the text of that article, and redisplay the site web page. You should find the cached version, not your modified text.
Changing an article (or other Joomla item) does not clear the page cache for the web page(s) where that article is displayed. To clear the page cache go to Administrator → System → Clear Cache. Click on the checkbox next to the Cache Group called "page", and press the Delete button. When you redisplay your web page it should now show your amended text.
If your site has a function like a shopping basket, applying page caching will cause problems, as pages have to show what the customer has already selected, rather than displaying a cached page which is common to everyone. However, you can configure the System - Page Cache plugin to exclude caching specified Menu Items or specified URLs and URL ranges (in the Advanced tab), so that only truly static pages are cached.
Conservative Caching
With Conservative Caching you can cache the View output from components and the output from those Modules which allow caching. But note that this will work only on pages which are not cached using the Page Cache. For those pages the whole web page is cached, and Conservative Caching isn't even considered.
To switch on Conservative Caching:
- Go to Administrator → System → Global Configuration → System tab and within Cache Settings, set System Cache to ON – Conservative caching
- Go to Administrator → Extensions → Modules and select the modules which you'd like to be cached. If that module permits caching then under the Advanced tab you should be able to set Caching to
- Use Global – this module will be cached (with the Global option now having been set to Conservative caching)
- No caching – this module will not be cached.
(Note that the Cache Time in the Global Configuration is in minutes but the Cache Time in the Module settings is in seconds.)
To check it's working, go to your site, ensure that you are logged out, and navigate to a web page which displays an article. Check your file system and you should find a folder cache/com_content containing a cache file.
You'll also find other directories such as cache/com_languages (as displaying the page involves loading the current language, and this will be cached as well) and also directories relating to module cache, e.g. cache/com_modules. These result from the use of cache which developers have coded within the Joomla application.
If you edit and save that article then refresh the site page, you will find that the site displays the updated text this time. This is because whenever the edit is saved, Joomla clears the cache for that article.
However, you can demonstrate that the cache is working if you edit the cache file in the cache/com_content directory using a basic text editor. Using the editor, change one letter within the article text in the cache file and save the file. Then when you refresh the web page you should see the change that you made to the cache file.
How can you select which component views get cached, and under what circumstances? Alas, you can't do this. This is determined by the Joomla core component developers and coded in the component PHP code. The criteria are different for each component. However, you can easily discover what criteria are used because for each of the site components they are coded in the site DisplayController.php file. For example, at the time of this revision (Joomla version 5) for the Contacts component we find in components/com_contact/src/Controller/DisplayController.php
    public function display($cachable = false, $urlparams = [])
    {
        if ($this->app->getUserState('com_contact.contact.data') === null) {
            $cachable = true;
        }
This means that the views associated with contacts will be cachable unless there is session data keyed by com_contact.contact.data – which will be the case if in the user session the user has displayed a contact form (e.g. on a page pointed to by a menu item of type Contacts → Single Contact).
The equivalent file for articles components/com_content/src/Controller/DisplayController.php contains:
    public function display($cachable = false, $urlparams = false)
    {
        $cachable = true;

        /**
         * Set the default view name and format from the Request.
         * Note we are using a_id to avoid collisions with the router and the return page.
         * Frontend is a bit messier than the backend.
         */
        $id    = $this->input->getInt('a_id');
        $vName = $this->input->getCmd('view', 'categories');
        $this->input->set('view', $vName);

        $user = $this->app->getIdentity();

        if (
            $user->get('id')
            || ($this->input->getMethod() === 'POST'
            && (($vName === 'category' && $this->input->get('layout') !== 'blog') || $vName === 'archive'))
        ) {
            $cachable = false;
        }
The expression $user->get('id') is true if this is a logged-in user. This means that articles are never cached for logged-in users. The subsequent expressions relate to other conditions when the caching is not performed, even if the user is not logged in.
So in this way you can discover the circumstances under which caching is performed, but changing these is not advisable. You can also demonstrate that modules are being cached by using the Joomla Breadcrumbs module, ensuring it's displayed in some module position on the web page, setting its Caching option and manually editing the cached file in cache/mod_breadcrumbs.
Progressive Caching
Like Conservative Caching, Progressive Caching also caches the output from component views and from modules. The functional difference between the two is that with Progressive Caching for logged-off users all modules are always cached. In this case, setting the No Caching option for a module has no effect. If the caching storage option is set to File, you can find the modules cache file (the output from all modules is stored within the same file) within the cache/com_modules directory.
To switch on Progressive Caching, go to Administrator → System → Global Configuration → System tab and within Cache Settings set System Cache to ON – Progressive caching.
As regards the conditions for caching of Joomla core component views, there is no difference between conservative and progressive caching. Despite what you may read on some websites and responses to Stack Overflow questions, it is not the case that Conservative Caching relates to when the user is not logged on and Progressive Caching to when the user is logged on.
Summary
A summary of the caching types is below.
Whole Page Caching
- Configuration: Built-in Plugin (Administrator → Extensions → Plugin Manager → System - Page Cache)
- Caches: each whole page of your site
- Based on: URL
- More info:
- Optional browser caching: Also caches on your visitors' browser/computer
- Only caches pages for guest visitors (not for logged in visitors). Be careful using this plugin if you have an interactive site where you want to server content based on session/cookie information rather than on the plain URL only. Features like a shopping cart will not work.
View Caching
- Configuration: Global Config -> Cache
- Caches: each view of a component
- Based on: URL, view, parameters, ...
- More info: Component developers have to include this in their code to work. Mostly this is not done. The Joomla main content component uses this, but only for guest visitors of your site though this is not obligated for every component.
Module Caching
- Configuration: Global Config -> Cache
- Caches: each module (individually customized via each module's Advanced Parameters)
- Based on: the module id, the user's view levels and the Itemid parameter in the HTTP request
- More info: You must disable it on some modules to avoid problems
Further Caching
If you want to check out other cache systems and possibilities, you might want to check out the third-party extensions around caching.
Caching engines or storages
- Configuration: Global Config -> Cache
Here you can choose which system you want your site to use for all caching. Some options are: APC, Eaccelorator, File, Memcache, Redis, XCache.
APC, for example, also caches your PHP opcode.
For Developers
The class JCache allows a lot of different sorts and levels of caching. The following subclasses are made specifically, but you can add your own, or use the main one in many different ways.
Don't forget that the first level of cache encountered, will override any deeper caching. I suppose that too many levels is also counterproductive (to be verified though).
- JCacheView caches and returns the output of a given view (in MVC). A cache id is automatically generated from the URI, specific view and its specific method, or you can give your own.
This can automatically be done via the base controller's display function. For example in the controller of your component:
class DeliciousController extends JController {
    function display() {
        parent::display(true); //true asks for caching.
    }
}
There are also some urlparams to consider. Check this Joomla StackExchange
Also, be aware that any updates (such as hits or visit counts) will NOT be updated (unless you add this outside this method and thus any deeper MVC-part.)
- JCachePage caches and returns the body of the page.
- JCacheCallback caches and returns the output and results of functions or methods.
If you want to cache queries, this is a good class for it, as illustrated here: Using caching to speed up your code
- JCacheOutput caches and returns output.
This is rather meant for caching a specific part of PHP code. It acts like an output buffer, but cached.
How to Choose a Scheduler
Joomla's Task Scheduler can be started in three ways:
- Lazy Scheduler: by visits to your site.
- Web Cron: a cronjob that calls a link to your site.
- Command line: a cronjob on your site's own server that starts Joomla directly.
Use one of them at a time. The Lazy Scheduler and Web Cron are switched on and off in System > Scheduled Tasks > Options; the command line needs nothing switched on.
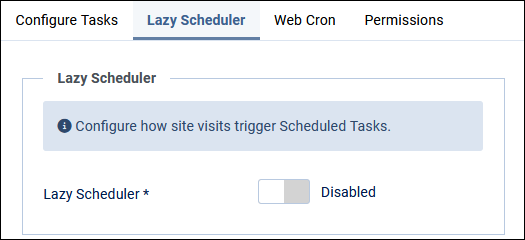

The Lazy Scheduler
Lazy scheduling relies on activity on your site: someone browsing pages in the frontend or working in the backend. While Joomla handles such a visit, it also runs the tasks that are due. That can make the site a little slower for that visitor.
The Lazy Scheduler does not guarantee that tasks run at their scheduled times: on a quiet site nothing runs. But it is on by default and needs no setup. If you have tasks that must run at precise times, for example with a Cron Expression, use Web Cron or the command line.
The Web Cron Scheduler
Web Cron needs a cronjob: in your hosting control panel, or at an external cron service. When you switch Web Cron on, Joomla creates a Webcron Link for you. The cronjob calls that link, and that starts the Task Scheduler. Usually the cronjob uses curl. This command runs the scheduler on mysite.com:
curl --request GET 'https://mysite.com/component/ajax/?plugin=RunSchedulerWebcron&group=system&format=json&hash=auto-generated-hash'
The screenshot below shows a typical cronjob setup in a hosting control panel (this is not part of the Joomla Administrator). Let the cronjob run every minute to give the Task Scheduler one-minute precision. You can run it less often: tasks then run less precisely on time, but your site does a little less work.

Once the cronjob is set up, switch the Lazy Scheduler off and Web Cron on. If both are on, both run tasks, and the Lazy Scheduler may still slow down visits now and then.
The command line: Web Cron without the link
If the cronjob runs on the same server as your site, it does not need the link. It can start Joomla's scheduler directly, with Joomla's own command line tool:
php /path/to/your/site/cli/joomla.php scheduler:run
This does the same as calling the Webcron Link: it runs the next task that is due. Add --all to run all due tasks in one go. How to set this up step by step is in Run Tasks from the Command Line.
Link or command?
Calling the Webcron Link
Advantages:
- It works from anywhere. The cronjob can run on another server or at an external cron service. That helps when your hosting has no cronjobs, or only cronjobs that call a URL.
- Tasks run like a page of your site: with the PHP version and the user of your website.
- No overlap. A task is not started while another task is still running.
Caveats:
- The link holds a secret key (the hash): anyone who has the link can start your tasks. Keep it private. If it gets out, use Reset Access Key in the Scheduled Tasks Options and update your cronjob.
- Time limits. The web server or the hosting may stop a request after a minute or two, which cuts long tasks short.
- Your site must be reachable for the cronjob, and every call is a visit that your site handles.
Running the command
Advantages:
- No time limits. A task runs as long as it needs: the best choice for long tasks.
- No secret, nothing open to the outside. Only someone who can run commands on the server can start it.
Caveats:
- It only works on the same server, and only if your hosting lets you run commands in a cronjob, not only call URLs.
- The PHP version. The command line may use another PHP version than your website. Give the full path to a PHP version your Joomla supports (PHP 8.3 or later for Joomla 6), for example
/usr/bin/php8.3; your host can tell you the path. - The user. The command runs as the user of the cronjob. If that is not the user of your website, files that a task writes may get the wrong owner.
- Overlap is possible. The command does not check whether a task is still running from an earlier cronjob. If a task can take longer than the interval of your cronjob, make sure that two runs at the same time do no harm, or run that task less often.
How to Schedule a Task
Each task has an Edit Task tab that allows you to choose how to schedule that task's execution period. To edit a task, go to System→Scheduled Tasks and then click on the name of the task.

The scheduling options are under the Edit Task tab. If the task has additional configuration parameters, you can find them under the Advanced tab.
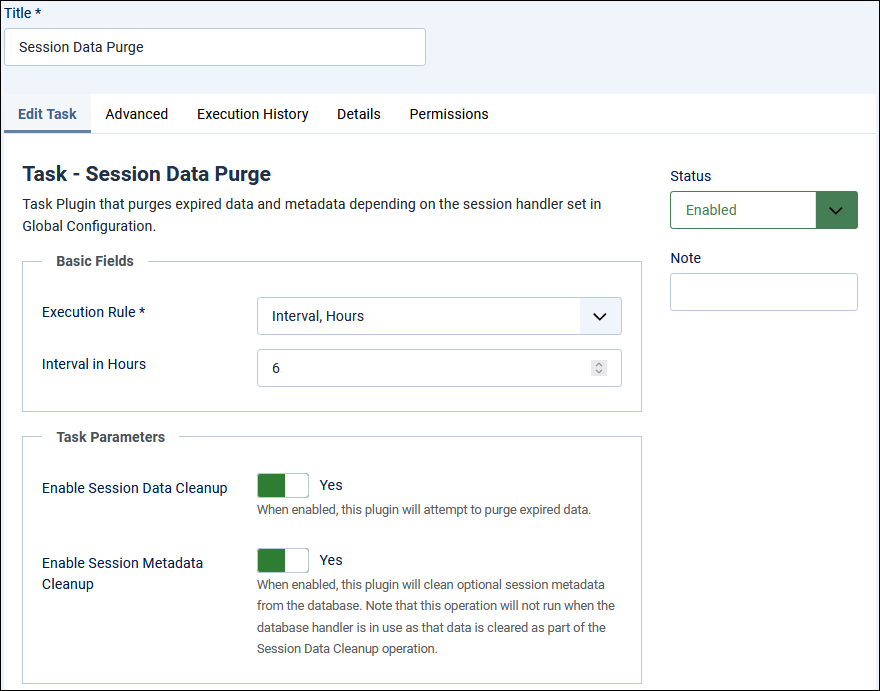
In the above example, the Session Data Purge task is scheduled to run every 6 hours. There are several different ways to make it run at this interval; this is the simplest way. Other ways are:
- Interval Minutes - The interval value to schedule a 6-hour period would be 6x60, or 360 minutes.
- Cron Expression (Advanced) - Here we must setup all the parts of an entire year to create the schedule. The settings below show that we've chosen to run the task at the top of the hour starting at 5 AM and every 6 hours after that on every day of every month on every day of the week. This is more precise scheduling allowing you to spread your task executions over time so they aren't all running at the same time.
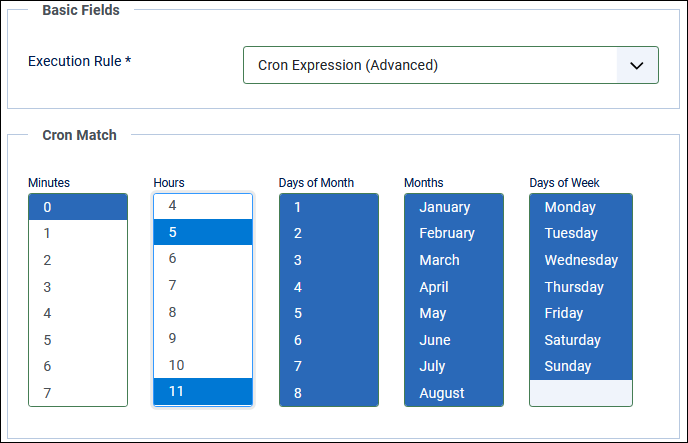
N.B.: not all selected hours, days of the month and months are visible in the above screenshot. Can you figure out from the story above what other hours were selected in this case?
Other scheduling options are:
- Interval Minutes - only minutes period must be specified.
- Interval Days - days period and time must be specified.
- Interval Months - months period, single day and time must be specified.
- Manual Execution - only runs when you click the yellow "Run Task" button in the task list.
Purge Expired Cache
Cache Files
Cache files are temporary files that are created to improve the performance of your site. You need to ensure that cache files that have expired, so they are no longer needed, are removed from the system. Otherwise you will eventually run out of disk space.
Expired cache files can be purged from the Administrator interface or thr Command Line interface (CLI).
Purge - Administrator Method
From the Home Dashboard
- Select the Cache option in the System panel.
- In the Maintenace: Clear Cache page select the Clear Expired Cache button in the Toolbar.
Purge - Command Line Method
Open a terminal window and cd to the cli directory in the root of your site. If you do not know what CLI commands are available issue the following command:
php joomla.php
You will see a list of commands available. The cache command is:
php joomla.php cache:clean
There should be a green confirmation message or perhaps a maroon error message.
Automatically Purging Expired Cache Files
You can automatically purge expired cache files using a cron job. Hosting services make this easy by providing a form to select how frequently a job runs and the command to use. So you might choose set the cron to run a 05:00 every day with the following command:
/usr/local/bin/ea-php82 /home/username/public_html/cli/joomla.php cache:clean
Most cron job managers allow you to enter an email address to which the cron output will be sent. If you do not want a message sent append > /dev/null 2>&1 to the command.
The PHP version used on the command line is often different from that used for delivery of a website. It might be incompatible with Joomla. So use the full path to the version of PHP you wish to use rather than php alone.