 User Documentation
 Local Setup
How to set up an environment to run Joomla for testing and development on your local computer? You need a webserver, a database, and PHP. If you use Apache webserver, MySql database, and PHP, then you have a so called AMP stack. Here you have a tutorial for setting each of them up separately in Linux. But there are several packages that install all of these and some things more in one go.
Here are some of those packages:
- Laragon (on Windows)
- FlyEnv
- Bearsampp
- WAMP (on Windows)
- Laravel Herd + MySql
Don't use XAMPP anymore: that stopped at PHP 8.2, is not maintained since, and is not suitable for newer Joomla.
After having installed your AMP stack (or alternative webserver like nginx) you can install Joomla. Just unpack the installation zip in a folder of your localhost and run the index.php. We also have a more elaborate setup for testing and developing purposes.
You can also install your AMP stack and Joomla in a Docker container.
DDEV is another container setup.
René Kreijveld made a script to easily install a PHP development environment on macOS. It is freely available on github.com/renekreijveld/macOS_PHP_local_development.
We are working on a complete set of tutorials for different methods to set this up and will provide some tips & tricks.
Install Joomla with Tests
Since Joomla! 4 we have changed the development process. It is no longer possible to clone the repository and have a usable Joomla installation. We follow best practices and implement a build process for the CMS.
Quick Start Guide
The steps to setup your development environment depend on your operating system. We cannot write documentation for every operating system (OS), please use your favourite search engine to find a HowTo.
Tools You Need
- PHP - basically the same as you need for running a Joomla site, but you need the PHP CLI (command line interface) version. (See the Configuring a LAMPP server for PHP development page.)
- Composer - for managing Joomla's PHP dependencies. For help installing Composer, read the documentation at https://getcomposer.org/doc/00-intro.md.
- Node.js - for compiling Joomla's JavaScript and SASS files. For help installing Node.js, please follow the instructions available on https://nodejs.org/en/. Note, you will need NodeJS 12 or higher to install Joomla.
- Git - for version management.
Steps to Set up the Local Environment
- Clone the repository
- Checkout the branch of the latest release.
- Run composer install (composer = package manager for PHP) from the root of the git repo. (You can add --ignore-platform-reqs if you don't have the PHP-LDAP locally installed, and you don't need it.)
- Run npm ci (npm = package manager for the JavaScript, "ci" parameter means "clean install") from the root of the git repo. (Note, you need npm 10.1.0 or higher for this. Run npm install -g npm@lts to upgrade your version of npm to the LTS version.)
Linux and OSX users can set up the following bash alias by placing the following inside the ~/.bashrc file:
alias jclean="rm -rf administrator/templates/atum/css; \
rm -rf templates/cassiopeia/css; \
rm -rf administrator/templates/system/css; \
rm -rf templates/system/css; \
rm -rf media/; \
rm -rf node_modules/; \
rm -rf libraries/vendor/; \
rm -f administrator/cache/autoload_psr4.php; \
rm -rf installation/template/css"
alias jinstall="jclean; composer install; npm ci"
This will delete all the compiled files in your system and run a fresh install as one command by calling jinstall inside your Joomla install.
A Bit Longer Start Guide
Joomla is similar to many other web tools these days. It has a large PHP part and it has more and more JavaScript code. While PHP coding doesn't need so much preparation, JavaScript needs a lot of tooling around. The main reason is that nobody writes code in a way that every browser understands, so the code needs transpiling from e.g. ES6 to a compatible version of JavaScript. The same is true for CSS. For Joomla we are using SASS and this will be converted to native CSS so that any browser understands it. On the downside, setting up a development environment is a bit more complicated but the tooling makes coding more convenient. Thanks to watchers and browser auto reload, you can see your changes in real time.
PHP
It should be enough to run composer install as this will install PHP dependencies saved in the composer.lock file. You can do this as many times as you like. It will only install new packages when the composer.lock file is changed. Don't run composer update as this will update all packages to newer versions and update the composer.lock file.
Note: You may need to run composer install with the --ignore-platform-reqs option to ignore platform requirements specified in Composer. That is, if you do not have PHP's LDAP extension installed.
Node/npm Scripts
Node.js comes with a package manager called NPM (in some ways the same as Composer). NPM has a run command and we have prepared some scripts to make your life easier. You have to run the commands for the root of the repository when you have changed JS or SASS files. Previously you needed to run npm ci once, to install dependencies.
npm run build:css
It will compile SASS files to CSS and also create the minified files.
npm run build:js
It will compile and transpile the JavaScript files to the correct format and create minified files.
npm run watch
This is the same as the build:js command but will watch for changes and automatically build updated files in the media directory. SASS files are not included yet.
npm run lint:js
This will perform a syntax check on all ES6 JavaScript files against the JavaScript code standard (for more information on the Joomla codestyle standard please read the the coding standards manual at the coding standards manual.
npm run test
This will run a JavaScript testing suite.
Possible Issues
When running composer install you can run into these errors
Problem 1
    - Installation request for joomla/ldap 2.0.0-beta -> satisfiable by joomla/ldap[2.0.0-beta].
    - joomla/ldap 2.0.0-beta requires ext-ldap * -> the requested PHP extension ldap is missing from your system.
Problem 2
    - Installation request for symfony/ldap v5.1.5 -> satisfiable by symfony/ldap[v5.1.5].
    - symfony/ldap v5.1.5 requires ext-ldap * -> the requested PHP extension ldap is missing from your system.
The solution is to run the composer install with the --ignore-platform-reqs option to ignore platform requirements specified in Composer. That is, if you do not have PHP's LDAP extension installed.
composer install --ignore-platform-reqs
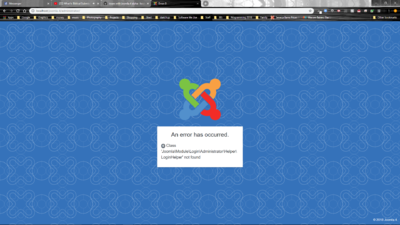
If you receive a login error such as shown below, delete the administrator/cache/autoload_psr4.php file.
Local Hosting on Linux
Introduction
This article covers hosting Joomla on a personal Linux based computer for testing and development purposes. The Linux versions covered are from the Debian-Ubuntu family, and specifically Linux Mint. Other distributions are similar but have different command syntax and file locations.
You need to install a set of software packages often referred to as LAMP stack. The letters refer to Linux, Apache, MySQL and PHP. You can install software using either the Graphical User Interface (GUI) or the command line in a Terminal window. They are different ways of using the Synaptic Package Manager.
Install Apache with the GUI
From the system Menu, marked with the LM logo, select Administration / Synaptic Package Manager. You will be prompted for your password. Enter your login password to open the GUI. At the top right is a Search button. Select it and enter apache and select Search. Select the apache2 checkbox and in the pop-up label select Mark for Installation. Another pop-box will show a list of additional packages required to support apache. Select Mark:
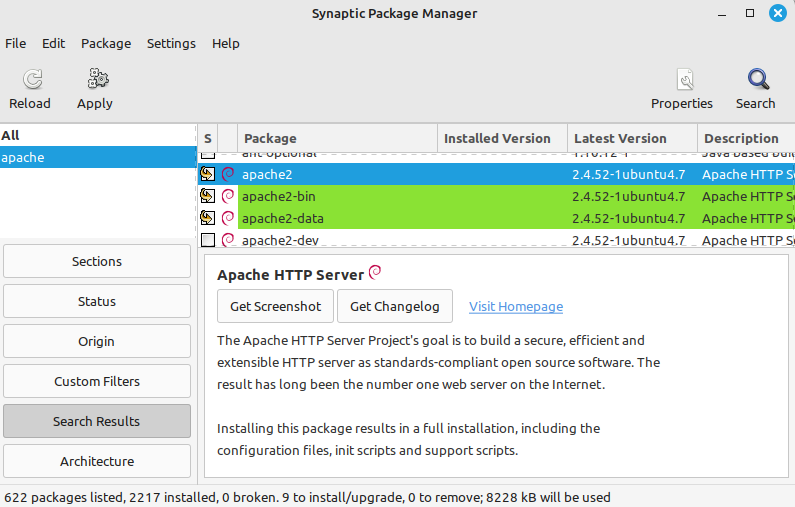
Select the Apply button in the top Toolbar and the Apply button in the Summary dialog. Apache will be installed and configured, the process ending with a Changes Applied dialog. Select Close.
You can confirm that Apache is installed and working by opening your browser, Firefox by default in a new Linux Mint install, and entering localhost in the URL bar. You should see the Ubuntu Apache2 Default Page:
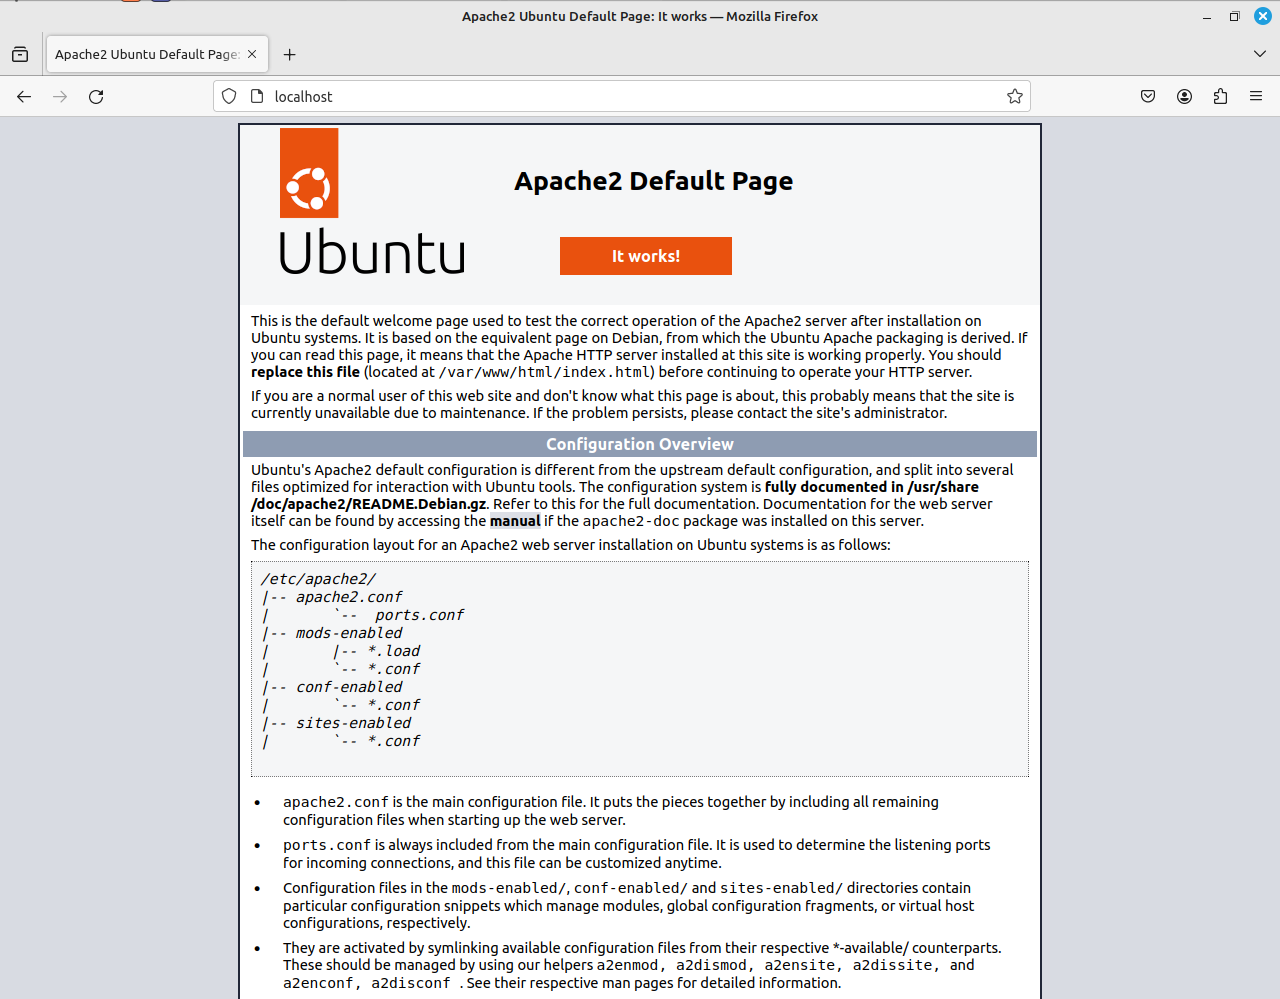
The page contains some useful information about file locations that may not be so readily available later so you might like to print this page to paper or a pdf file.
Install PHP with the CLI
It is probably best to install PHP using the command line. One reason for this is that, at the time of writing, the Synaptic Package Manager only offers PHP8.1 although PHP8.2 has been available for some time and can be installed from a third party repository. There is a good description of the procedure in this tutorial with Quickstart and Detailed sections.
First close your Synaptic Package Manager GUI and then open a Terminal window and enter the following commands one at a time:
sudo add-apt-repository ppa:ondrej/php
sudo apt update
sudo apt install php8.2 php8.2-cli php8.2-{bz2,curl,mbstring,intl}
sudo apt install php8.2-fpm
sudo a2enconf php8.2-fpm
sudo systemctl reload apache2
In your browser, check that the localhost default page is still working.
Install MySQL or MariaDb
You can search the web for information on each of these database packages. MySQL is the traditional choice but was taken over by Oracle and is now less popular. MariaDB is a drop-in Open Source replacement with additional features. Both work with Joomla! 5 but it is not easy to change from one to the other. Tables have to be exported and imported. Joomla! 5 requires specific minimum versions which Linux Mint offers via the Synaptic Package Manager.
Open the Synaptic Package Manager GUI and search for either mysql-server or mariadb-server. Select the checkbox for the item ending in -server. Select Mark for Installation and them Apply in the top Toolbar. You can open the Details panel to see what is happening during the installation. Select Close when done.
You can test to see whether your database is working by entering mysql in the command line. This is the the same for both MySQL and MariaDB. You should see an Access denied error message, which is fine as it indicates your database installation is actually working.
Install phpMyAdmin
phpMyAdmin is a GUI database management tool that you will need to create and manage your databases. In the Synaptic Package Manager GUI search for phpmyadmin. Select its checkbox and Mark for Installation. After download there is a prompt to select the Webserver to reconfigure automatically. Select the chckbox for apache2 and then the Next button. At the next configuration screen leave the Configure database... checkbox checked and select Next.
Select an application password for the user phpmyadmin. Test: in your bowser enter localhost/phpmyadmin in the URL bar. You should see the phpMyAdmin login screen. With the username phpmyadmin and the password you entered during installation you will be able to login. But you will not be able to create any databases! To solve the problem you need to edit the configuration file as root in the Terminal window:
sudo nano /etc/phpmyadmin/config.inc.php
Find the two lines containing // $cfg['Servers'][$i]['AllowNoPassword'] = TRUE; and remove the leading slashes to uncomment them. Both of them!
Then login to mysql from the command line and create a new user and grant that user all privileges:
sudo mysql
CREATE USER 'admin'@'localhost' IDENTIFIED BY '';
GRANT ALL PRIVILEGES ON *.* TO 'admin'@'localhost' WITH GRANT OPTION;
exit
Then go back to phpMyAdmin and try to login with username admin and no password. You should see all databases and be able to create new databases.
Index File Priority
The default location for web pages on Ubuntu/Linux Mint is /var/www/html. If you list the contents of that directory you will see it contains index.html containing the content of the Ubuntu Apache2 Default Page. Create a file named index.php in that directory with the following content:
<?php echo phpinfo();
Reload localhost. There is no change! Enter localhost/index.php in the URL bar and you will see a page containing PHP Version information. This behaviour is controlled by the default Apache configuration which it can be changed by enabling the Apache dir module and editing its configuration:
sudo a2enmod dir
sudo nano /etc/apache2/mods-enabled/dir.conf
Move index.php to the front of the list. Then restart Apache:
sudo systemctl restart apache2
This time using localhost alone in the URL bar you should see the content of the index.php file, a PHP Information page.
Virtual Hosts
In a default Linux installation the system files are in the root folder (/) and user data files are in the home folder (/home/myusername). This is a potential because the default Apache user, www-data, may not have appropriate permissions to create files in user file space. The best solution is to create Virtual Hosts.
First, a module is needed that allows Apache to switch its user and group to suit each user:
sudo apt-get install libapache2-mpm-itk
sudo a2enmod mpm_itk
Next, make a copy of the default site configuration file and edit it:
cd /etc/apach2/sites-available
sudo cp 000-default.conf username.localhost.conf
sudo nano username.localhost.conf
The default site configuration file contains comments to explain its content. They are left out in the illustration below. Uncomment the ServerName line and change all instance of username to your own username.
<VirtualHost *:80>
        ServerName username.localhost
        ServerAdmin webmaster@localhost
        DocumentRoot /home/username/public_html
        <IfModule mpm_itk_module>
                AssignUserId username username
        </IfModule>
        <Directory /home/username/public_html/ >
                Options Indexes FollowSymLinks
                AllowOverride None
                Require all granted
        </Directory>
        ErrorLog ${APACHE_LOG_DIR}/error.log
        CustomLog ${APACHE_LOG_DIR}/access.log combined
</VirtualHost>
Enable the new site and restart Apache:
sudo a2ensite username.localhost
sudo systemctl reload apache
Make an entry in the /etc/hosts file to add an entry for the new virtual host. Otherwise your browser will be looking for it on the internet.
sudo nano /etc/hosts
When done it will look something like this:
127.0.0.1       localhost
127.0.0.1       username.localhost
127.0.1.1       hostname

# The following lines are desirable for IPv6 capable hosts
::1     ip6-localhost ip6-loopback
fe00::0 ip6-localnet
ff00::0 ip6-mcastprefix
ff02::1 ip6-allnodes
ff02::2 ip6-allrouters
Hostname: This is the name you gave to your computer when you installed Linux. You will need it shortly. You can change it if you wish - but best to read up on that and do it first.
All being well, with a URL of the form username.localhost you will see a directory listing of your public_html directory. Public display of directory listings is considered bad practice, a security risk, and usually disallowed by another Apache configuration setting. However, for a personal site on a personal computer used for development and testing it is very useful. Many different sites may be set up in different sub-directories. For example, Joomla 4 and Joomla 5 sites, Bulletin Boards, Wikis and so on. When you have a lot of test sites it is difficult to remember all of the subdirectory names!
Home Network Access
If you have another computer on your home network you would probably like to access your Linux site from there too. To make that work you need another virtual host. Copy and edit the one just made:
cd /etc/apache2/sites-available
sudo cp username.localhost.conf username.conf
sudo nano username.conf
Change the ServerName from username.localhost to username.hostname and then enable the new virtual site and restart Apache.
sudo a2ensite username
sudo apachectl restart
Go to your other computer on the home network and edit its personal hosts file. For example, on a Mac edit /private/etc/hosts and add the following line at the bottom:
192.168.178.20 username.hostname www.username.hostname
Where 192.168.178.20 is the IP address of your Linux computer.
Now on your second computer you should be able to access the web server on you Linux computer by entering username.hostname in the URL bar of your browser.
Partition Notes
Software installed using the Synaptic Package Manager is usually in the Linux root directory (/). User data is located in the home directory (/home). In a simple installation these directories are in the same physical disk partition.
In a more complex installation, perhaps with the option to boot different operating systems (Windows or Linux) or different versions of the same operating system, the root and user data are often in separate partitions. This allows access to the same user data from each operating system.
There is a snag: a Joomla site located in a /home/username directory needs database data that is usually in the root directory, specifically in /var/lib/mysql. You can move the MySQL/MariaDB data directory to a location available to both operating systems, either in the /home partition or in a separate partition. This tutorial describes how to Change the MySQL Data Directory in Ubuntu and Debian Linux. That needs to be done for each operating system but is not covered here.
Local Hosting on Windows
WAMP vs XAMPP
In these acronyms W stands for Windows and X stands for Cross-Platform (Linux, Mac and Windows). The remaining letters stand for Apache (the Web Server), MySQL or MariaDB (the Database Server) and PHP (the scripting language used for Web development). The final P in XAMPP stands for Perl (another scripting language).
You can install each of these software packages independantly on your platform of choice. However, it is often more convenient to install a package that bundles all of the separate items together. So XAMPP works on the three major platforms but WAMP only works on Windows. Aprt from that, they do the same job. They allow you to install and manage your local development environment.
XAMPP is covered in a separate article:
- Local Hosting with XAMPP for Linux, Mac and Windows.
There is a comparison available:
- Umbrella: WAMP vs XAMPP
Local Hosting with WampServer
If you are using a Windows computer set up a development environment using WampServer downloaded from the first of the following articles:
ToDo: Installation
Raspberry Pi Installation
Preface
Note: This document is not yet complete and fully tested.
The Raspberry Pi is a small single-board computer that was originally developed to promote the teaching of basic computer science in schools and developing countries. Because of its versatility it has become very popular and is used as media player, small stand-alone server, etc. You can use it as web server and install Joomla! on it. This page shows you how to get a your Joomla! website running on the Raspberry Pi.
Hardware
- Raspberry Pi version 3 Model B - There are various models of Raspberry Pi. You can use most models that have an Ethernet port (the Model B types). However for performance we will use the latest version with most RAM memory.
- micro SD card - For the operating system + web server + Joomla. (RPi version 3 model B uses micro SD other versions might use normal SD cards)
- 5 Volt adapter (1 Amp) - to power the Raspberry Pi you'll need to convert the mains power (230V or 110V) to 5 Volt. The Raspberry Pi needs about 1 Amp, and maybe more if you connect USB devices to it.
- standard Ethernet cable - to connect the RPi to your Local Area Network / router / the internet.
Installing Operating System
The operating system Raspbian is a Debian Linux version specially compiled for the Raspberry Pi. There are two versions of Raspbian available: Raspbian Jessie with Pixel Lite (version with PIXEL desktop based on Debian Jessie) and Raspbian Jessie Lite (minimal version based on Debian Jessie). Because we use the Raspberry Pi as a web server for Joomla, we won't need the GUI.
Download Raspbian Jessie Lite and unzip the downloaded file, e.g. 2016-09-23-raspbian-jessie-lite.zip (306 MB) to 2016-09-23-raspbian-jessie-lite.img (1.4 GB).
Now we need to copy the .img file to the (micro) SD card. You can use a tool with graphical interface such as UNetbootin (for Windows, Mac OS X and Linux) or do it on the command line).
Be careful when writing the .img disk image to another disk. If you specify the wrong destination disk, you will overwrite that disk with the .img which makes that disk unusable, resulting in data loss.
Windows
In a terminal (CMD) check which device corresponds with the SD Card and do something like:
dd bs=1M if=c:\temp\2016-09-23-raspbian-jessie-lite.img od=[the device of your SD Card]
See also Installing Operating System Images using Windows
Apple OSX
Check which device is used for your SD Card. In our case it's disk1s1 and we'll do in Terminal:
sudo dd bs=1M if=~/Downloads/2016-09-23-raspbian-jessie-lite.img of=/dev/disk1s1
See also: Installing Operating System Images on MacOS
Linux
We connect an SD Card reader with the (micro) SD Card to a computer. With dmesg we can find the device name of the SD Card. In our case dmesg shows something like [xxxxxx.xxxxxxx] sdd: sdd1 sdd2 meaning that we have an SD Card with 2 partitions. Do not write the Raspbian image to a partition but to the whole disk sdd.
We will use dd ("Disk Dump") to write an Input File (if) to an Output File (of) using a specified Block Size (bs).
Be careful: dd will write to a device without any warning. Double check that that you write to the correct device! If you write to the wrong disk, you will always remember the dd command as "Disk Destroyer".
sudo dd if=~/Downloads/2016-09-23-raspbian-jessie-lite.img of=/dev/sdd bs=4M
See also Installing Operating System Images on Linux
WARNING for Raspbian Stretch version : to have a SSH server working from boot you need to create an empty file ssh on the root partition.
Connecting Raspberry Pi to LAN
When we have installed the Raspbian Operating System on the SD Card, we will:
- Insert the micro SD card in the SD Card slot on the Raspberry Pi.
- Connect an an Ethernet cable to the Raspberry Pi and to the Local Area Network (connect it to our router).
- Connect the 5V power supply to the the Raspberry Pi.
Booting up the Raspberry Pi takes roughly 30 seconds. We've to find the IP address to connect to it using SSH. We can use different approaches for that:
- log into the web interface of your router and look up the connected devices;
- use a mobile phone connected the wi-fi router using a network scanning App called Fing Overlook;
- use a command like nmap. Assuming that our PC has IP address 192.168.0.25 we can find all other devices in the same network range by doing the following:
sudo nmap -sP 192.168.0/24
Which might show the following details:
Starting Nmap 6.47 ( http://nmap.org ) at 2016-10-22 17:42 CEST
Nmap scan report for 192.168.0.35
Host is up (0.00042s latency).
MAC Address: 42:42:42:42:42:42 (Raspberry Pi Foundation)
To log into our Raspberry Pi, we'll use the command ssh.
ssh This email address is being protected from spambots. You need JavaScript enabled to view it.
The first time you'll connect to it, it will show something like:
The authenticity of host '192.168.0.35 (192.168.0.35)' can't be established.
ECDSA key fingerprint is 42:42:42:42:42:42:42:42:42:42:42:42:42:42:42:42.
Are you sure you want to continue connecting (yes/no)?
We'll choose Yes
Warning: Permanently added 192.168.0.35 (ECDSA) to the list of known hosts.
This email address is being protected from spambots. You need JavaScript enabled to view it. 's password:
and use the default password: raspberry which on successful login will show:
The programs included with the Debian GNU/Linux system are free software;
the exact distribution terms for each program are described in the
individual files in /usr/share/doc/*/copyright.

Debian GNU/Linux comes with ABSOLUTELY NO WARRANTY, to the extent
permitted by applicable law.
pi@raspberrypi:~ $
We can configure the Raspberry Pi using a text interface via:
sudo raspi-config
Raspberry Pi Software Configuration Tool (raspi-config)
With this configuration tool we'll only change the following settings.
1 Expand Filesystem
By default the disk space on the SD Card is the same size as the 1.4GB .img file that you used to create the SD card for your Raspberry Pi. You can use this option to gain the rest of the disk space.
2 Change User Password
For security reasons it's best to change the default password "raspberry" as soon as possible.
3 Boot Options
We would like the Raspberry Pi to boot the Text console
B2 Console Autologin Text console, automatically logged in as 'pi' user
9 Advanced Options
A3 Memory Split
Because we will use the Raspberry Pi as a headless server without connecting it to a monitor, we can decrease the memory used for the GPU from 64 to 16
5 Internationalisation Options
I2 Change Timezone
We'll change the Timezone to our own time zone (e.g. Europe/Amsterdam)
After all changes we'll Reboot the Raspberry Pi, and will login again with our new password.
ssh This email address is being protected from spambots. You need JavaScript enabled to view it.
Now it's time to install everything else.
Update software
Before installing anything else, we'll:
-
update the list of software versions from all external repositories sudo apt-get update
-
upgrade all installed software sudo apt-get upgrade
Updating the version list and upgrading all software is something that should be done regularly.
Nginx Webserver
A fast and lightweight alternative for Apache web server is the increasingly becoming popular Nginx web server.
Installation of Nginx
We will install nginx and all dependencies (read: software that nginx needs to work) with
sudo apt-get install nginx
We'll get a message like:
Reading package lists... Done
Building dependency tree
Reading state information... Done
The following extra packages will be installed:
 fontconfig-config fonts-dejavu-core libfontconfig1 libgd3 libjbig0 libtiff5 libvpx1 libxpm4 libxslt1.1 nginx-common nginx-full
Suggested packages:
 libgd-tools fcgiwrap nginx-doc ssl-cert
The following NEW packages will be installed:
 fontconfig-config fonts-dejavu-core libfontconfig1 libgd3 libjbig0 libtiff5 libvpx1 libxpm4 libxslt1.1 nginx nginx-common nginx-full
0 upgraded, 12 newly installed, 0 to remove and 0 not upgraded.
Need to get 3,550 kB of archives.
After this operation, 8,666 kB of additional disk space will be used.
Do you want to continue? [Y/n] y
By choosing "y" nginx and all needed packages will be installed.
You can check the installation with a browser. Go to the IP address of your Raspberry pi, in our case http://192.168.0.35/ We should see a message like:
Welcome to nginx on Debian!
If you see this page, the nginx web server is successfully installed and working on Debian. Further configuration is required.
For online documentation and support please refer to nginx.org
Please use the reportbug tool to report bugs in the nginx package with Debian.
However, check existing bug reports before reporting a  new bug.
Thank you for using debian and nginx.
Starting and stopping Nginx
After installation Nginx will automatically be started. You can:
- Stop Nginx: sudo service nginx stop
- Start Nginx: sudo service nginx start
- Restart Nginx: sudo service nginx restart
Configure Nginx
Global Nginx configuration
In the global configuration of Nginx we can configure default caching etc. The Raspberry Pi 3 uses 1.2 GHz 64-bit quad-core ARM Cortex-A53 processor. If you have an earlier version with less CPU cores, then you should use
sudo nano /etc/nginx/nginx.conf
to change the "worker_processes" to fit the amount of CPUs of your device. By default it's configured as
worker_processes 4;
so for Raspberry Pi 3 you don't have to change it.
After changing the Nginx configuration or virtual domain configuration, you have to do a
sudo nginx reload
to make the changes effective.
Virtual Domains
It's possible to run multiple Joomla websites on the same server using virtual domains.
Put every website in a separate folder in the default webroot /var/www/ for example:
- /var/www/example.com/
- /var/www/voorbeeld.nl/ sudo mkdir /var/www/example.com sudo mkdir /var/www/voorbeeld.nl
For every site we will create a virtual domain which is basically a text file with domain specific information:
-
/etc/nginx/sites-available/example.com server { listen 80; server_name example.com www.example.com; root /var/www/example.com;
access_log /var/log/nginx/example.com.access_log; error_log /var/log/nginx/example.com.error_log info;
location / { index index.php index.html index.htm; } }
-
/etc/nginx/sites-available/voorbeeld.nl server { listen 80; server_name voorbeeld.nl www.voorbeeld.nl; root /var/www/voorbeeld.nl;
access_log /var/log/nginx/voorbeeld.nl.access_log; error_log /var/log/nginx/voorbeeld.nl.error_log info;
location / { index index.php index.html index.htm; } }
We need to enable every site by linking from /etc/nginx/sites-enabled/ to the virtual domain in "sites-available". We create a symbolic link for each virtual domain:
sudo ln -s /etc/nginx/sites-available/example.com /etc/nginx/sites-enabled/example.com
sudo ln -s /etc/nginx/sites-available/voorbeeld.nl /etc/nginx/sites-enabled/voorbeeld.nl
To make this virtual domain configuration effective, we do
sudo nginx reload
and when everything has been configured correctly it will respond:
Reloading nginx configuration: nginx.
Database
We can install MariaDB or MySQL; Joomla will work with both. Let's install MariaDB with:
sudo apt-get install mariadb-server
During the installation you've to add a password for the root user. Lets create a database password, for example correcthorsebatterystaple.
Finally let's improve the security of our MariaDB installation by removing root accounts that are accessible from outside the local host, anonymous-user accounts and the test database. We can do that with
mysql_secure_installation
PHP
For PHP we will install the php-fpm (FastCGI Process Manager) that runs as a daemon and receives Fast/CGI requests. Furthermore we will install php5-mysql which is a module for MySQL database connections directly from PHP scripts.
more recent php7 should be installed with
sudo apt-get install php-fpm php-mysql
Now we need to let Nginx know that it should use php-fpm for .php files. We add a couple of lines to our virtual domains:
sudo nano /etc/nginx/sites-available/example.com
add:
location ~ \.php$ {
fastcgi_pass unix:/var/run/php/php7.0-fpm.sock;
fastcgi_index index.php;
include fastcgi_params;
}
Test it by creating the following PHP file
sudo nano /var/www/example.com/test.php
We use a browser to test if we see the PHP configuration page at http://192.168.0.35/example.com/test.php
Joomla!
- to do
    sudo wget https://github.com/joomla/joomla-cms/releases/download/3.6.3/Joomla_3.6.3-Stable-Full_Package.zip
    sudo unzip -x Joomla_3.6.3-Stable-Full_Package.zip
Connecting Raspberry Pi to Internet
We want people on the internet to be able to visit our Joomla website on our Raspberry Pi. In order to do that we need to configure our Internet router to forward all incoming traffic on port 80 to our Raspberry Pi.
Use your web browser to connect to the Web Interface of your router. A router is usually located on the first number of your IP range, in our case on 192.168.0.1. In our router we configure Port Forwarding:
- External IP Address: 0.0.0.0
- External Start Port: 80
- External End Port: 80
- Internal IP Address: 192.168.0.35 ( = our Raspberry Pi)
- Internal Start Port: 80
- Internal End Port: 80
- Protocol: TCP
Make sure that it is enabled.
If everything is working correctly then you should see your own Joomla website on the Raspberry Pi by visiting your external IP address (Find your external IP address with a tool like whatsmyip.org).
Using a domain name
Let's assume that our external IP address is 42.42.42.42. Let's also assume that we have registered a domain name called example.com. We would like to serve our Joomla site on our Raspberry Pi to visitors visiting example.com. If your domain name registrar gives us the possibility to configure the Domain Name System (DNS) server, then we'll need to create an MX record in the DNS that points our domain name to our IP address 42.42.42.42. Note that it can take up to 24 hours till all internet providers will redirect the traffic of their customers to the configured MX record.
Static IP address
Most routers will keep assigning the same internal IP address to your Raspberry Pi. Sometimes it's better to configure your Raspberry Pi to use a static IP address:
sudo nano /etc/network/interfaces
change
iface eth0 inet static
to
iface eth0 inet static
address 192.168.0.35
netmask 255.255.255.0
gateway 192.168.0.1
The gateway is the IP address of your router. You can also find it using
route
External links
- Raspberry Pi Foundation (RPF) - official website and forums
- Raspberry Pi Wiki, supported by the RPF
- Video of presentation Joomla on Raspberry Pi (with Nginx) at Joomladay Germany 2013 in Nuremberg, Germany
Setting Up a Local Joomla Environment using Docker
Getting Joomla running on your computer needs four things -> downloading and configuring a web server Apache or nginx, a database service like MySQL or MariaDB, and surely we need PHP and Joomla. To get all these different pieces to actually communicate with each other, most of us rely on bundled software like XAMPP, Laragon, or FlyEnv.
However, traditional setups can easily lead to port conflicts or database servers that mysteriously refuse to start. When a local server crashes, you might find yourself manually downloading and reinstalling entire Joomla sites over and over again just to test a single PR, potentially losing your work while fixing a bug. It consumes valuable time, and the fixes are usually just temporary band-aids.
The switch to Docker (Learn about Docker) With Docker, you can skip the manual configuration entirely. Instead of installing web servers directly onto your computer, you just write a single "recipe" file. Docker automatically downloads, isolates, and connects everything in the background. If something breaks, you don't reinstall your whole setup; you simply restart the container.
In this guide, you will learn the simplest way to get a local Joomla environment running using Docker, allowing you to spend less time fixing servers and more time contributing.
Prerequisites
You only need one thing installed before we start: Docker Desktop.
- Download it from docker.com and run the installer
- On Windows, leave the "Use WSL 2 instead of Hyper-V" option checked - it makes things faster
- Open Docker Desktop and wait until the bottom-left corner shows a green Engine running status.
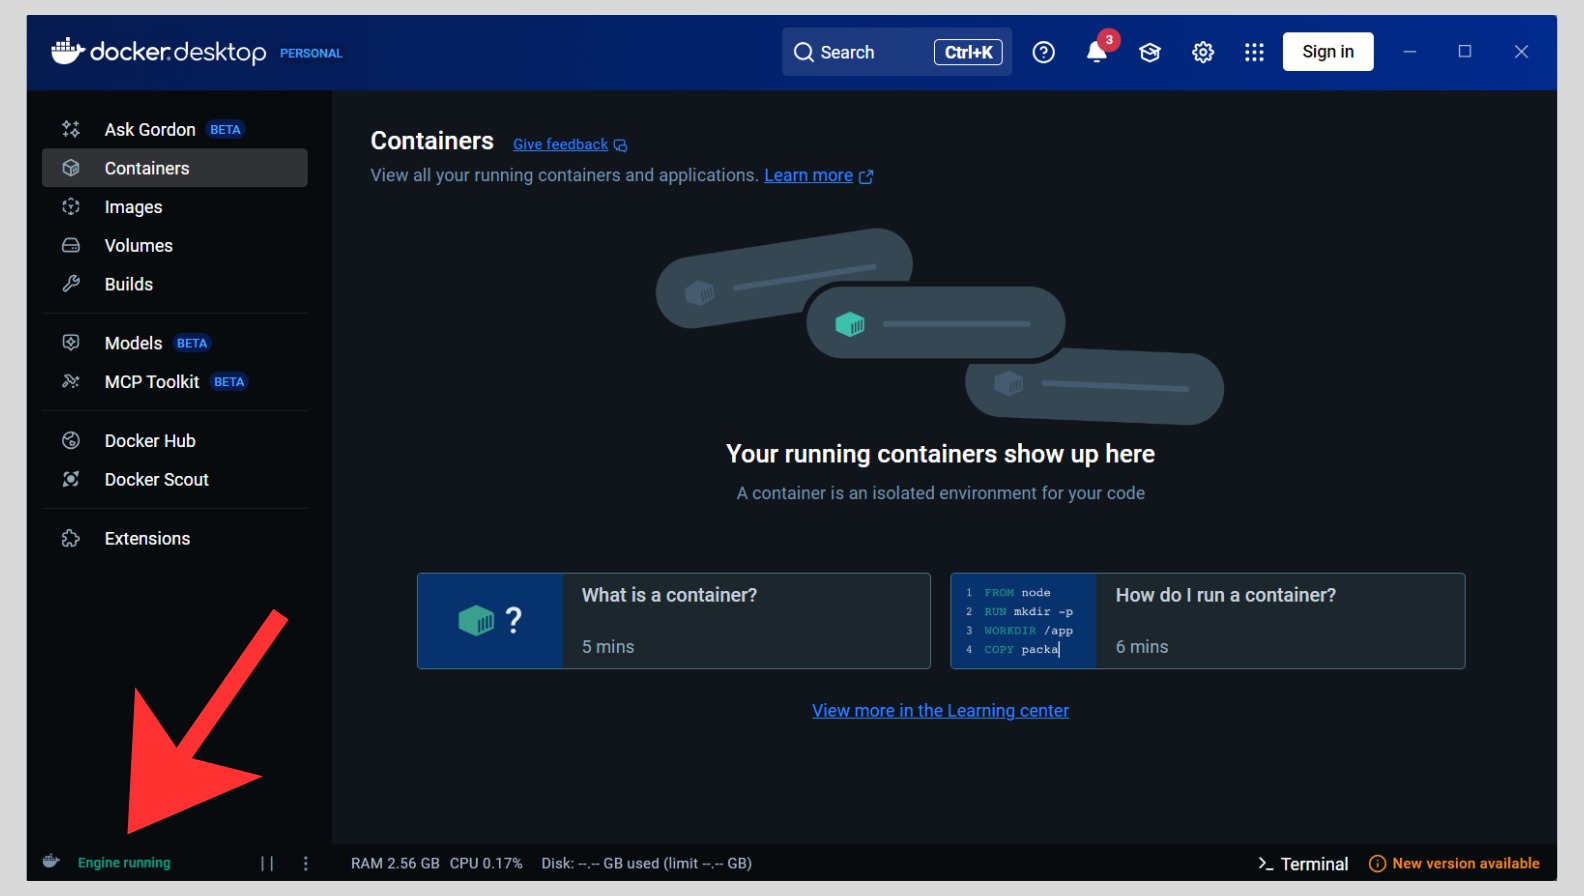
That's it.
The docker-compose.yml File
When you need multiple services to communicate - like a web server (Apache/Nginx), PHP, and a database (MySQL/MariaDB) - you use a special orchestration file called docker-compose.yml. This file acts as the blueprint for your project, defining all the services required and how they collaborate. (The official Docker Joomla image is actually built on top of a PHP and Apache image. This means that by using just this one Joomla image, you get PHP, Apache, and Joomla all bundled together)
First, create a new folder on your computer for your project (for example, on your Desktop, make a folder called joomla-docker).
Inside that folder, create a new text file and name it exactly this:
docker-compose.ymlOpen that file in any text editor (like VS Code or Notepad), paste the following code exactly as it is, and save it:
services:
  joomla:
    image: joomla:latest
    ports:
      - "8080:80"
    environment:
      - JOOMLA_DB_HOST=db
      - JOOMLA_DB_USER=joomla
      - JOOMLA_DB_PASSWORD=joomlapass
      - JOOMLA_DB_NAME=joomladb
    depends_on:
      - db
  db:
    image: mariadb:10.11
    environment:
      - MYSQL_ROOT_PASSWORD=rootpass
      - MYSQL_DATABASE=joomladb
      - MYSQL_USER=joomla
      - MYSQL_PASSWORD=joomlapass
    volumes:
      - db_data:/var/lib/mysql
volumes:
  db_data:
Starting the Environment
Open your terminal (or PowerShell on Windows), navigate to your joomla-docker folder, and run:
docker compose up -dThe first time you run this, Docker will download the Joomla and MariaDB images which might take a minute or two depending on your internet speed. After that, every subsequent start is almost instant as you can see below.

The Joomla Installer
Open your browser and go to http://localhost:8080. You should see the Joomla installation screen.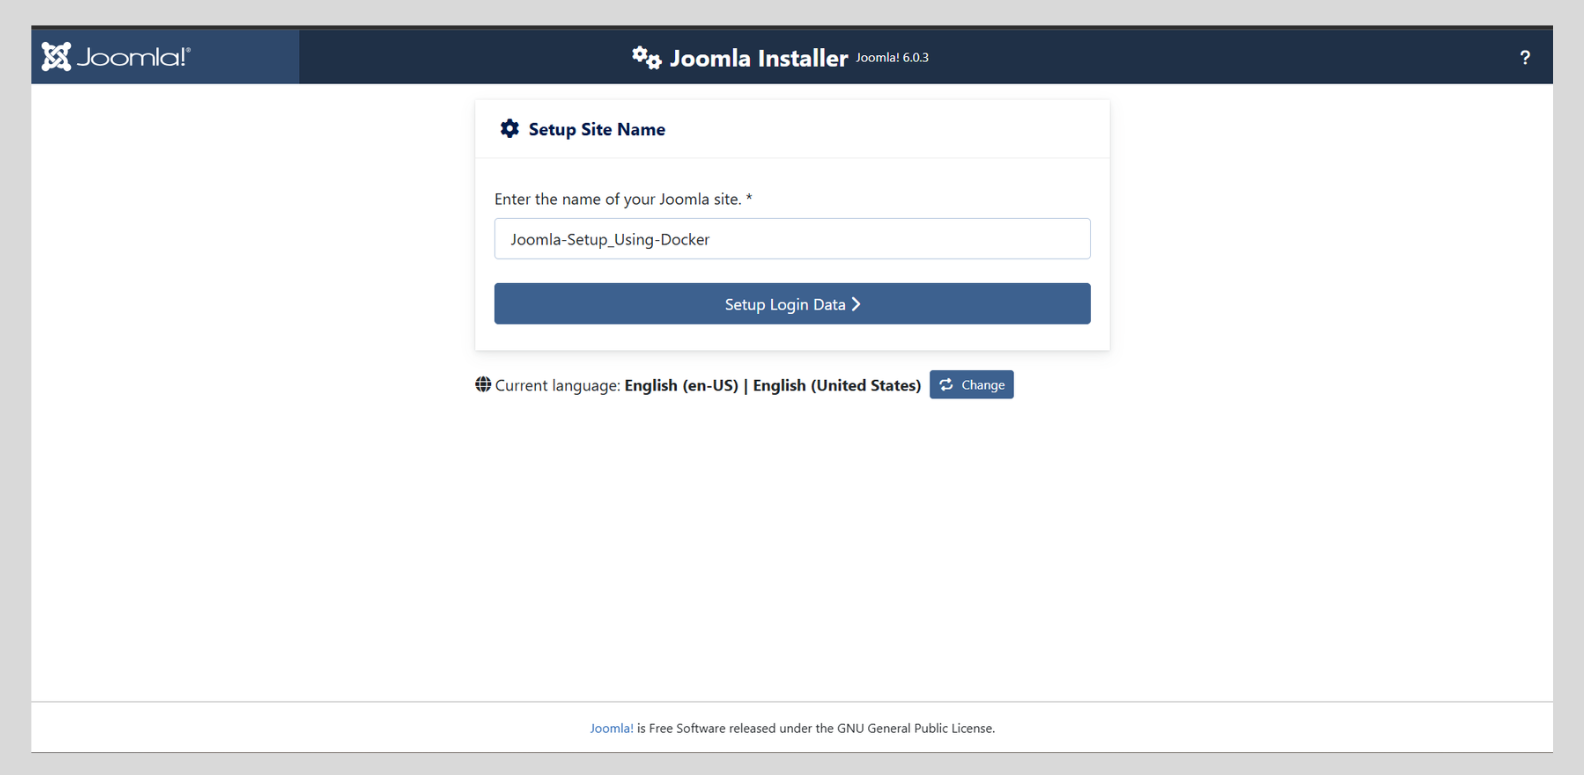
Fill in your site name and admin details on the first screen.
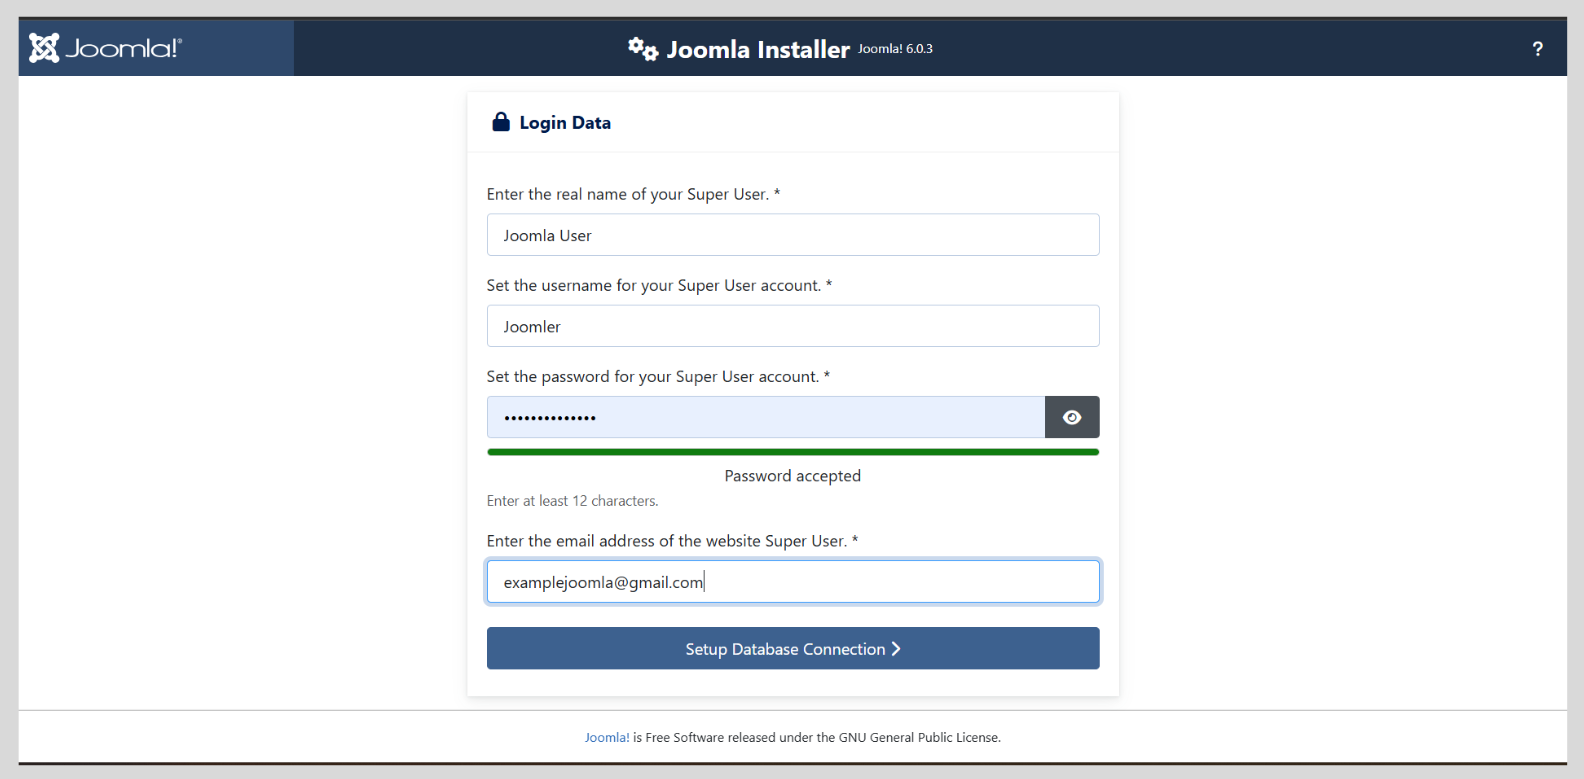
When you reach the Database Configuration screen, this is where most people get stuck:
Do not type localhost as the host name.
Because the database is running in its own container, Joomla needs the container's service name — not localhost. Use these exact values:
- Database Type: MySQLi
- Host Name:
db - Username:
joomla - Password:
joomlapass - Database Name:
joomladb
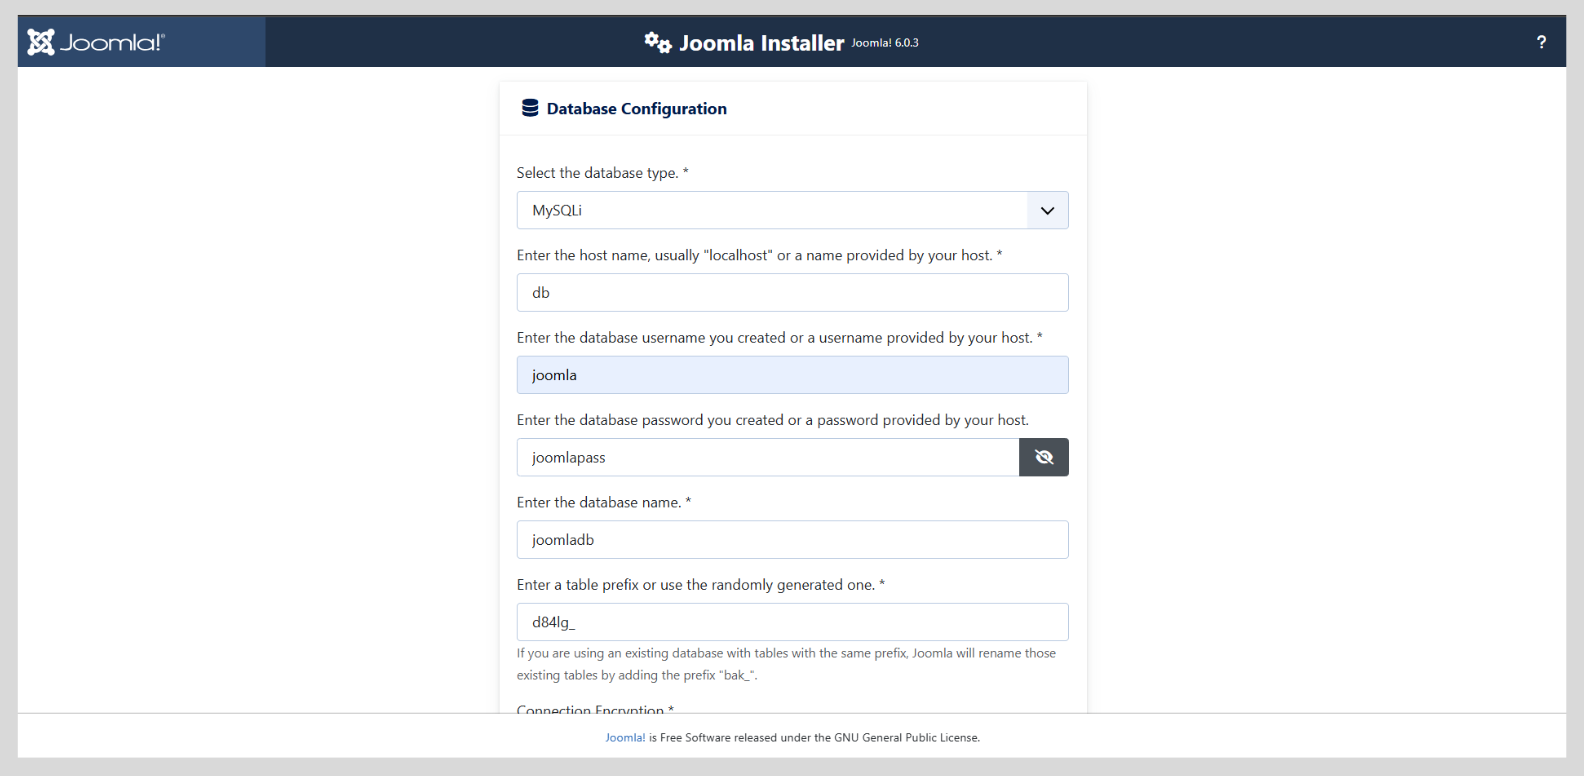
Click through, finish the installation, and you're done.
When you're finished working for the day, run docker compose stop to pause the containers and free up memory. Your site will be exactly where you left it next time.
Common Issues
- The page at localhost:8080 won't load right after starting: The database container takes a few seconds to finish initialising. Wait 30 seconds and refresh.
- Port 8080 is already in use: Change
"8080:80"to"8081:80"in the compose file and access it atlocalhost:8081instead. - Containers started but Joomla shows a database error: Double-check that your Host Name in the installer is
dband notlocalhost.
Pro-Tip: Accessing the Joomla Files for Development
Right now, your Joomla site is running, but the actual PHP files are hidden inside the Docker container. If you want to contribute to Joomla, test PRs, or write your own plugins, you need those files on your computer so you can open them in VS Code or your favorite editor.
To sync the files from the container to your local hard drive, you just need to add two lines (volumes: ) and (- ./site_joomla:/var/www/html) to the joomla section of your docker-compose.yml file as shown below:
services:
  joomla:
    image: joomla:latest
    ports:
      - "8080:80"
    volumes:
      - ./site_joomla:/var/www/html
    # ... (rest of your settings)
What this does:
The next time you run docker compose up -d, Docker will automatically create a folder called site_joomla right next to your compose file. It will copy the entire Joomla core (including the administrator dashboard, components, and templates) into that folder.
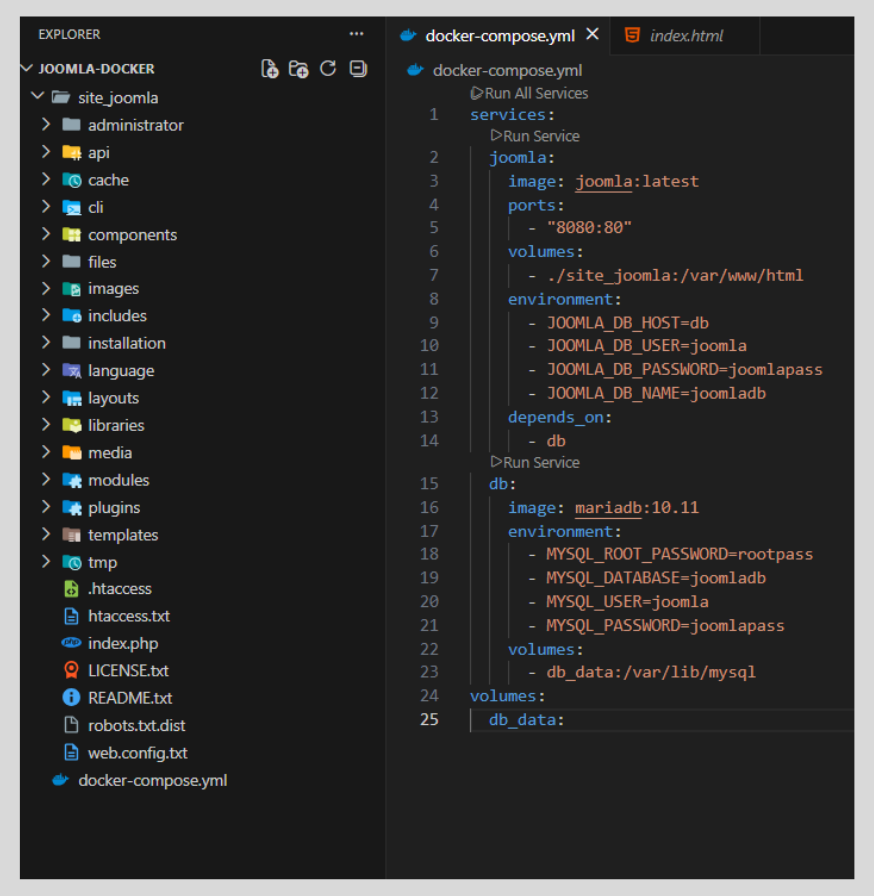
Any code changes you make in that folder on your computer will instantly update inside the running container! You are now fully set up for local development.
Bonus Tip 1: Testing Specific Joomla and PHP Versions
When testing PRs, maintainers will often ask you to test against specific PHP versions. With XAMPP, downgrading or upgrading PHP is a nightmare. With Docker, it takes two seconds.
Instead of using image: joomla:latest in your docker-compose.yml, you can specify exact versions using tags. For example, if you need to test Joomla 5.2 on PHP 8.3, just change that one line to: image: joomla:5.2-php8.3-apache
Run docker compose up -d again, and Docker will instantly swap out your server environment. You can find all the available version tags on the Official Joomla Docker Hub page.
Bonus Tip 2: Adding phpMyAdmin
If you are coming from XAMPP, you might miss having a visual interface to look at your database. You can easily add phpMyAdmin to your setup by adding a new service block to the bottom of your docker-compose.yml file:
phpmyadmin:
  image: phpmyadmin/phpmyadmin:latest
  ports:
    - "8081:80"
  environment:
    - PMA_HOST=db
  depends_on:
    - db
Restart your containers, and you can now access phpMyAdmin by going to http://localhost:8081 in your browser. Just log in with joomla as the username and joomlapass as the password.